I – How To Set Up A Qnap Nas As A VPN Server?
.
I – How To Set Up A Qnap Nas As A VPN Server?
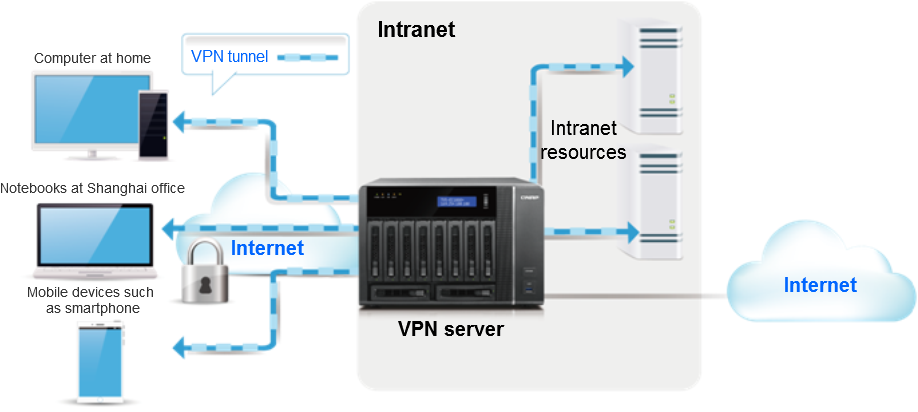
Virtual private networks (VPN) offer secure connections to access network resources and services across a public network. QNAP NAS provides a VPN service for users to access anything on their NAS or other sources via the internet. Layer 2 Tunneling Protocol over IPsec (L2TP/IPsec), Point-to-Point Tunneling Protocol (PPTP), OpenVPN software is also supported, providing advanced certification and encryption to provide the safest connection for QNAP NAS users.
Setting up the VPN service
Follow the instructions below for the first time setup of the VPN service on QNAP NAS.
- Preparation.
- Enable L2TP/IPsec, PPTP or OpenVPN services
- Add a new VPN user.
- Enable the Auto Route Configuration function
Appendix. Use VPN software to connect to an internal network.
1. Preparation
- The Internet connection is normal.
- You must disable active VPN clients. The client and server services cannot be run at the same time.
- L2TP/IPsec is supported in QTS version 4.2.0 or above.
2. Enable L2TP/IPsec, PPTP or OpenVPN services.
QNAP NAS supports L2TP/IPsec, PPTP and OpenVPN connections and you can select which one to use.
L2TP/IPsec
L2TP (Layer Two Tunneling Protocol) is a combination of the Point-to-Point Tunneling Protocol (PPTP) and Layer 2 Forwarding (L2F). Compared to PPTP, which only establishes a single tunnel between the two end points, L2TP supports the use of multiple tunnels. IPsec is often used to secure L2TP packets by providing confidentiality, authentication and integrity checks. The combination of these two protocols provides a high-security VPN solution which is known as L2TP/IPsec. L2TP/IPsec is supported by most clients, including Windows, Mac, Linux, and mobile devices.
Go to the “App Center”, search for “L2TP/IPsec VPN Service”, and add it to your NAS.
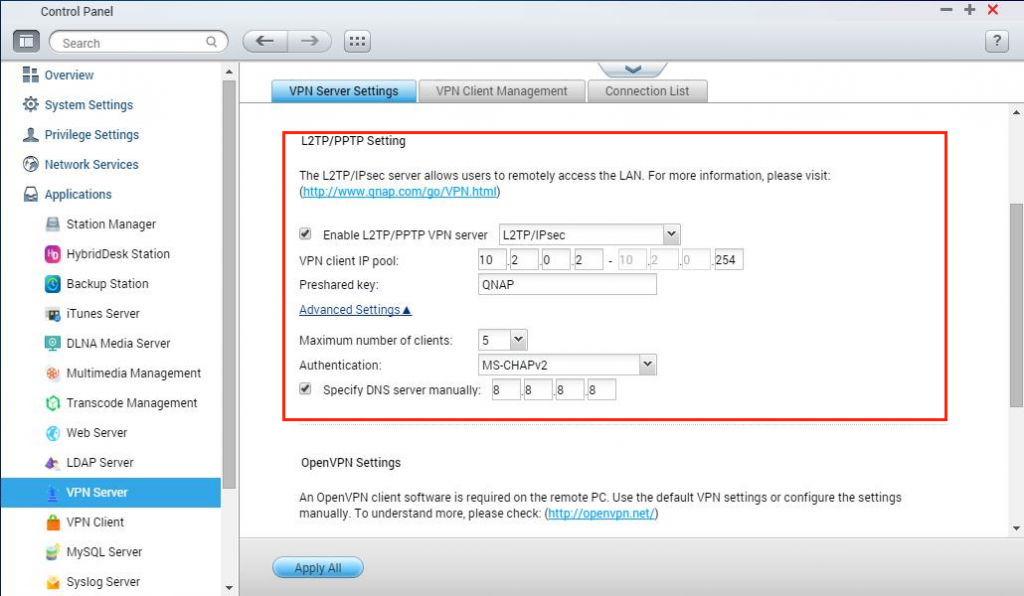
After finishing installation, go to “Control Panel” > “Applications” > “VPN Server” >”VPN Server Settings”, enable L2TP/PPTP VPN Server and select “L2TP/IPsec” and enter the configuration settings:
- VPN Client IP pool: Enter the start and end IP addresses to define the IP range for the VPN clients to connect to the VPN server.
- Preshared key: Enter the Preshared key for the VPN client user to be verified by L2TP/IPsec.
- Maximum number of clients: Select the maximum number of concurrent client connections supported by the VPN server.
- Authentication: Select how the VPN clients will be authenticated.
- Network interface: Choose a network interface.
- Specify DNS server manually: Specify the DNS server IP for the VPN clients. When disabled, the DNS settings of the NAS will be used. This option is disabled by default.
PPTP
PPTP (Point-to-Point Tunneling Protocol) enables secure data transfer from a remote location to the NAS by creating a virtual private network (VPN). PPTP is supported by most clients, including Windows, Mac, Linux, and mobile devices.
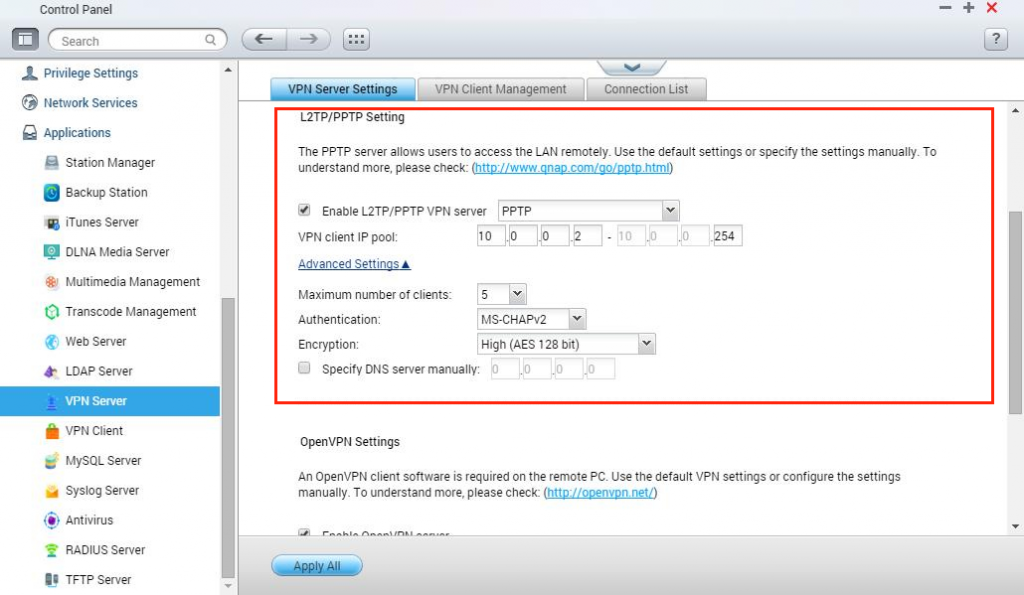
Go to “Control Panel” > “Applications” > “VPN Server” >”VPN Server Settings”, enable L2TP/PPTP VPN Server and select “PPTP” and enter the configuration settings:
- VPN Client IP pool: Enter the start and end IP addresses to define the IP range for the VPN clients to connect to the VPN server.
- Maximum number of clients: Select the maximum number of concurrent client connections supported by the VPN server.
- Authentication: Select how the VPN clients will be authenticated.
- Encryption: Select an encryption method.
- Network interface: Choose a network interface.
- Specify DNS server manually: Specify the DNS server IP for the VPN clients. When disabled, the DNS settings of the NAS will be used. This option is disabled by default.
OpenVPN
OpenVPN is open-source software that supports encrypted VPN access. You have to install software on your computer to connect to the OpenVPN server. Click “Download Configuration File” to download the VPN client settings, certification/key, and installation instructions and then upload the settings file to the OpenVPN client.
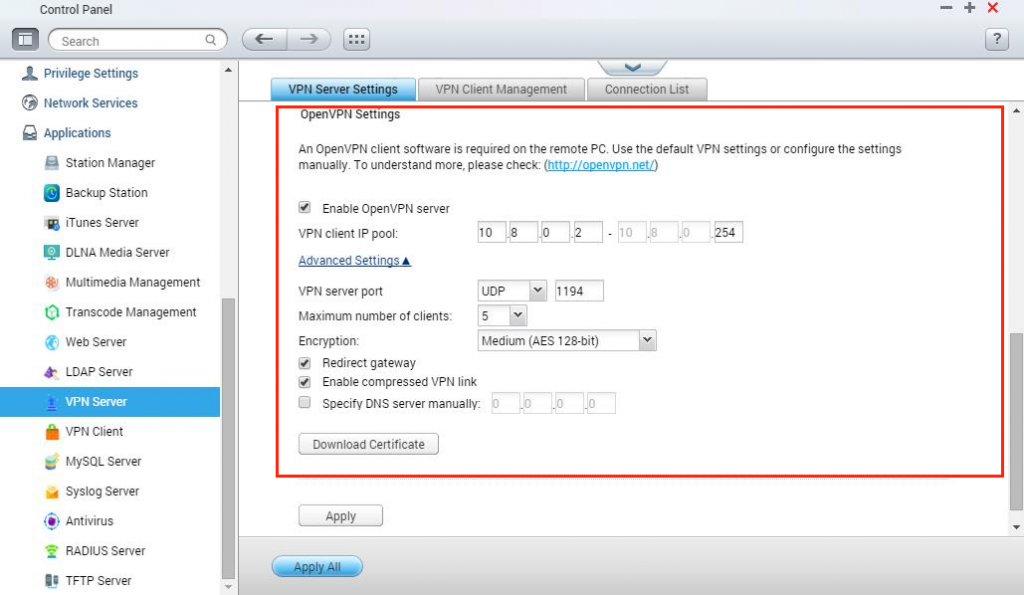
Go to “Control Panel” > “Applications” > “VPN Server” >”VPN Server Settings”, enable OpenVPN Server and enter the configuration settings:
- VPN Client IP pool: Enter the start and end IP addresses to define the IP range for the VPN clients to connect to the VPN server.
- VPN Server Port: Select UDP or TCP as the OpenVPN transport protocol. The OpenVPN server will listen for client connections on port 1194.
- Maximum number of clients: Select the maximum number of concurrent client connections supported by the VPN server.
- Authentication: Select how the VPN clients will be authenticated.
- Network interface: Choose a network interface.
- Redirect gateway: Selecting this option will cause all IP network traffic originating on client machines to pass through the OpenVPN server.
- Enable compressed VPN link: Select this option to compress the data before transferring via the VPN. The data transfer speed will increase but more CPU resources of the NAS will be used. This option is enabled by default.
- Specify DNS server manually: Specify the DNS server IP for the VPN clients. When disabled, the DNS settings of the NAS will be used. This option is disabled by default.Please note: If you change your OpenVPN settings, myQNAPcloud name, or security certificate you must your upload settings files again.
3. Add a new VPN user.
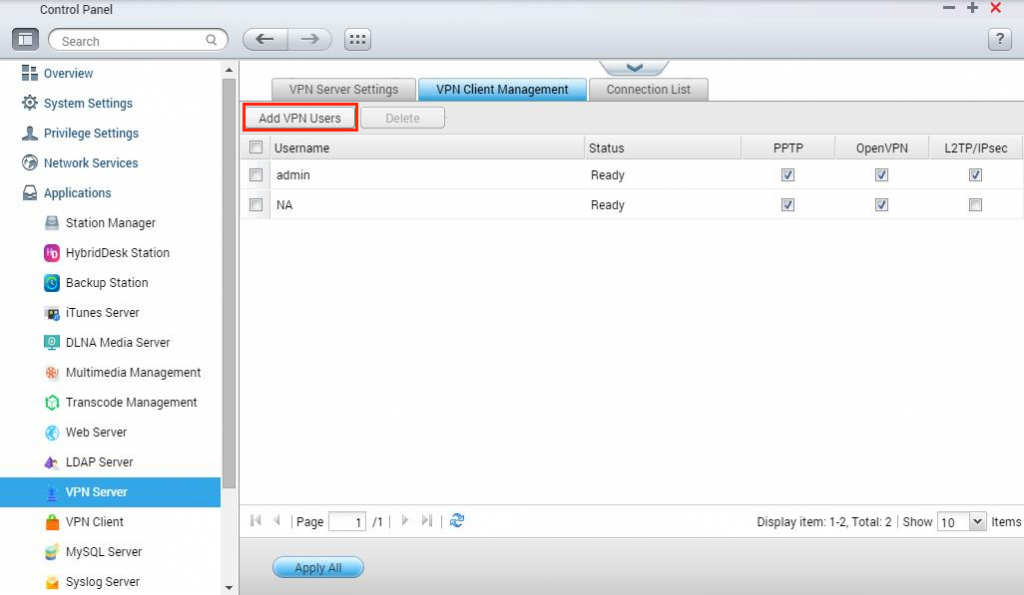
Go to “Control Panel” > “Applications” > “VPN Service” > “VPN Client Management” > “Add VPN Users”. Administrators can choose the connection types of other users to each protocol.
Note: Only local users are currently allowed to use the VPN service.
4. Setup port forwarding on your router
If your QNAP NAS is located behind a NAT router, you need to open the ports on the NAT router and forward these ports to the fixed LAN IP of the NAS. This function is available on most routers and is often known as “Port Forwarding”, “NAT Server” or “Virtual Server”. The following is the corresponding port number of each protocol; please follow the router provider’s instructions to enable port forwarding.
| Protocol | Port |
|---|---|
| L2TP/IPsec | UDP 500、UDP 1701、UDP 4500 |
| PPTP | 1723 |
| OpenVPN | UDP 1194 (Default) |
You can also use your WAN IP or myQNAPcloud DDNS to connect to your QNAP NAS. If you want to enable the myQNAPcloud service, please click “myQNAPcloud Service” to open the “myQNAPcloud setting page”. You can get more detailed instructions from:http://www.qnap.com/i/useng/trade_teach/
Appendix. Use VPN software to connect to the internal network.
L2TP/IPsec settings on Windows 8
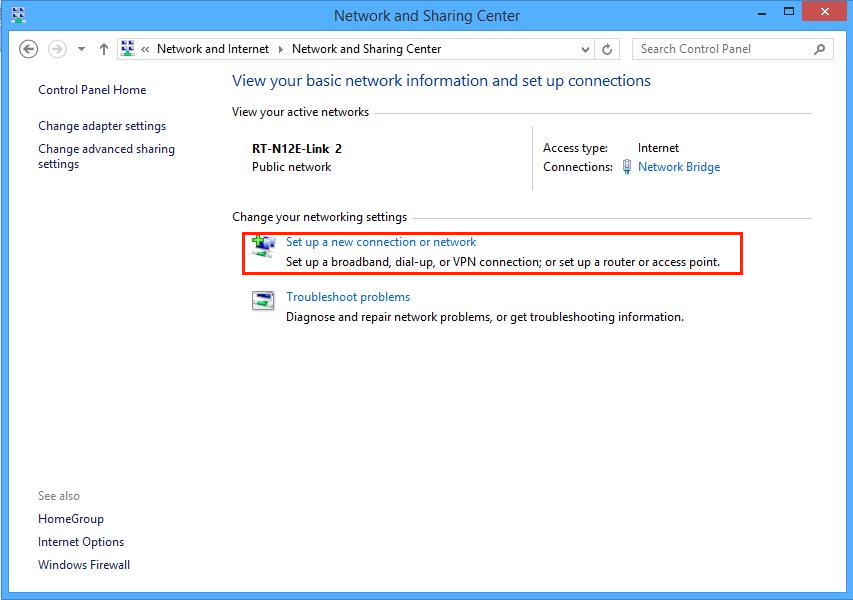
- Go to “Control Panel” > “Network and Internet” > “Network and Sharing Center” and select “Set up a new connection or network”.
- Select “Connect to a workplace”.
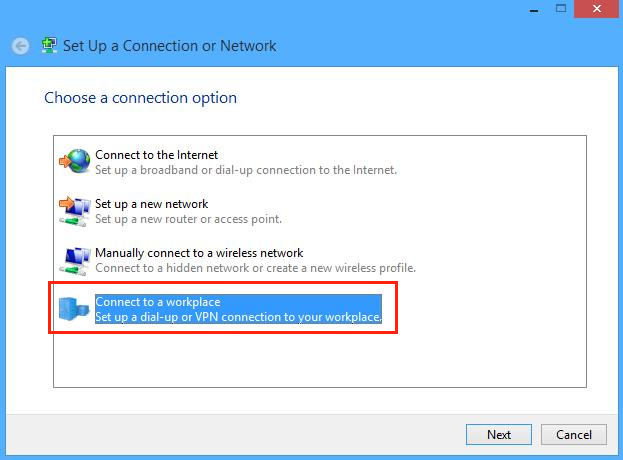
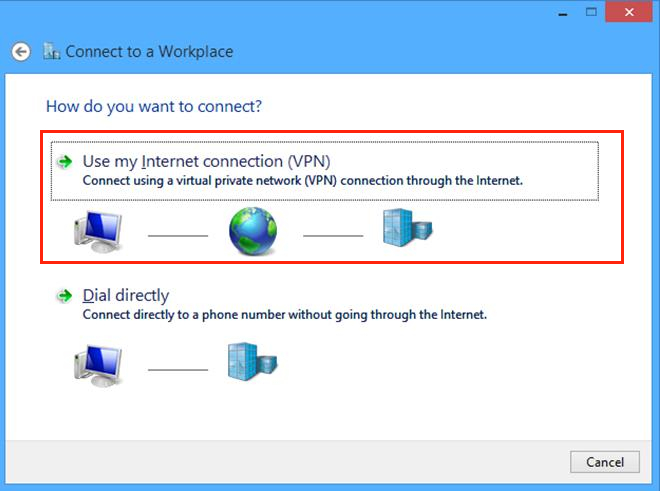
- Select “Use my Internet connection (VPN)”.

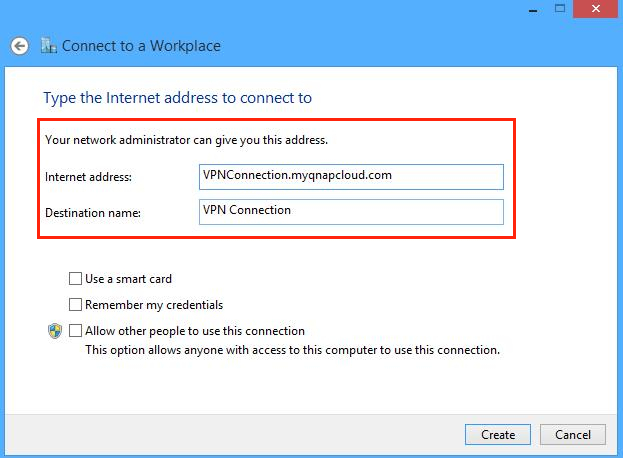
- Enter your myQNAPcloud name or IP address in “Internet address”. You can also name your connection in “Destination name”.
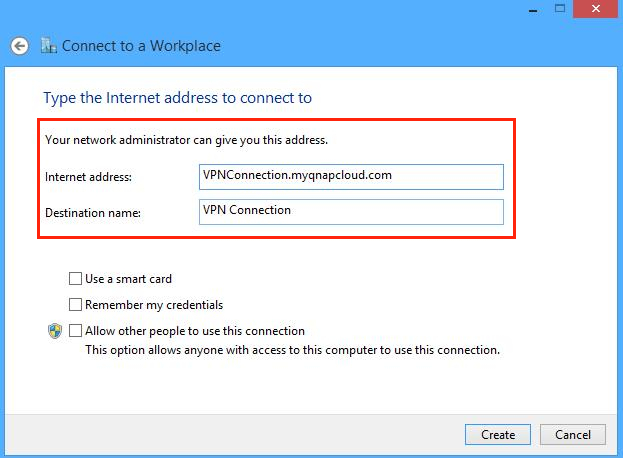
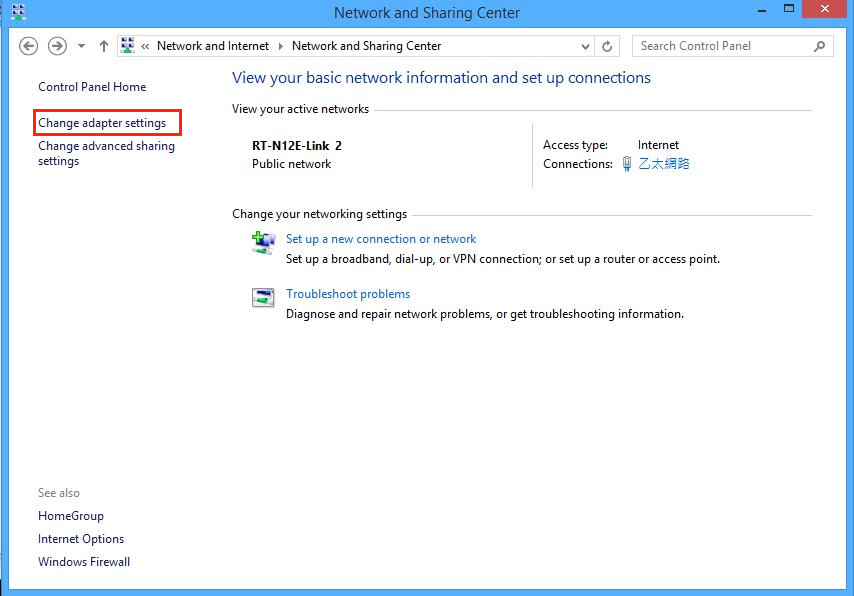
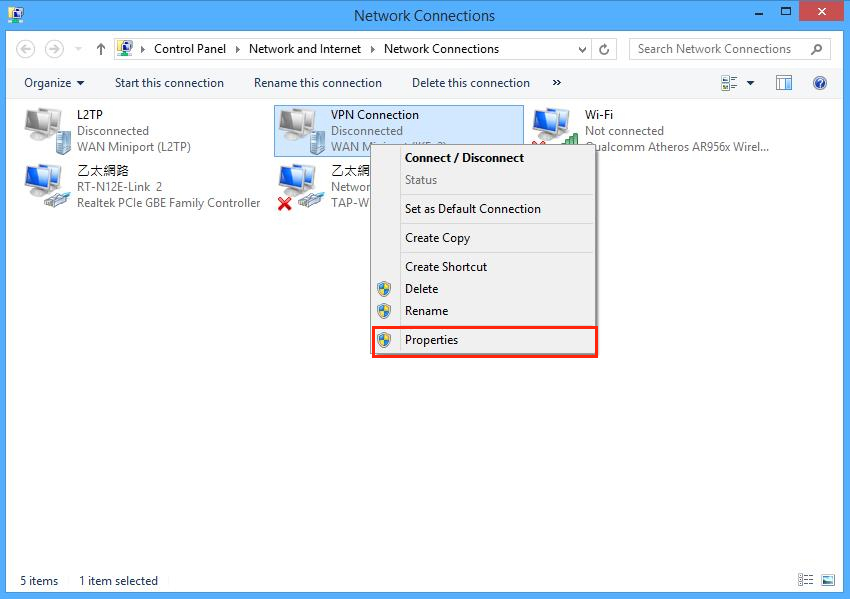
- Go to “Control Panel” > “Network and Sharing Center” > “Change adapter settings”, right click on the VPN connection and select “Properties”.
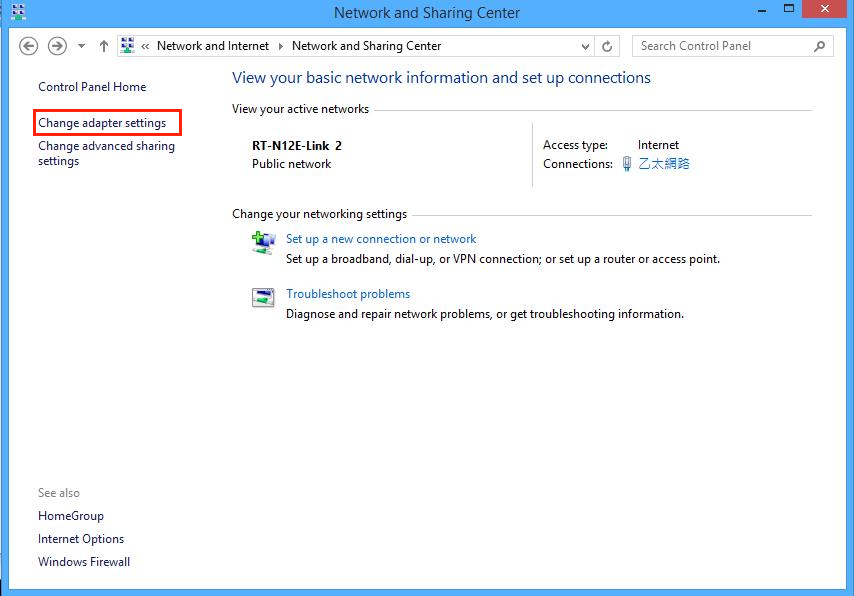
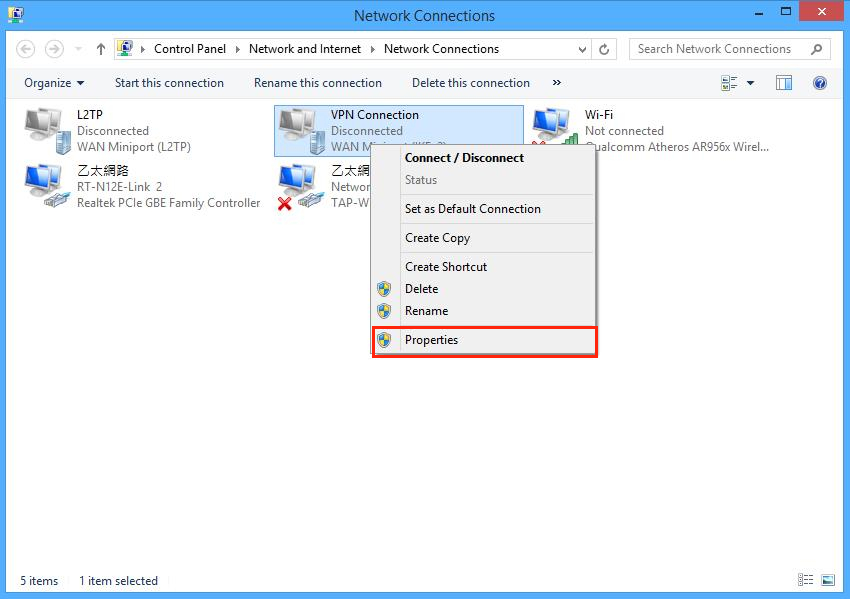
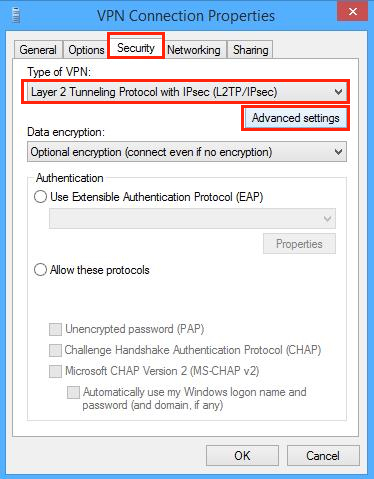
- Go to the “Security” tab, select the “Type of VPN” as L2TP/IPsec then click “Advanced settings”.
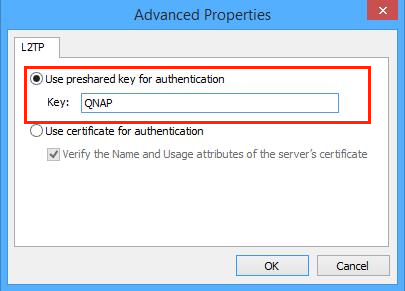
- Select “Use preshared key for authentication” and enter the same key as the server’s settings.
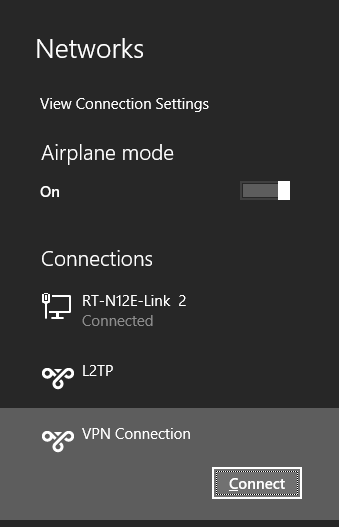
- You can now connect to the VPN.
Please note, if your NAS is behind a NAT router, please follow this configuration: https://support.microsoft.com/zh-tw/kb/926179/zh-tw
Setting L2TP/IPsec on Mac OS X10.10
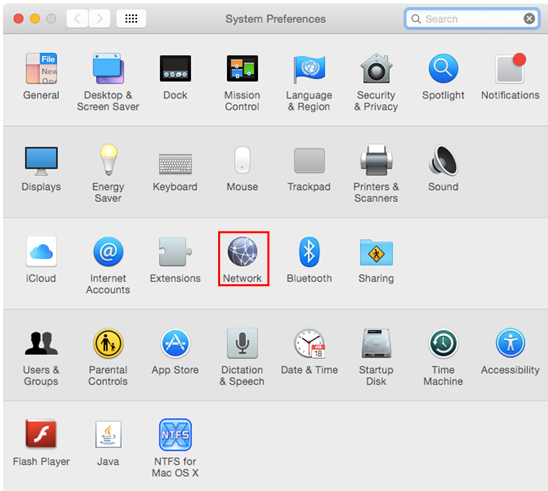
- Go to “System Preferences” > “Network”.
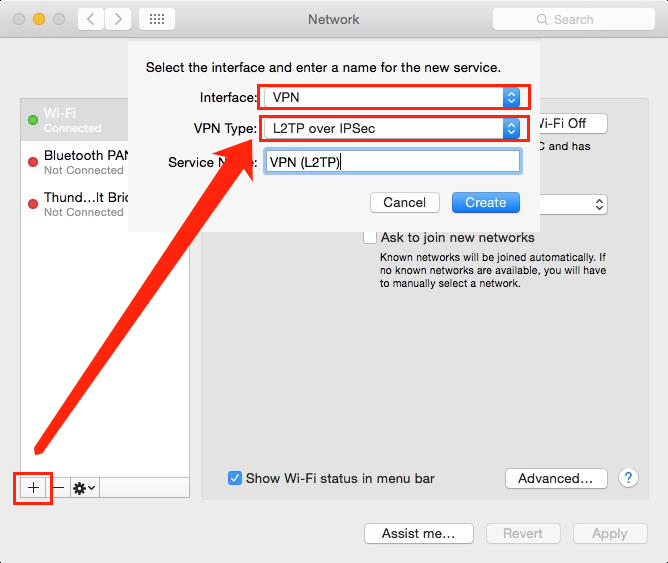
- Select “Add new service (+)” and choose “VPN” in “Interface”. Choose “L2TP/IPsec” in “VPN Type”. You can also name your connection in “Service Name”.
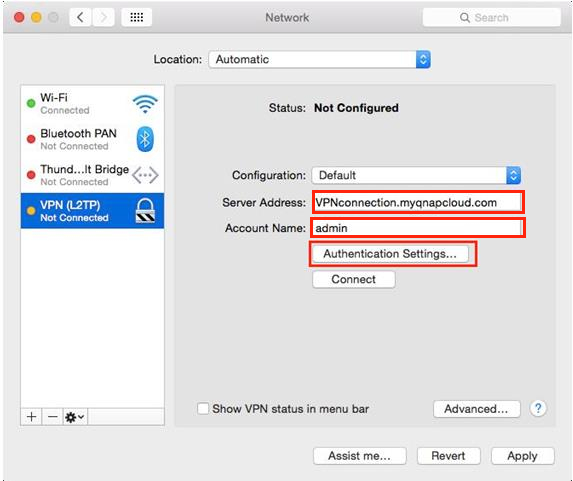
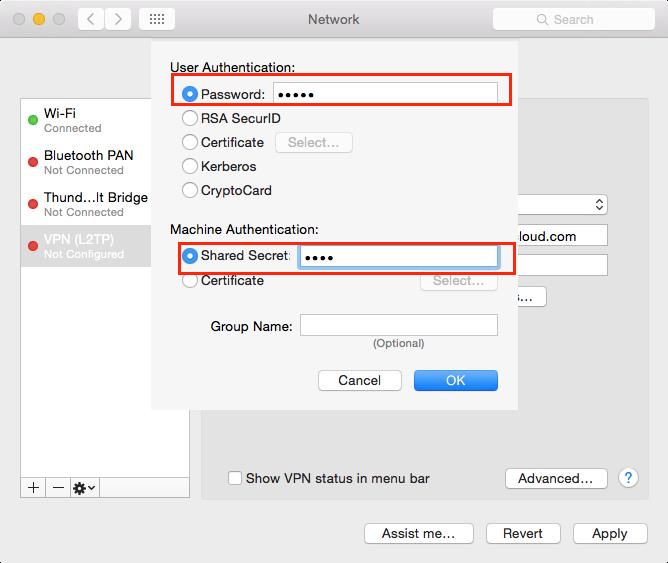
- Enter your myQNAPcloud name or IP address in “Server Address” and your QNAP NAS user name in “Account Name”. Then click “ Authentication Settings”, and enter the password & preshared key.
- Click “Connect” to connect to the VPN.
Setting L2TP/IPsec on Android 5.0
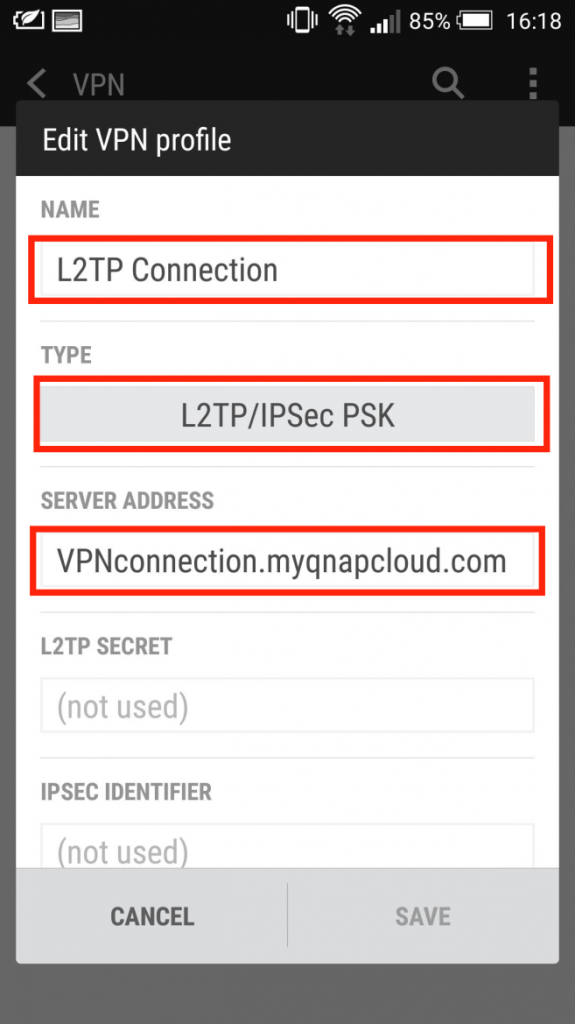
- Go to “Settings” > “VPN”. Click “Add VPN profile”.

- Enter “Name” and choose the type as “L2TP/IPsec PSK”
- Enter “IPsec Pre-shared key”.
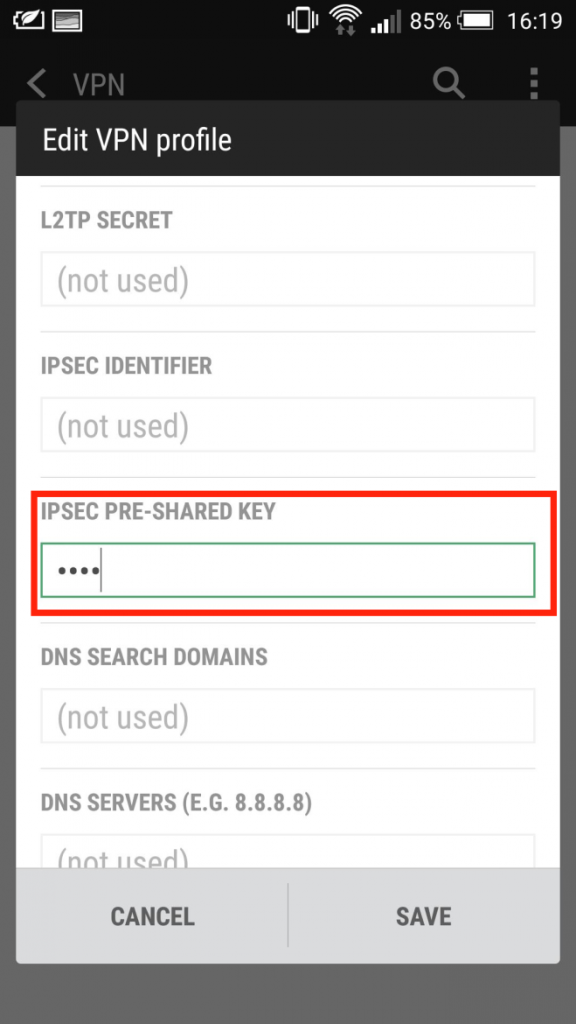
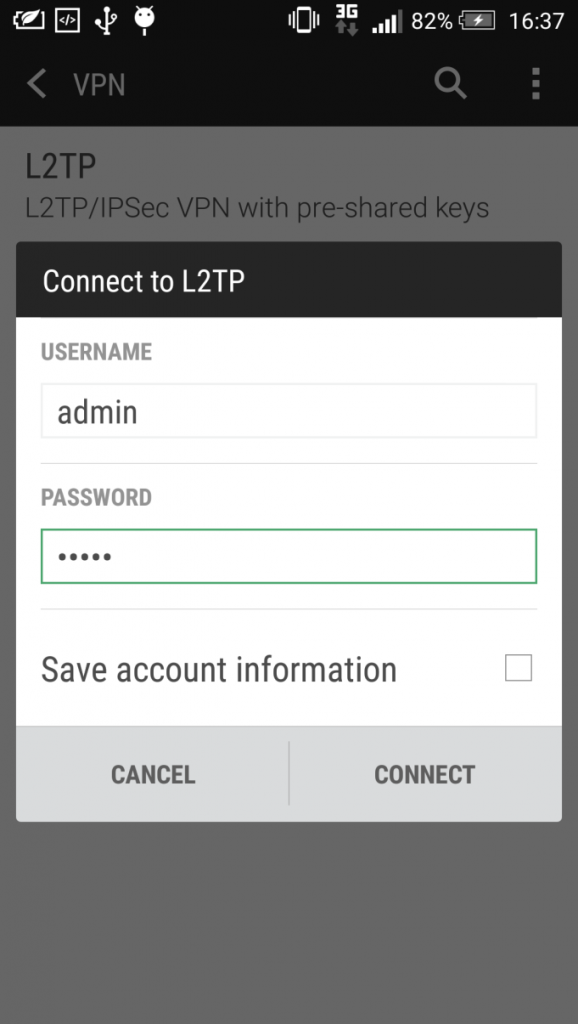
- Click the VPN profile and enter your username and password to start connection.
Setting L2TP/IPsec on iOS 8
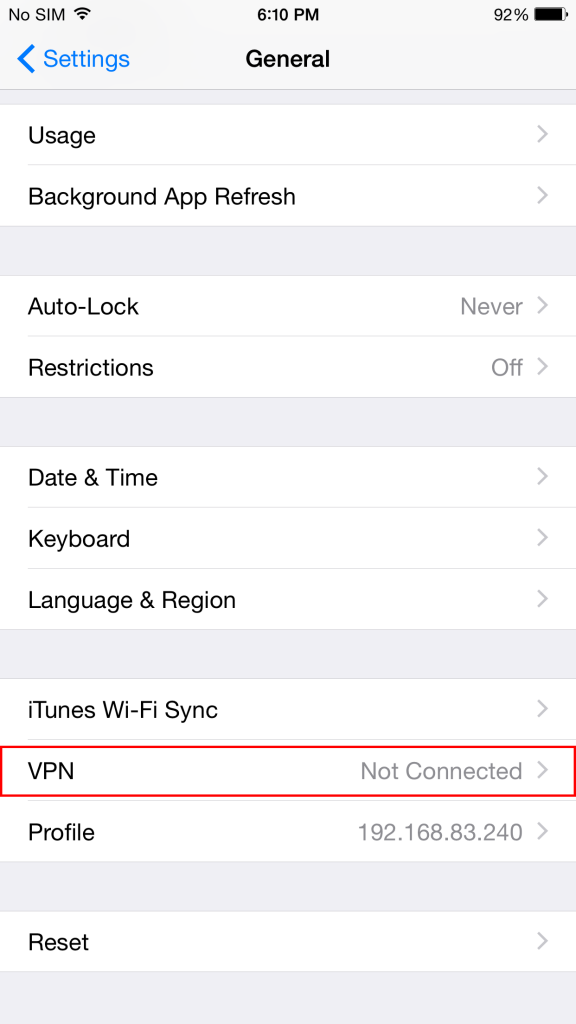
- Go to “Settings” > “General” > “VPN”.
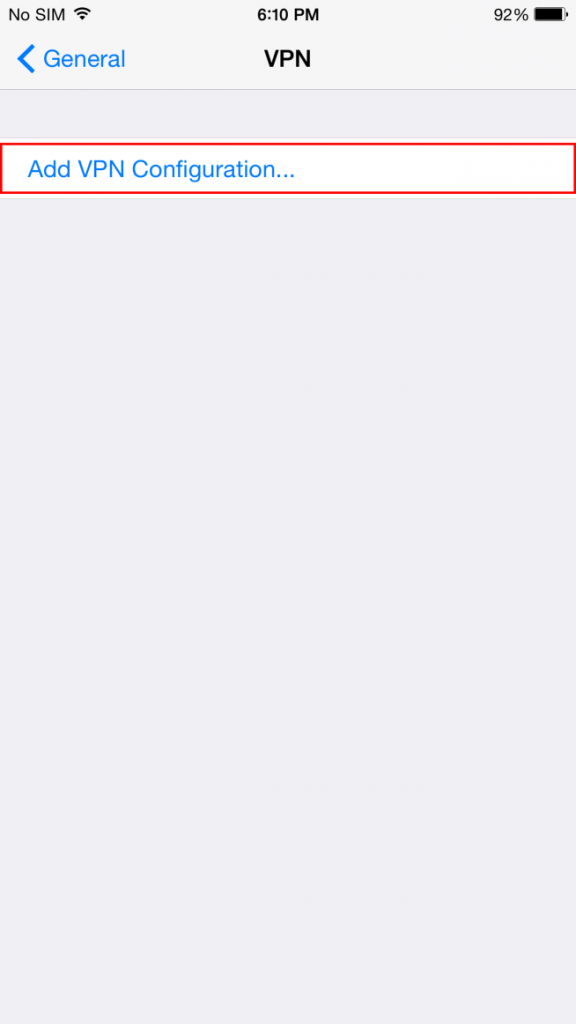
- Choose “Add VPN Configuration…”.
- Choose “L2TP” and name your connection in “Description”, before entering the myQNAPcloud name or IP address in “Server”, and then your QNAP NAS username, password and preshared key.
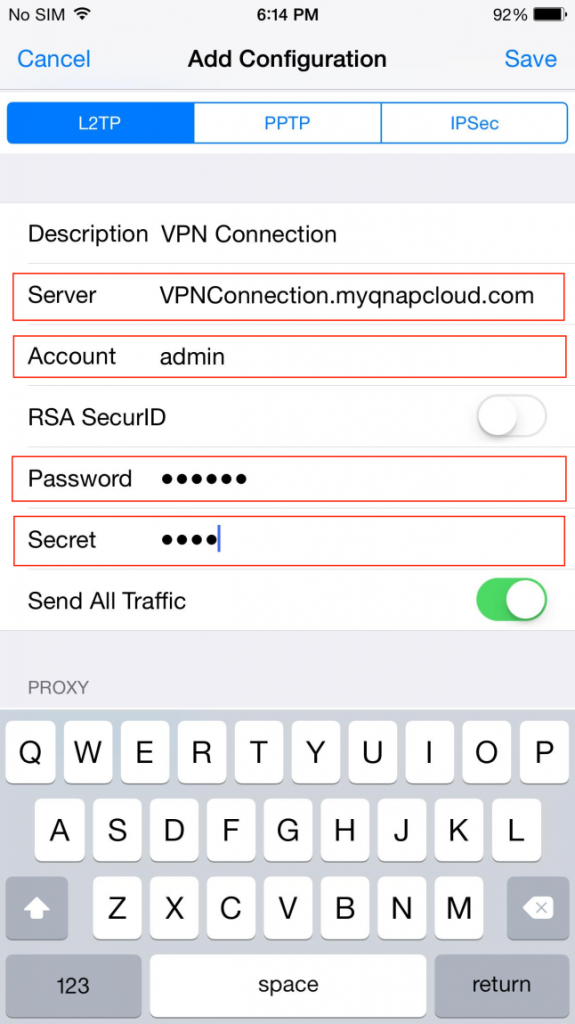
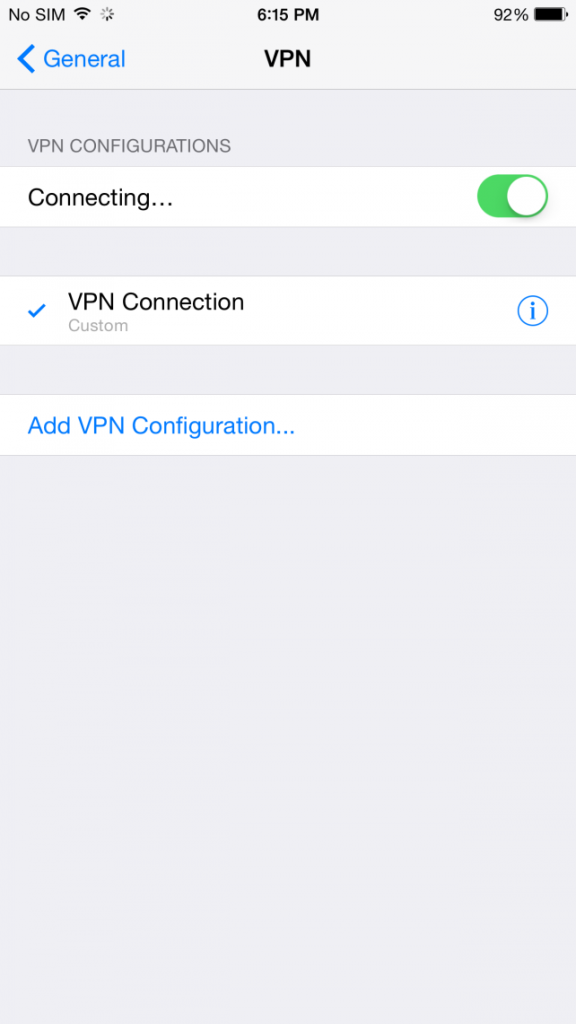
- Go to “Settings” > “General” > “VPN” to connect to the VPN.
PPTP settings on Windows 8
- Go to “Control Panel” > “Network and Internet” > “Network and Sharing Center” and select “Set up a new connection or network”.
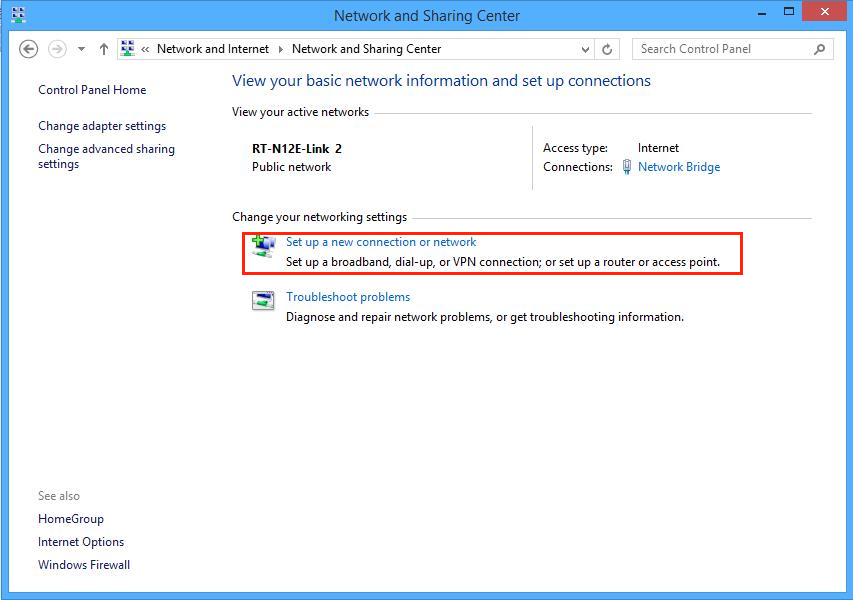
- Select “Connect to a workplace”.
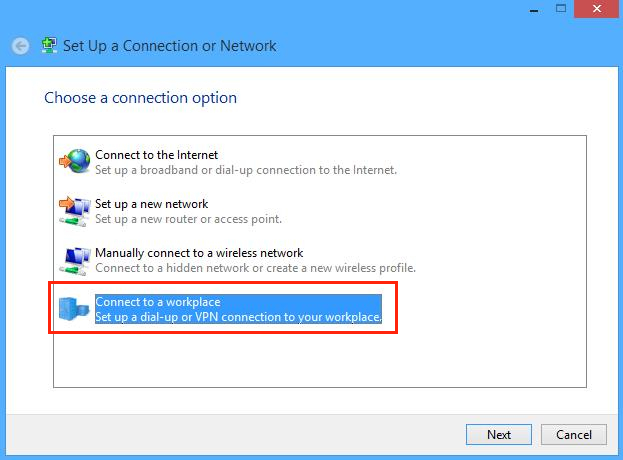
- Select “Use my Internet connection (VPN)”.
- Enter your myQNAPcloud name or IP address in “Internet address”. You can also name your connection in “Destination name”.
- Go to “Control Panel” > “Network and Sharing Center” > “Change adapter settings” and right click this VPN connection then select “properties”.
- Enter “Security” page, select the “Type of VPN” as PPTP.
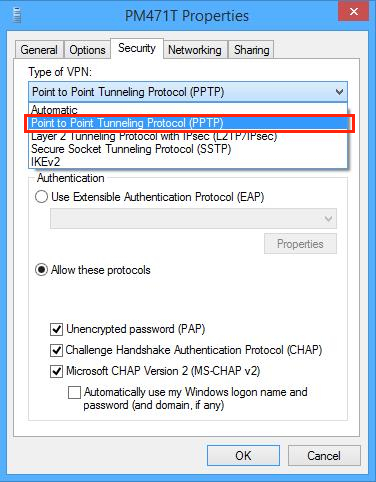
- You can now start using the VPN.
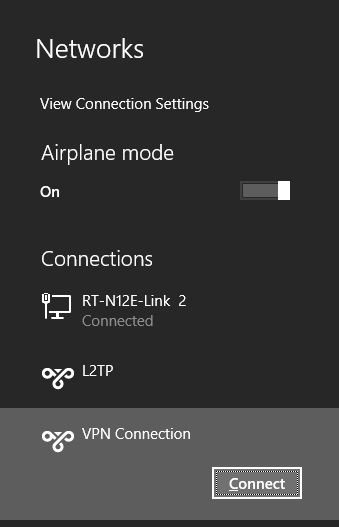
Setting PPTP on Mac OS X10.10
- Go to “System Preferences” > “Network”.
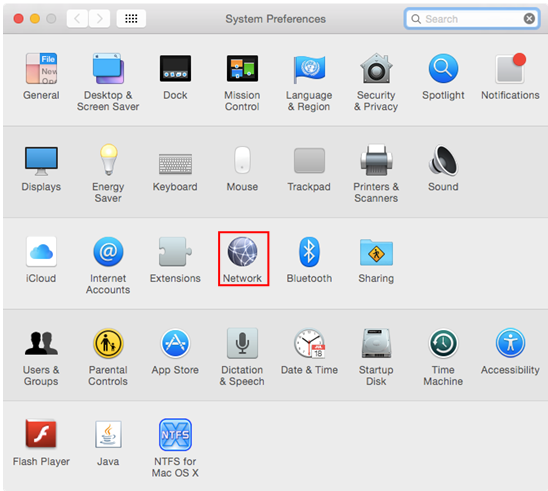
- Select “Add new service (+)” and choose “VPN” in “Interface”. Choose “PPTP” in “VPN Type”. You can also name your connection in “Service Name”.
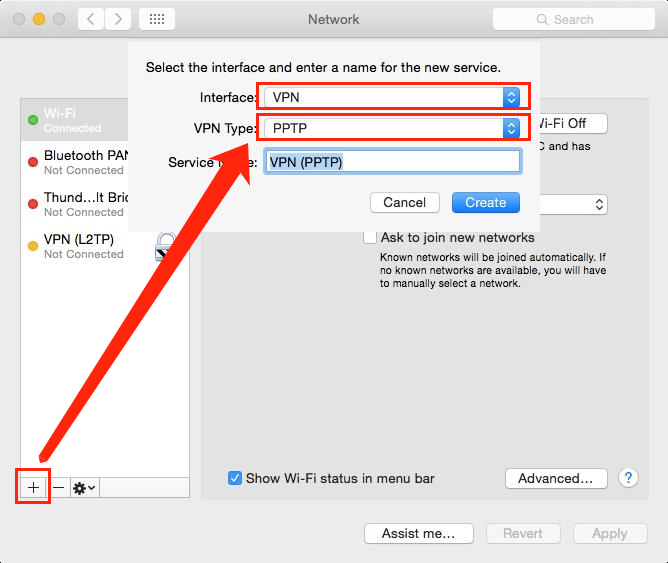
- Enter your myQNAPcloud name or IP address in “Server Address” and your QNAP NAS user name in “Account Name”. Then click “ Authentication Settings”, enter the password and preshared key.
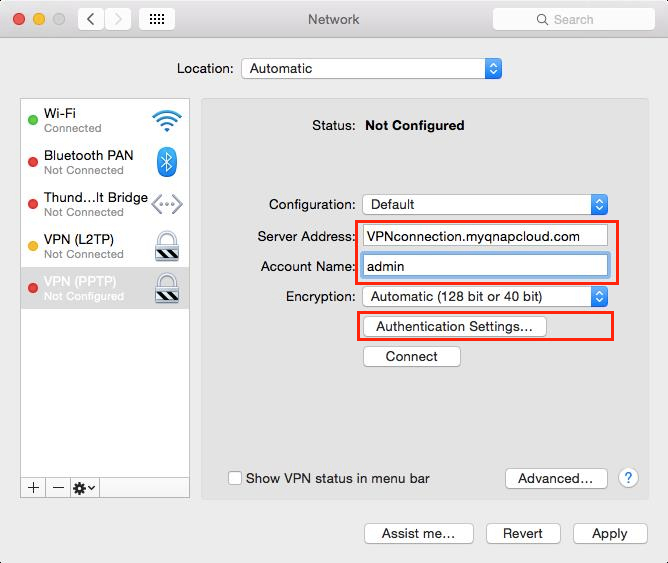
- Click “Connect” to start using the VPN.
Setting PPTP on Android 5.0
- Go to “Settings” > “VPN”. Click “Add VPN profile”.

- Enter “Name” and choose the type as “PPTP”
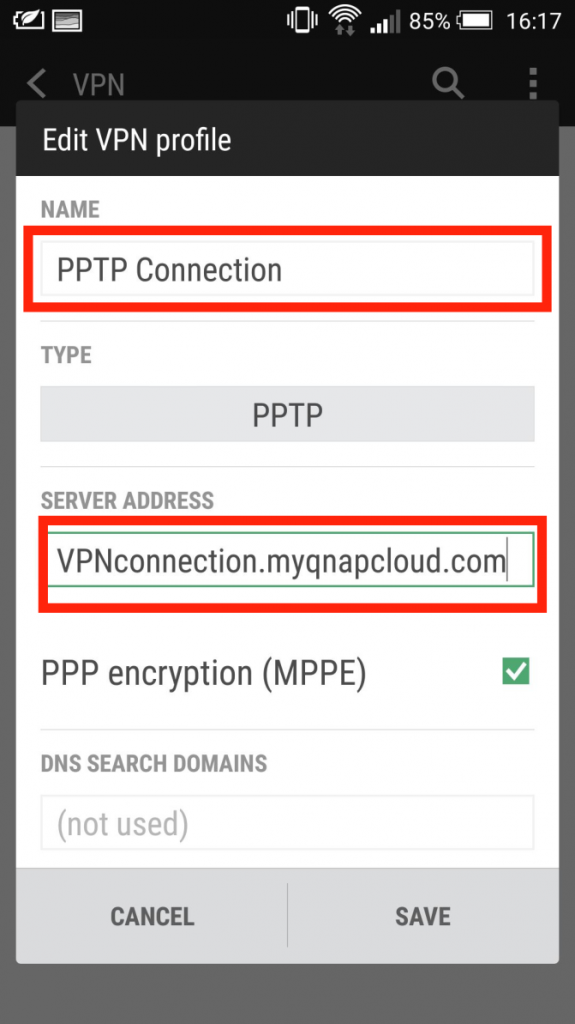
- Click the VPN profile and enter your username and password to start the connection.
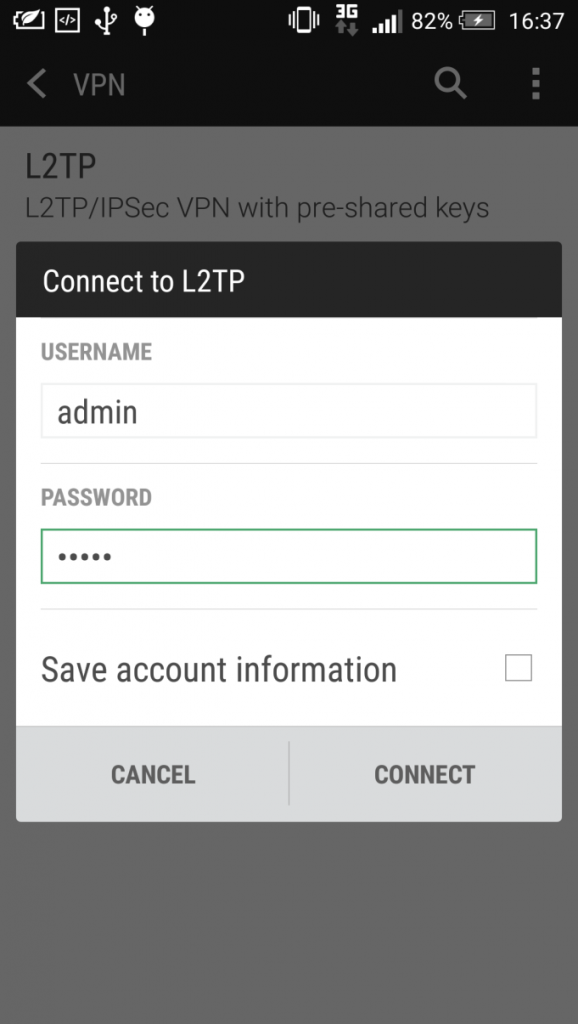
Setting L2TP/IPsec on iOS 8
- Go to “Settings” > “General” > “VPN”.
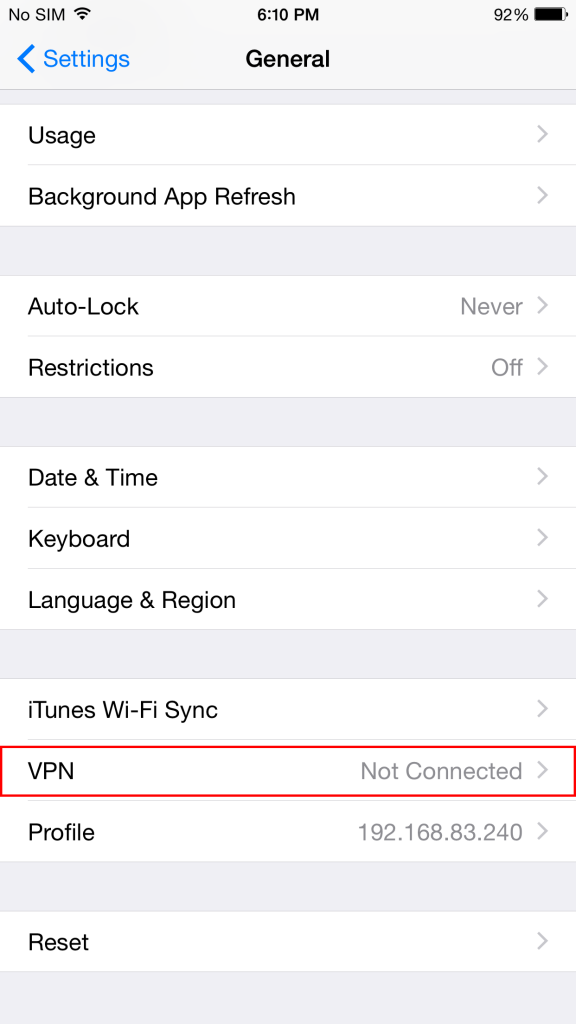
- Choose “Add VPN Configuration…”.
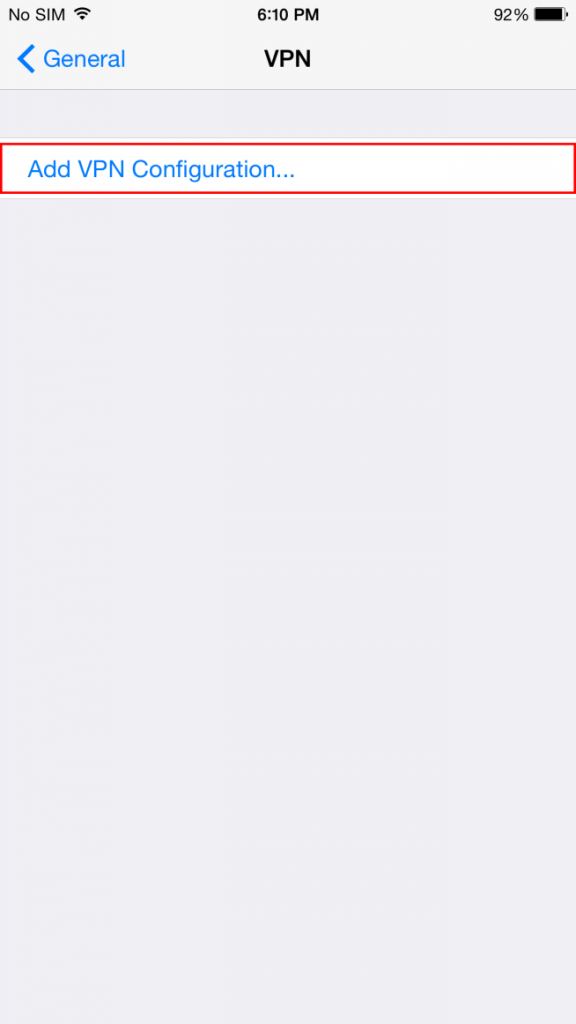
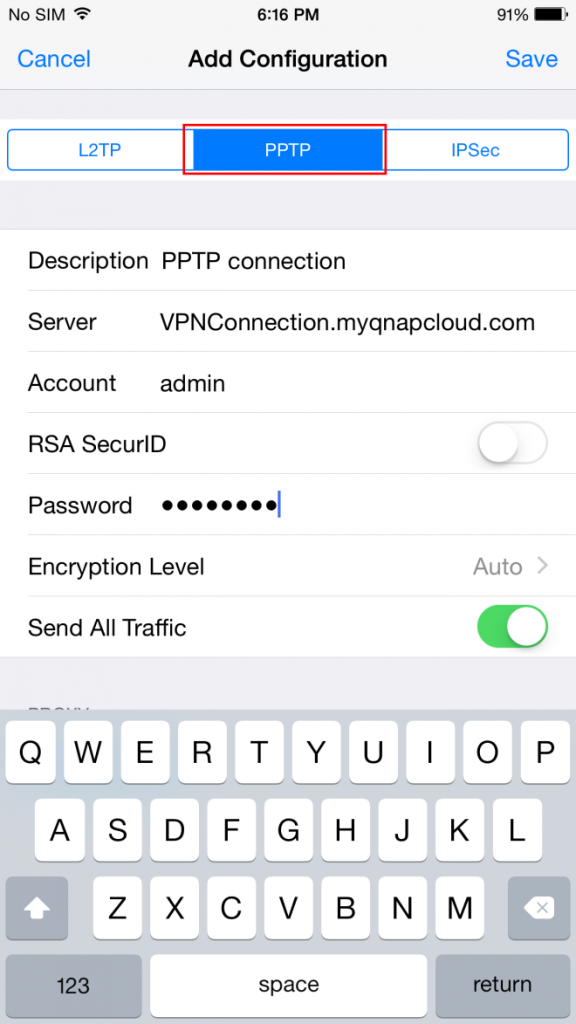
- Choose “PPTP” and name your connection in “Description”, before entering the myQNAPcloud name or IP address in “Server”, and then your QNAP NAS username and password.
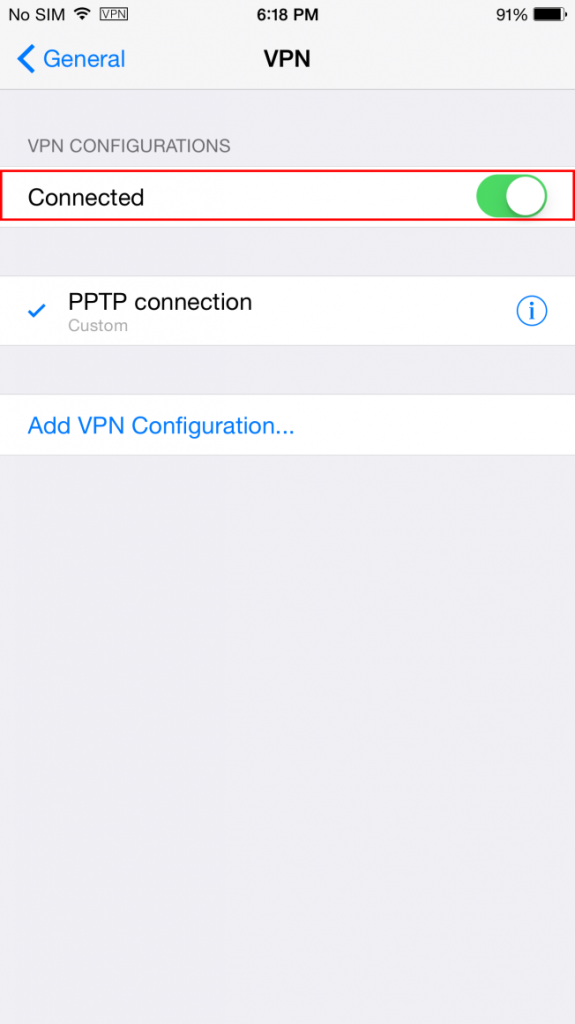
- Go to “Settings” > “General” > “VPN” to start the VPN connection.
OpenVPN on a Windows PC
- Download and install OpenVPN from: http://openvpn.net/index.php/open-source/downloads.html
- Using the administrator account, open the OpenVPN client.
- Download the settings files from your QNAP NAS (“Control Panel” > “Applications” > “VPN Service” > “VPN Server Setting”.)
- Open openvpn.ovpn and change “OPENVPN_SERVER_IP” to “NASIP”.
- Move “ca.crt” and “openvpn.ovpn” to the folder “OpenVPNconfig” where you installed OpenVPN.
OpenVPN on Mac
- Download and install OpenVPN from: https://code.google.com/p/tunnelblick/
- Download the settings files from your QNAP NAS (“Control Panel” > “Applications” > “VPN Service” > “VPN Server Setting”.)
- Open openvpn.ovpn and change “OPENVPN_SERVER_IP” to “NASIP”.
- Put “ca.crt” and “openvpn.ovpn” under the configuration file.
https://www.qnap.com/i/en/tutorial/con_show.php?op=showone&cid=3
How To Set Up A Qnap Nas As A VPN Server?Qnap’ı VPN Server Olarak Nasıl Konfigre Edebilirsiniz?,

Merhabalar ;
vpn yapıldığında vpn yapan kullanıcının ınternete kendı baglantısından(kendı modemınden)cıkmasını ıstıyoruz
Can you tell me what ip-range to use in the VPN-server settings?
In your example you use 10.1.0.1 – 10.1.0.254
Is this because in your local network your pc is at 10.1.0.x? Or should I use always another subnet fot the VPN-connection?
You can use whatever you want in your IP Range, 10.1.0.x is just an example
I had to use the IP address just below the client IP addresses in the VPN setup. Clients were 10.2.0.2-10.2.0.254 so the gateway to connect on the VPN was 10.2.0.1. For Mac to connect, used afp://10.2.0.1 with Apple File Protocol enabled.
Mac Instructions
1. Open your VPN connection
2. Go to the Finder and hit apple-K (Connect to Server)
3. In the Server Address box enter the IP address of the computer you want to log into with this prefix afp://
4. Click on the Connect button
The share should now appear in the Finder window sidebar. Hope this works for you and good luck.
@ Gijs
that is a good question. I would set the IPs to match your local network in order to have acccess to your local devices.
Hi all,
I’m trying to configure OpenVpn server on my QNAP (QTS -453A). I can connect to the server without problem (Client on Windows 7). The problem is that although the user I’m using to connect to the vpn server can only access to its home directory, if I open the VPN IP of the NAS from Explorer , I can browse all the shared directories.
Where is the mistake? Thank you for any help.
Angelo