+"Lun Stuck At Removing & Other Qnap iSCSI Lun Problems" document added;
http://qnapsupport.net/lun-stuck-at-removing-other-qnap-iscsi-lun-problems/
+"High CPU & RAM Usage Problems & How To Understand Which Service Use Resource" Document added;
http://qnapsupport.net/high-cpu-ram-usage-problems-how-to-understand-which-service-use-resource/
+"The File or Directory is Corrupted and Unreadable Error On iSCSI Lun Folder" Document added
http://qnapsupport.net/the-file-or-directory-is-corrupted-and-unreadable-error-on-iscsi-lun-folder/
+"How To Hide Folder & Disable Recycle Bin For Other Users" Document added;
http://qnapsupport.net/how-to-hide-folder-disable-recycle-bin-for-other-users/
+"How To Mount Qnap ISCSI Lun On NAS & Backup To Azure?" Document Added
http://qnapsupport.net/how-to-mount-qnap-iscsi-lun-on-nas-backup-to-azure/
+"Backup Job Unsupported Filenames Problem: “Warning: Skip the /nas/Backup/folder1/.streams” file which has an unsupported filename!" Document Added;
http://qnapsupport.net/backup-job-unsupported-filenames-problem-warning-skip-the-nasbackupfolder1-streams-file-which-has-an-unsupported-filename/
+"MySQL Problems, Cannot Access SQL Server After Update Firmware & How to Solve" Document extended;
http://qnapsupport.net/mysql-problems-how-to-solve/
+"Qnap Windows Access Smb 1.0 Share Problem After Windows Wannacry Update Patch" Document added
http://qnapsupport.net/qnap-windows-access-smb-1-0-share-problem-after-windows-wannacry-update-patch/
+"How To Recover Unreachible NAS with “Restore Factory Settings” Feature" Document added;
http://qnapsupport.net/how-to-recover-unreachible-nas-with-restore-factory-settings-feature/
+"Windows Server 2012/2008 iSCSI Lun File Problems: How To Start chkdsk Command" Document added;
http://qnapsupport.net/windows-server-lun-file-system-problems/
+"How To Stop Every Day At 02.00 Am “[Volume Volume1, Pool 1] Start To Reclaim Volume” Process" Document Added;
http://qnapsupport.net/how-to-stop-every-day-at-02-00-am-volume-volume1-pool-1-start-to-reclaim-volume-process/
+"Qnap Reboot Itself Randomly Even There is No Problem on RAID, What Should I Do?" Document extended
http://qnapsupport.net/qnap-reboot-itself-randomly-even-there-is-no-problem-on-raid-what-should-i-do/
+"Error Page Not Found Or The Web Server Is Currently Unavabile. Please Contact The Website Admin For Help" Document added;
http://qnapsupport.net/error-page-not-found-or-the-web-server-is-currently-unavabile-please-contact-the-website-admin-for-help/
+"How To Unmap Lun, Move Lun To Another Target or Delete Lun on Qnap" Document added;
http://qnapsupport.net/how-to-unmap-lun-move-lun-to-another-target-or-delete-lun-on-qnap/
+"Qnap Smb Service Totaly Broken After Firmware Update? How To Fix" document extended;
http://qnapsupport.net/enable-trusted-domains-doesnt-work-how-to-reinstall-to-fix-smb/
+"How To Purchase And Use myQNAPcloud SSL Certificates & How To Use SSL Certificates" Document Added;
http://qnapsupport.net/how-to-purchase-and-use-myqnapcloud-ssl-certificates-how-to-use-ssl-certificates/
+"Load Balance Setup: Which Is The Best Port Trunking Option?" Document Added;
http://qnapsupport.net/load-balance-setup-which-is-the-best-port-trunking-option/
+"Qsync Failed To Inıtialize Problem & How To Restore Homes Folder" Document fixed;
http://qnapsupport.net/qnap-qsync-problems-and-how-to-fix/
+" Qnap Blue Login Screen Problem" Document Added;
http://qnapsupport.net/qnap-blue-login-screen-problem/
+"Cannot Access NAS With \\NasName But Can Access Via \\IPAdress. Why?" Document Added;
http://qnapsupport.net/cannot-access-nas-with-nasname-but-can-access-via-ipadress-why/?lang=en
+"Qnap SMB / Cifs Backup Fails To Connect, Even Test Connection Seems Ok?" Document added;
http://qnapsupport.net/qnap-smb-cifs-backup-fails/?lang=en
+"Virtual Switch Blank Page Problem, How To Reinstall Network Config & “You don’t have permission to access /apps/netmgr/ on this server” Problem" Document added;
http://qnapsupport.net/virtual-switch-blank-page-problem-how-to-reinstall-network-config-you-dont-have-permission-to-access-appsnetmgr-on-this-server-problem/?lang=en
+"How To Create Multi Volume/Second RAID And Upload Folders To This Second RAID/Volume" Document added;
http://qnapsupport.net/how-to-create-multi-volumesecond-raid-and-upload-folders-to-this-second-raidvolume/?lang=en
+"What is QPKG & How To Install Application Manually & How To Reinstall App Center" Document Extended
http://qnapsupport.net/what-is-qpkg-how-to-use/?lang=en
+"Container Station Problems & How To Fix" Docuement Added;
http://qnapsupport.net/container-station-problemleri-ve-cozumu/
+"Read I/O error, sense_key=0×0, asc=0×0, ascq=0×0, CDB=28 00 57 09 ed 18 00 00 10 00 Errors & How To Fix" Document Added;
http://qnapsupport.net/read-io-error-sense_key0x0-asc0x0-ascq0x0-cdb28-00-57-09-ed-18-00-00-10-00-errors-how-to-fix/?lang=en
+"Qnap Lun Free Size Is Not Same on Windows ISCSI Disk? How To Fix Qnap Lun Dead Space" Document Added;
http://qnapsupport.net/qnap-lun-free-size-is-not-same-on-windows-iscsi-disk-how-to-fix-qnap-lun-dead-space/?lang=en
+"myQNAPcloud Name Registration Problems & How To Solve" Document Added;
http://qnapsupport.net/myqnapcloud-kayit-etme-problemleri-ve-cozumleri/
+"How To Be Sure If Its Qnap Hardware or HDD Issue?" Document Added
http://qnapsupport.net/how-to-be-sure-if-its-hdd-problem/?lang=en
+"Windows 7 / Windows 10 Backup Cannot Save To A Network Location On NAS, How To Solve!" Document Added;
http://qnapsupport.net/windows-7-windows-10-backup-isleminde-cannot-save-to-a-network-location-hatasi/
+"Qnap Exel / Word Files “Access Denied. Contact Your Administrator” Problem & How To Solve" Document added;
http://qnapsupport.net/qnap-exel-word-files-access-denied-contact-your-administrator-problem-how-to-solve/?lang=en
+"Qnap “System Reserved” Storage Takes Too Much Space? What Is Sys. Reserverd And How To Fix This" Document Added;
http://qnapsupport.net/qnap-system-reserved-storage-takes-too-much-space-what-is-sys-reserverd-and-how-to-fix-this/?lang=en
+"Qnap Login Interface Blue Screen Error After Firmware Upgrade & How To Solve" Document Added;
http://qnapsupport.net/qnap-login-interface-blue-screen-error-after-firmware-upgrade-how-to-solve/?lang=en
+"RAID Seems Unmounted and Mounting Volume Failed; How To Start e2fsck Command And Mount Volume" Document extended;
http://qnapsupport.net/raid-seems-unmounted-and-mounting-volume-failed-how-to-start-e2fsck-command-and-mount-volume/?lang=en
+"Qnapcloud UPnP Router Problem; I Can Access NAS Via Cloudlink, But name.myqnapcloud.com Doestn Work?" Document renewed!
http://qnapsupport.net/qnapcloud-upnp-router-problem-i-can-access-nas-via-cloudlink-but-name-myqnapcloud-com-doestn-work/?lang=en
+"How To Remove Second Volume And Expand First Volume Capacity" Document Added;
http://qnapsupport.net/how-to-remove-second-volume-and-expand-first-volume-capacity/?lang=en
+"Issue of Cloud Drive Sync Problems & How To Solve" Document Added;
http://qnapsupport.net/issue-of-cloud-drive-sync-problems-how-to-solve/?lang=en
+"PhotoStation Errors and How To Reinstall Database; Thumbnail Generation Failed A Few Photos, No Folder View And Albums Empty After Firmware, Photo Station Albums Gone, Photostation Not Showing All Files" Document Added;
http://qnapsupport.net/photostation-errors-and-how-to-reinstall-database/?lang=en
+"Container Station Only Shows My Nas And The Refresh İcon, But No Folders At All… How To Fix" Document added;
http://qnapsupport.net/container-station-only-shows-my-nas-and-the-refresh-icon-but-no-folders-at-all-how-to-fix/?lang=en
+"About Qnap Warranty Issue" Document Added;
http://qnapsupport.net/about-qnap-warranty-issues/?lang=en
+"Qnap Unable To Play MKV Files Anymore After Firmware Update And Gives “The Video Does Not Support Online Playback or Does Not Exist” Error?" Docuemnt Added;
http://qnapsupport.net/qnap-unable-to-play-mkv-files-anymore-after-firmware-update-and-gives-the-video-does-not-support-online-playback-or-does-not-exist-error/?lang=en
+"Qnap Download Station Stops Working Suddeny And Gives This Error; Download Station Is Currently Offline" Document Added;
http://qnapsupport.net/qnap-download-station-stops-working-suddeny-and-gives-download-station-is-currently-offline/?lang=en
+"RAID Seems Unmounted and Mounting Volume Failed; How To Start e2fsck Command And Mount Volume" Document Added;
http://qnapsupport.net/raid-seems-unmounted-and-mounting-volume-failed-how-to-start-e2fsck-command-and-mount-volume/
+"How To Understant Which Broken HDD Cause RAID Rebuilding Process Slow Down" Document Added;
http://qnapsupport.net/how-to-understant-which-broken-hdd-cause-raid-rebuilding-process-slow-down/
+"How To Add Or Remove Spare Disk From RAID" Document Added;
http://qnapsupport.net/how-to-add-or-remove-spare-disk-from-raid/?lang=en


hi, i want to try this method
I think I deleted my files or have trouble making raid5
Could you help me?
Hi,
In Turkey our company doesnt allow us to help this kind of recovery process, so If you are not good at Linux commands I advice you to use R-Stuio.
Its really easy to use and you can easly find lots of document with a little google search!
Thank you very much, it really helped!
Ran it on TS-869 Pro with 8 x 3Tb in RAID 6 – worked perfectly, but took almost 3 days.
First of all excuse my english
Thanx for this guide, i followed step by step and i recovered folders and files deleted by error.
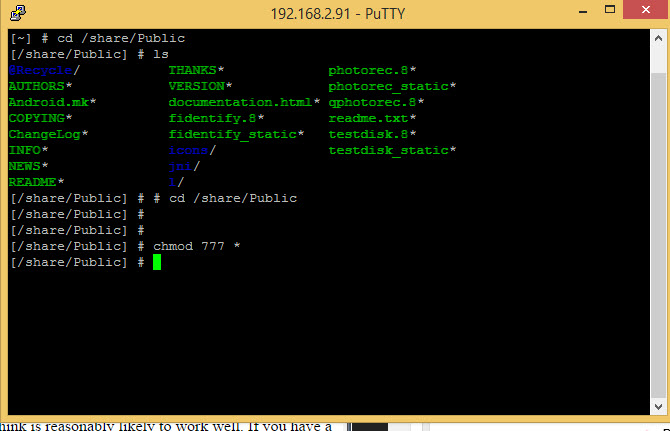
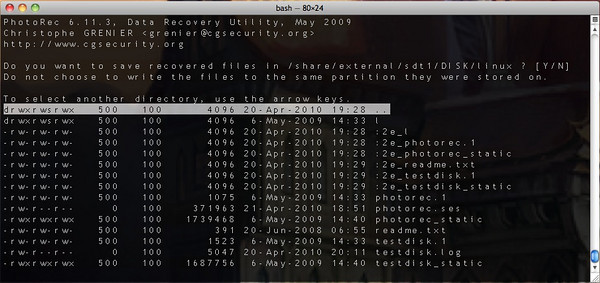
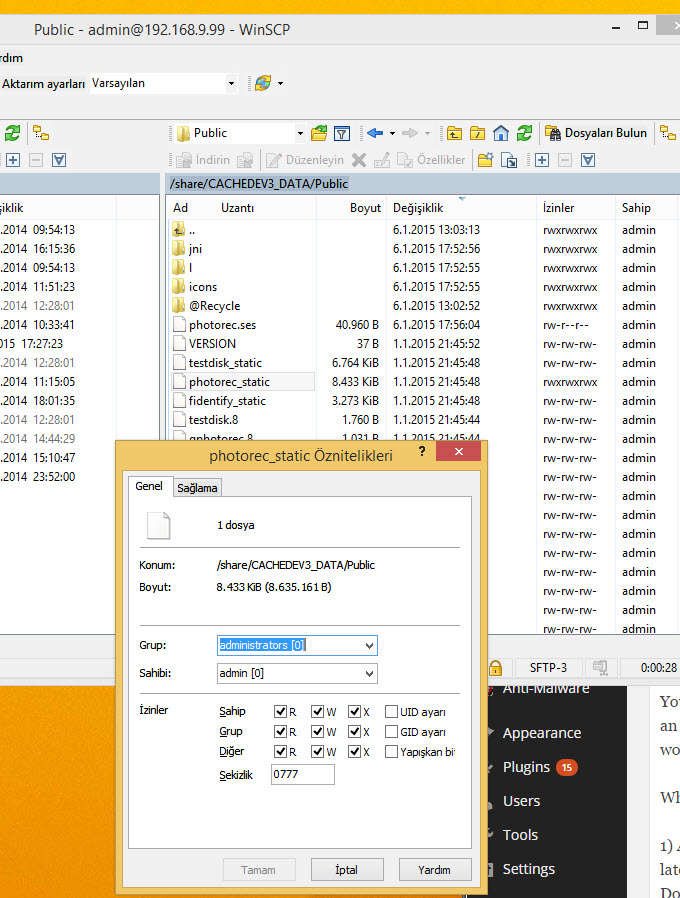
I just wanted to make a aportacion: in step three, when I execute photorec or testdisk, i get a permission denied message, so you will need to chmod the testdisk folder before execute it.
Dear Kiko;
Your definetly right, so I fix this document once again.
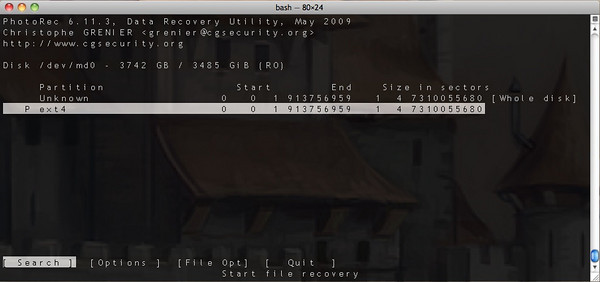
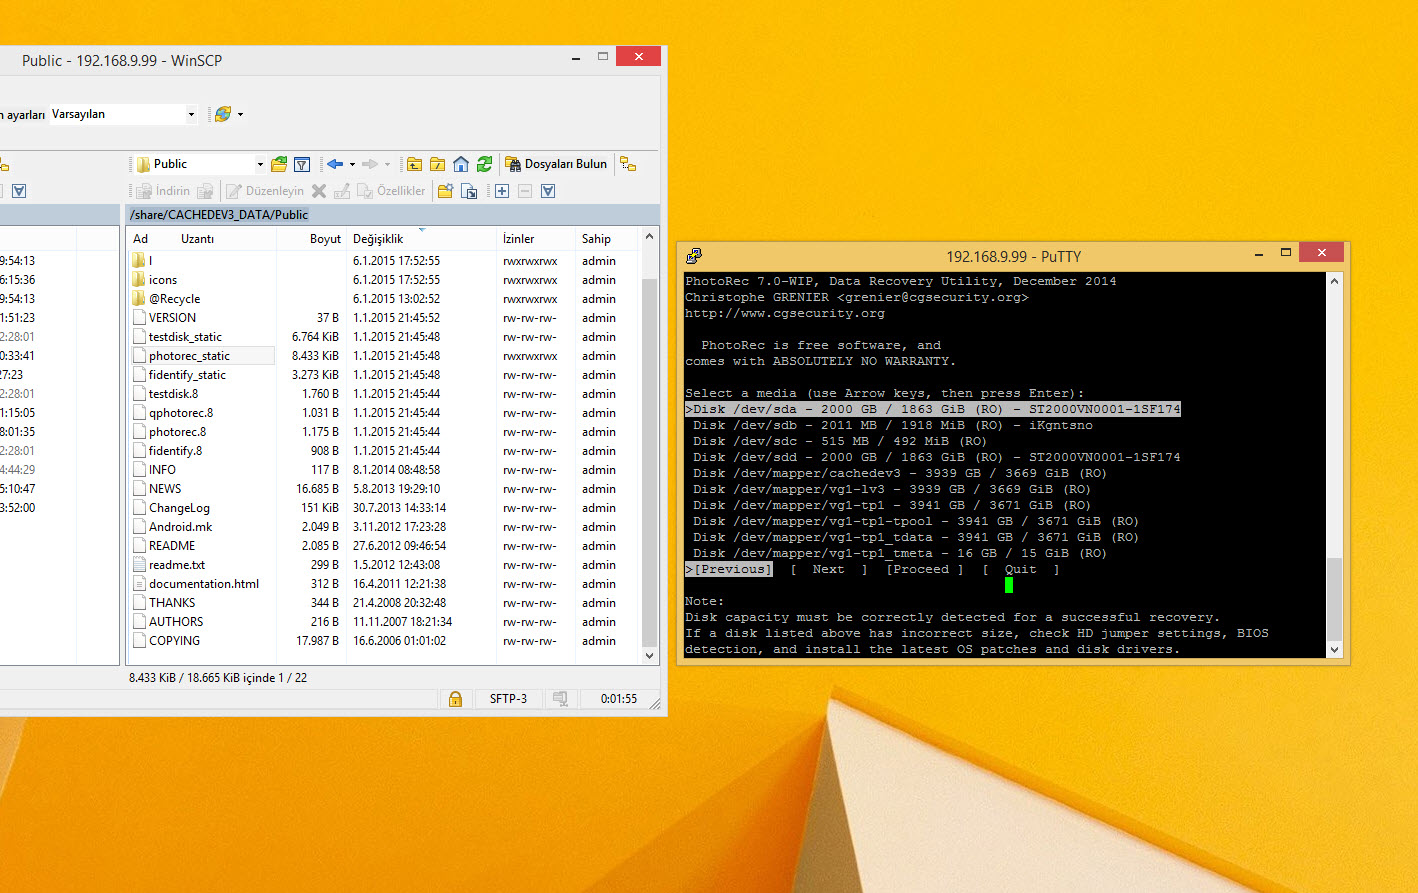
I tried to run photorec on my QNAP TS212P but got this error: cannot execute binary file
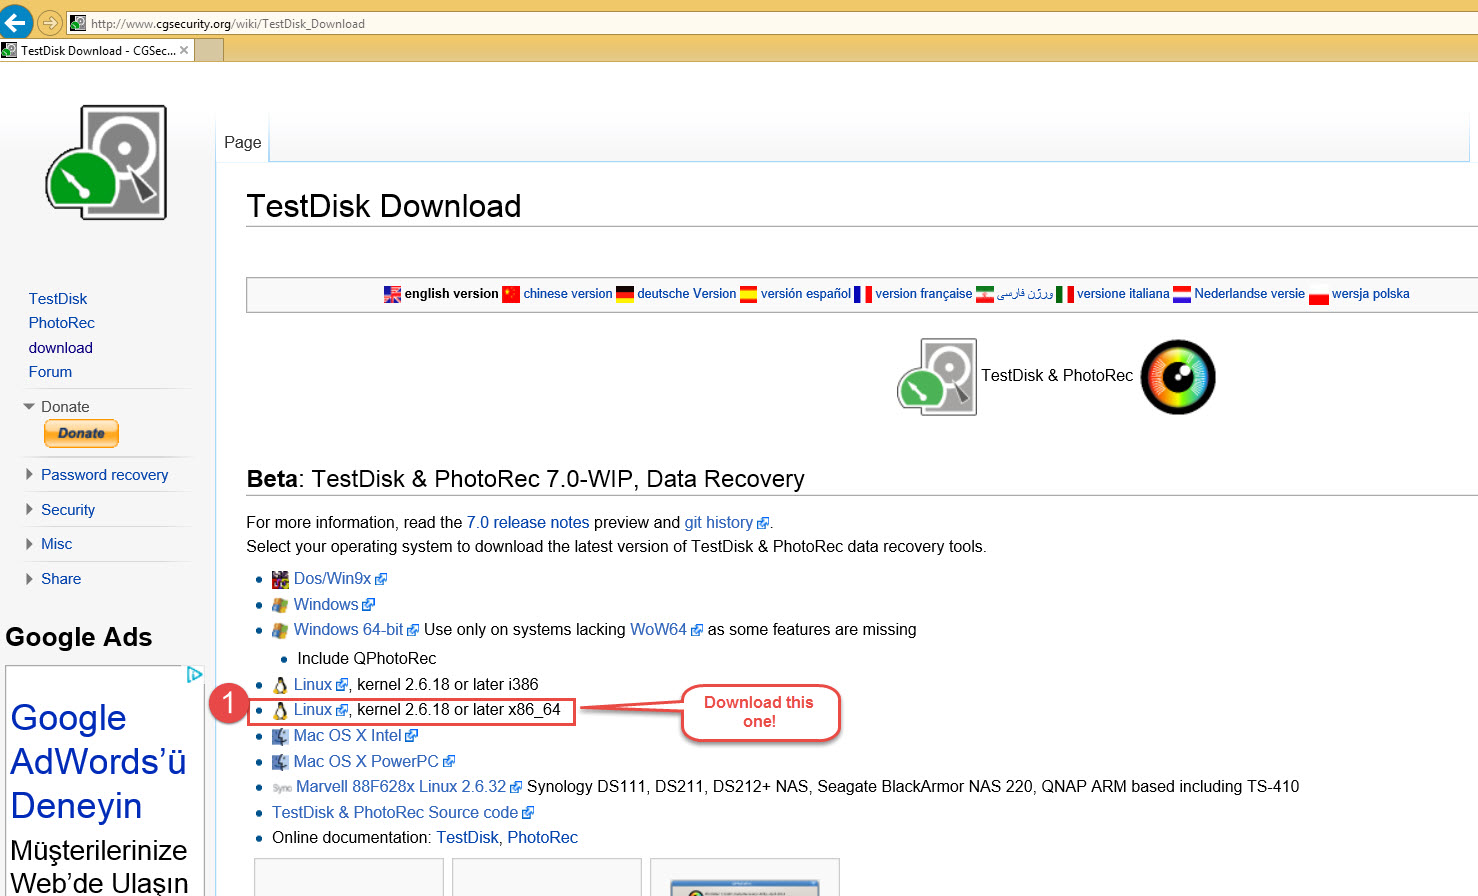
Do I need to use this version instead of the x86_64 version (from the TestDisk/PhotoRec downloads page):
Marvell 88F628x Linux 2.6.32 Synology DS111, DS211, DS212+ NAS, Seagate BlackArmor NAS 220, QNAP ARM based including TS-410
Hey;
+Before trying to recovery, can you check if your files still in your NAS or not?
http://qnapsupport.net/?page_id=440
+For photorec, try to install “Linux, kernel 2.6.x i386 version and it should work!”
+Also no need to panic; you can easly restore datas with recovery softwares on 1 or 2 HDD models. If you have RAID 1 or single HDD, just plugin HDD to a PC and follow my “I Accidently Delete a file, so is there a Chance to Recover Datas?” R-Studio Recovery document;
http://qnapsupport.net/?page_id=318
+If you have RAID 0, you should plug both HDD’s on PC.
http://qnapsupport.net/?page_id=596
Ps: Plug out HDD when Qnap power is off, and before power on your NAS again, plugin back HDDs back again to the same slots;
Pingback: how to recover deleted photos from android - android firmware download | android firmware download
Hi, do you have a way to submit questions? I had typed up a comment/question earlier here but I think it got lost or didn’t submit correctly. I typed up my question on the QNAP forums but I haven’t gotten any response.
http://forum.qnap.com/viewtopic.php?f=25&t=119724
I am trying to figure out what has happened to my drive and the best way to recover it. I am running Test Disk partition recovery on it now to see what it finds. It does show some partitions on it but only the “qnap” files show in the first partition so that is why I am running a deep analysis but it will probably take until the end of the weekend to finish..
Hi, will this process overwrite the contents of my external drive?
No, but you better use a fresh external HDD
So I went through everything you mentioned here and read all the comments. Nothing worked. I even tried installing all of this into the sbin folder. I tried the 64 bit, and the NAS one for Synology and Qnap. Still nothing. The file would not execute. Then I tried the 32 bit version because I have the same exact Qnap TS-695 Pro. Picked it up on Ebay.
The 32 bit version of this app worked perfect, just perfect.
There is more to this story. Recovering 3 gig takes 20 days on a slow system and 10 days on a kick ass I7. The issue is who wants to leave their computer running for 20 days straight? Well guess what? The Qnap mentioned above has a VGA port and it displays console/terminal ssh. So all you have to do is plug in a USB keyboard, connect the VGA port to a monitor, and do all this from the Qnap device. That way you don’t sacrifice 20 days of your PC/server to recover the files. Let the NAS device do it for you. When you disconnect the VGA monitor and keyboard the NAS continues extracting. When you reconnect and touch any button but the Enter key, it refreshes and your session is still running. Nothing shy of awesome in my book. I spent four days trying to figure out how not to tie up my PC’s to accomplish this.
20 Days for 3GB , wow thats a long time
I had unintentionally sent around 600GB to the Qnap Recycle bin and for some weird reason the NAS screwed my Data , so to recover this data , based on what your saying (in theory) I would have to let in run for 4000 Days or 10 Years to recover it all
Shall I post back in 10 years to tell you how I get on ?
So my deleted 600GB would take 10 years in theory ?
Hello,
does photorec work on a QNAP based on ARM ?
Thanks for your reply.
Julien
For anyone who needs to recover files on an ARM based Qnap (TS212 for example), download the “Marvell 88F628x Linux 2.6.32″ version from the Testdisk page.
After you have copied the folder to the QNAP and carried out the chmod function you will probably encounter an error like “Terminfo file is missing” when trying to run photorec.
If you run these two commands and try running photorec after, it should work…
export TERM=linux
export TERMINFO_DIRS=./
./photorec
Hope this helps!
Sürekli olarak bu hatayı alıyorum. Linx sistemlere ve Putty kullanımına yabancı değilim..
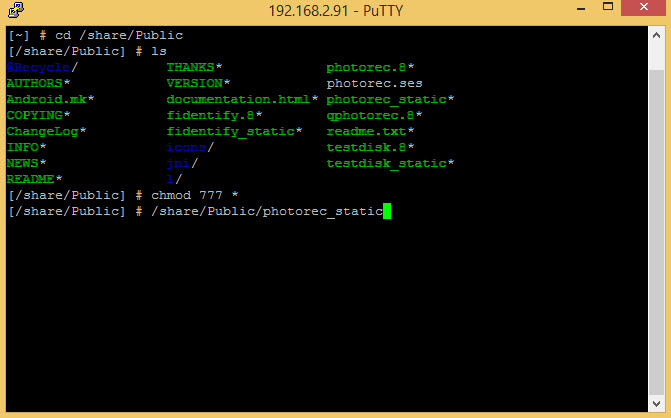
-sh: /share/Public/photorec_static: cannot execute binary file
[/share/Public] #
Hi. I get stuck at [Run PhotoRec (photorec_static) in the shell by issuing a ./photorec_static command] with an error of cannot execute binary file. Can you give a hint?