I – How To Recover Accidently Deleted Data On Qnap NAS: Before Start
II – How To Recover Data With Photorec
III – Recover Deleted Files From A QNAP NAS (https://cwl.cc)
IV – How To Solve “photorec_static ermission denied” Error;
.
I – How To Recover Accidently Deleted Data On Qnap NAS: Before Start
You probably saw this document before, and may fail to proceed because of “you dont have an access to do this” error. I re-edit document and hope this would help you to save your datas.
-Taken From Qnap Form & Extended By Me-
What you need:
1 – An external USB or eSata drive large enough to hold your deleted data (more on this later) – Or if you have another partition that you can safety write to, this might suffice 2)
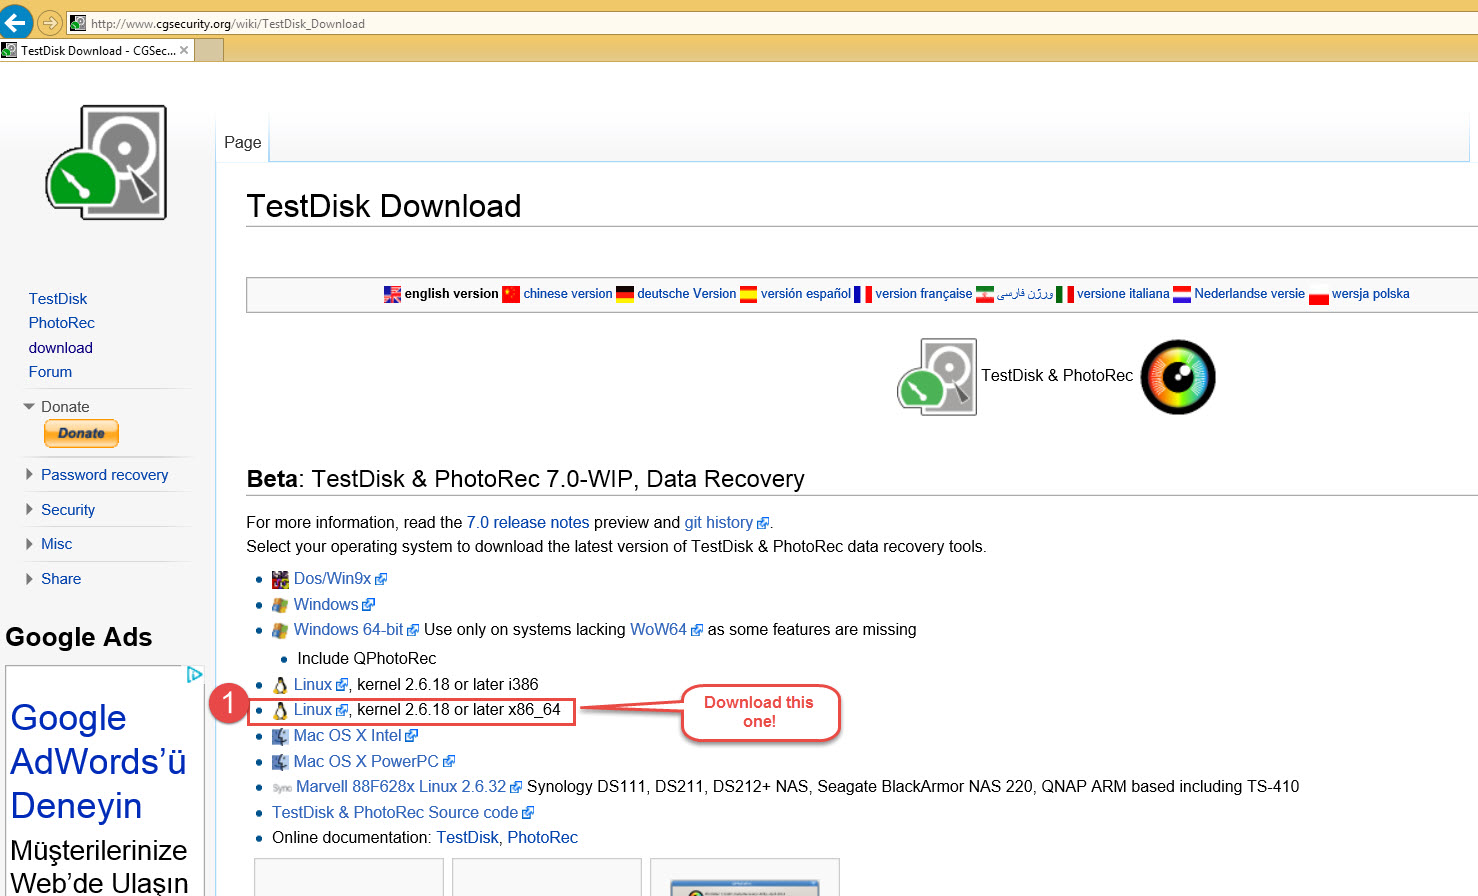
2 – Download and decompress on your PC/Mac etc. “Linux, kernel 2.6.x i386/x86_64 “ from http://www.cgsecurity.org/wiki/TestDisk_Download
.
A couple of important notes:
1) Stop using your NAS NOW! The more files that get written to your NAS, the more files you will NOT be able to undelete. This includes even the log files that the NAS generates. I’d recommend turning off all services, applications and protocols except for the basic minimum (SMB, AFP etc.)
2) You MUST copy your undeleted files to the external USB/eSata drive. This program does not “undelete” like Microsoft where it restores the file where it sits, it literally re-writes the new “recovered” file – and thereby will overwrite the files you are trying to undelete.
3) Testdisk vs. Photorec : My partition was in tact and my goal was to recover deleted files only. In this case I’d strongly recommend using PhotoRec vs. Testdisk. Ignore the filename, as PhotoRec recovers MUCH MORE than just photos. If you are recovering from a deleted or corrupt partition – use Testdisk. Much of these instructions would also apply to Testdisk, although the specifics would change. The scope of this HOWTO is to undelete files using PhotoRec
Disclaimer: Obviously this isn’t supported by QNAP – although if you ENSURE you recover your files to another partition or external drive, this process is also non-destructive to your existing partition as it only reads from your existing partition/hard drive.
.
II – How To Recover Data With Photorec
1 – Download Photorec and decompress on your PC/Mac etc. ”Linux, kernel 2.6.x i386/x86_64 ” from http://www.cgsecurity.org/wiki/TestDisk_Download
.
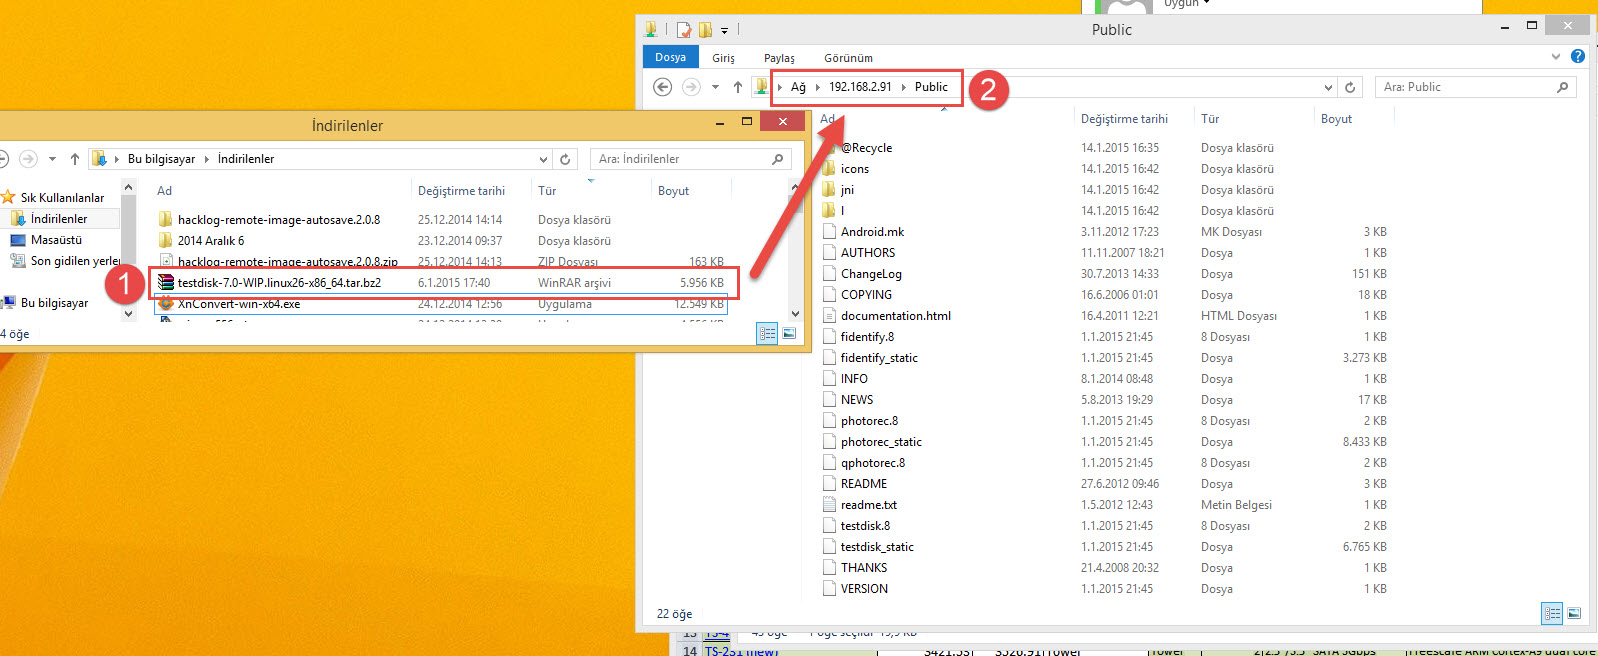
2 – Unzip Downloaded File Directly on Qnap Public Folder;
.
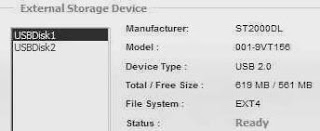
3 – Plugin an External HDD Enough To Recover Your Deleted File and Be Sure That Qnap Recognize This HDD
.
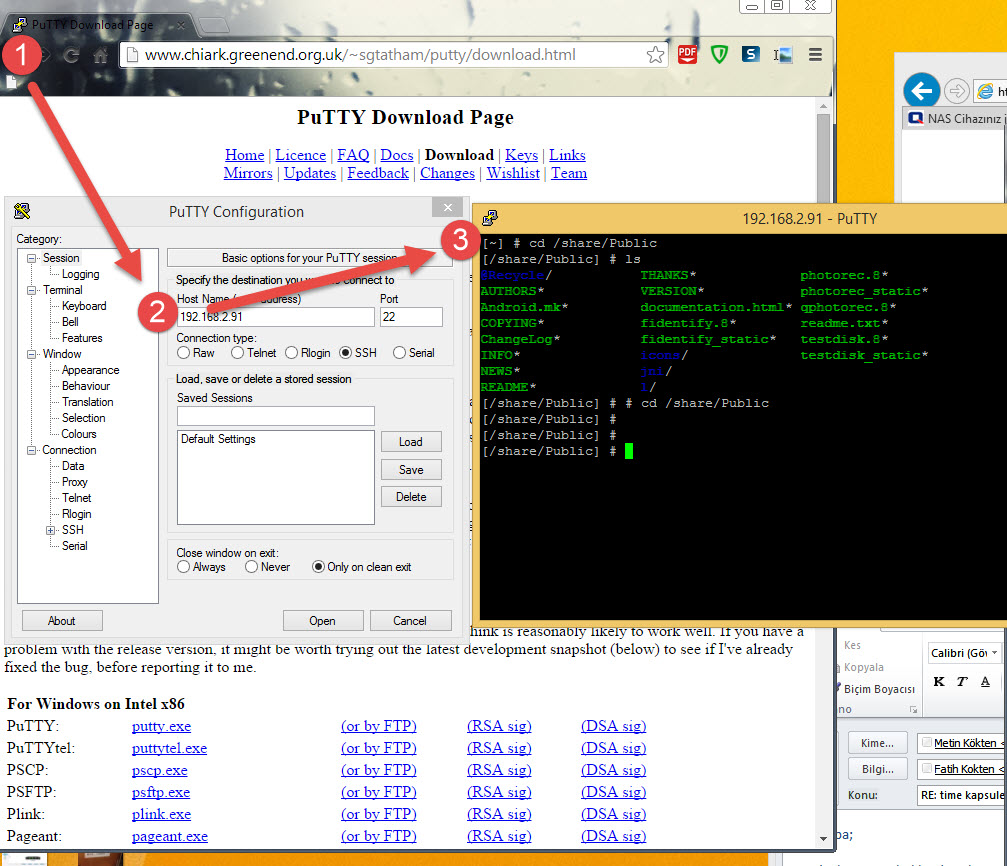
4 – Download Putty & Login Qnap.
http://www.chiark.greenend.org.uk/~sgtatham/putty/download.html
Login Qnap enter Public folder (Or just copy & blue command down below)
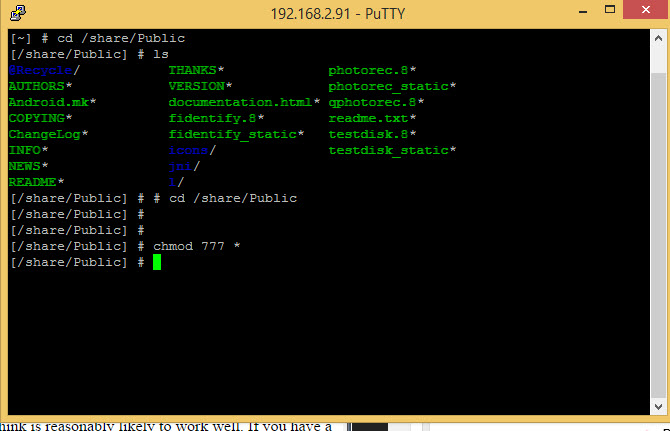
# cd /share/Public
.
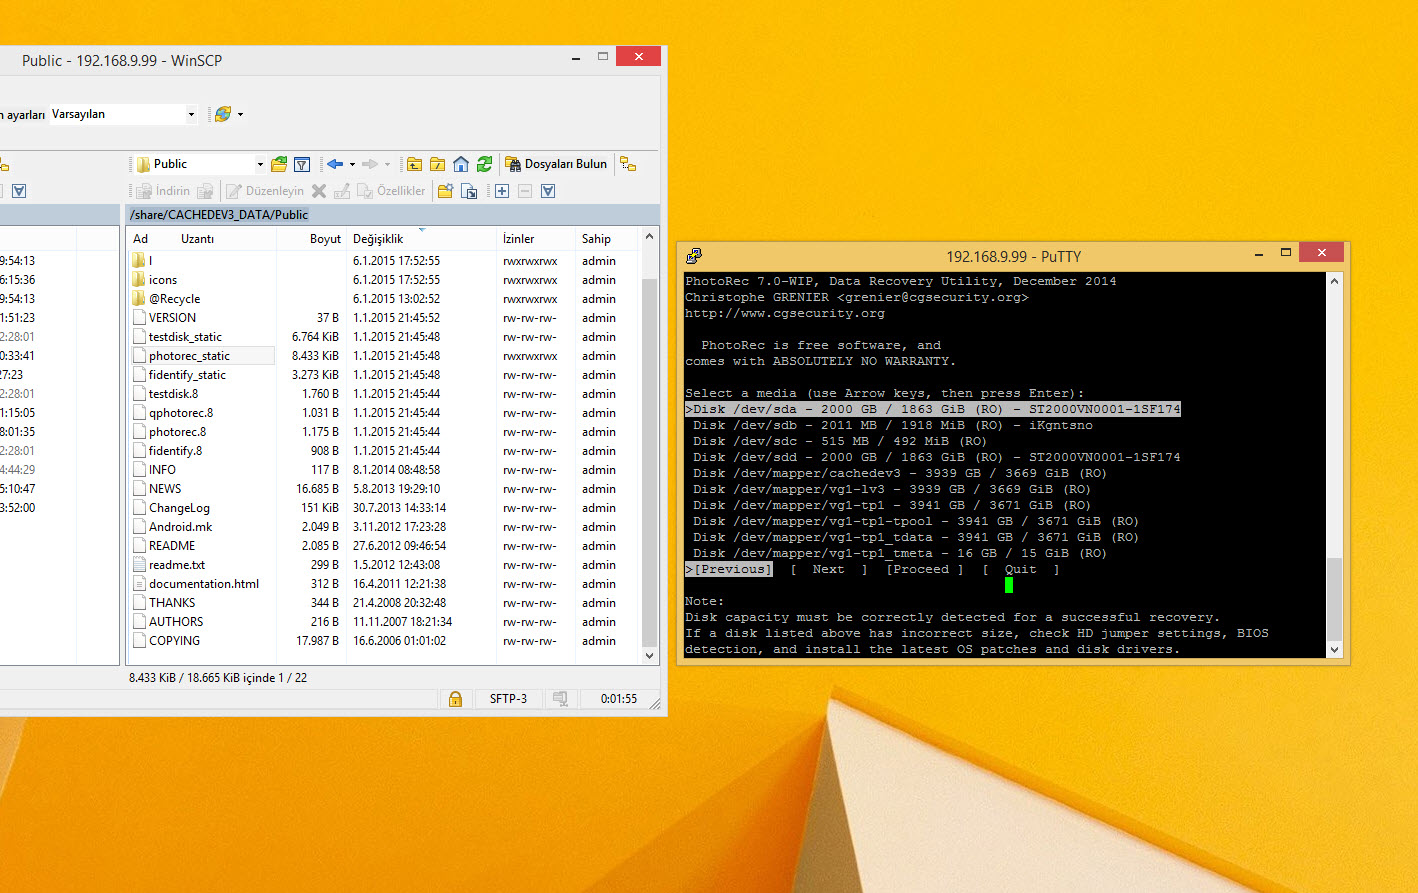
5 – Raise the permissions of the recovery tool (chmod), from 666 to 777 permissions type blue command down below;
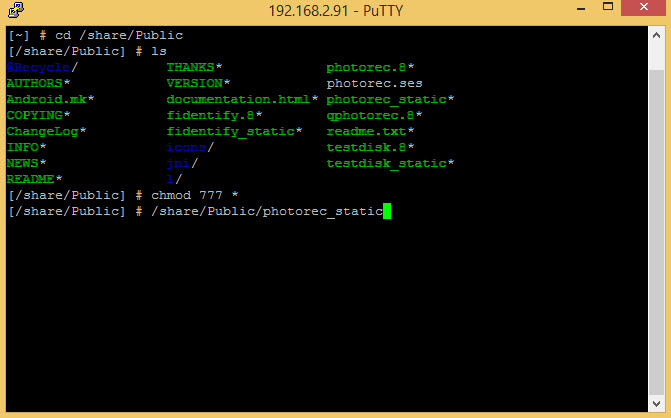
# chmod 777 *
.
6 – Execute PhotoRec Static package by using this command;
# /share/Public/photorec_static
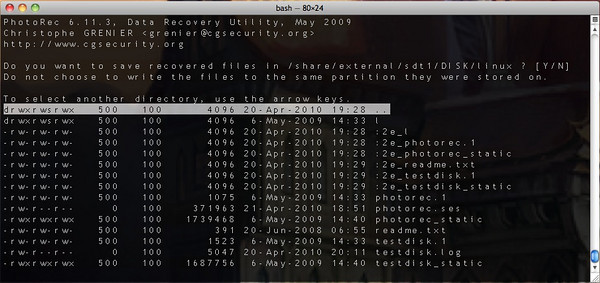
7 – PhotoRec will ask you to create a log file, say yes (this will be stored in the same directory you’re in) – important that you’ve changed directory to the USB drive for this purpose
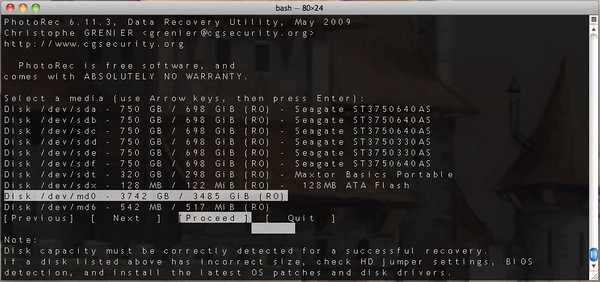
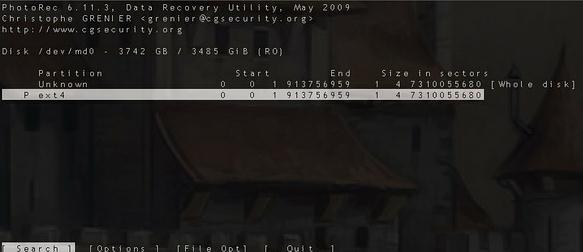
8 – Your hard drives will be shown as below. NOTE: You will see your individual drives – select accordingly if you’re recovering from a single drive. Or as the picture shows below, select the /DEV/MD0 drive which would usually be your entire RAID volume if it’s still in tact. Select your drive and use your right arrow key to highlight PROCEED and hit ENTER
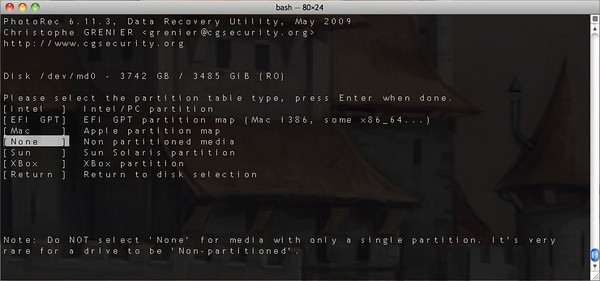
9 – Select your partition type and hit ENTER. Photorec recommends staying with what it has determined on it’s own and defaulted to. In my case it was “None”. Although it also might default to “Intel”
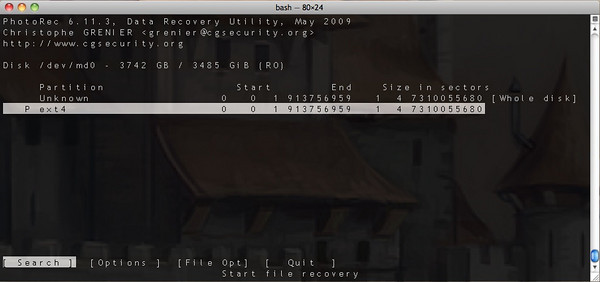
10 – Pick your partition. In my case I had 1 RAID 5 formatted to EXT4, therefore it looked as below; (NOTE: Don’t hit ENTER yet!)
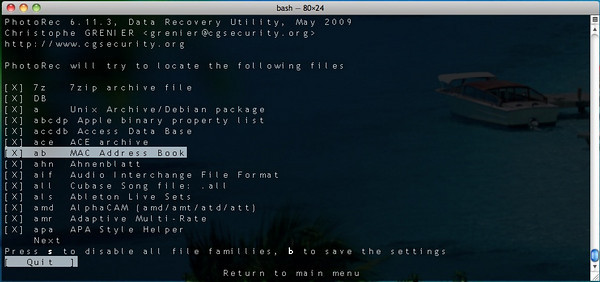
11 – Using your right arrow key, move the bottom menu to “File Opt”. You can also play with “Options” depending on your situation, although the defaults were fine for my use. I would STRONGLY suggest you spend a few minutes on this menu (as below) and De-Select the files that you are not interested in recovering. This will save a LOT of time in the recovery process. Use up and down arrow keys, spacebar to toggle. Press ENTER when done.
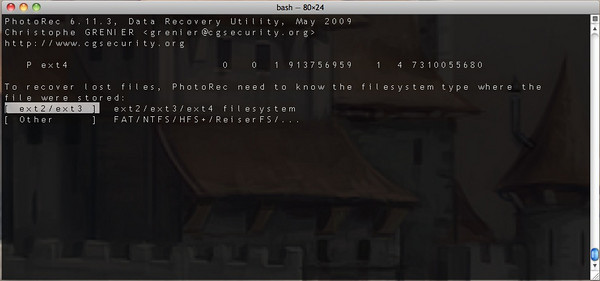
12 – Select the EXT2/EXT3/EXT4 file system on the next menu as below
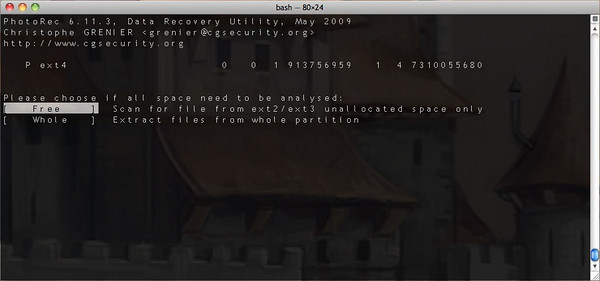
13 – Important option here on the next screen. You’ll have a choice of “Free” or “Whole” to scan. If you’re recovering from a partition corruption etc. you’ll probably want to do Whole. In my case just with file deletion, you will want to choose “Free” to scan for free space only. The Time difference (in my situation) was 320Hrs (Whole) vs. 8Hrs (Free).
14 – IMPORTANT STEP! Use up arrow key and go /share/. then go /share/USBDisk1/ Folder. we’ll recover our files to external disk, not on Qnap! It’s really important, Be careful.
This prompt (below) is asking you where you want the recovered files to be written. Once again you do NOT want these written to your NAS unless it’s on a totally different partition. I’d suggest either different partition or external drive. Use your right and left arrow keys to navigate to the drive where you want the files restored, then press “Y” to start the recovery process. NOTE: When you press “Y”, the recovery process will start. In my case, it ran for almost 9 hours – obviously mileage will vary greatly depending on your options and situation.
This process will create automated and auto numbered directories and file names during the restoration process. Note: Unfortunately your filenames and directory names will NOT be restored. I would install and use an indexing and search engine on your PC and use that to index files and contents of files- this helped me recover the files I was looking for.
I had great success with this process and tool, with restoring over 66,000 files.
I hope this helps someone else in their moment of panic! Feel free to email/respond if you feel my experience can help you in any way.
Cheers!
.
III – Recover Deleted Files From A QNAP NAS (https://cwl.cc)
Recover Deleted Files From A QNAP NAS
There is little worse than having lost data. Nothing can prepare you for what needs to be done – so it’s always good to have options. When presented with catastrophic data loss on a customer’s QNAP NAS device (that had no second copy), I had to work fast and try to recover as much data as possible. My attempt at a restore started from this post in QNAP’s forum and expanded into the steps you see here.
Briefly: I’ll take you through the steps required to download, install and run a recovery application on a QNAP NAS device. You’ll be able to recover the entire RAID partition or deleted files (found in free space on the drive).
Some Important Notes:
– Stop READING or WRITING to the NAS as soon as you can. Stop backups (temporarily) that write to the NAS. No changes mean you’ll get more files.
– This stuff takes a nasty long-ass amount of time, be ready to pull up a chair or possibly a cot
– Do yourself a favor and find the fastest interface of external drive possible. USB 2.0 will be allot slower than an eSata external drive.
– QNAP (in more recent firmware releases) has a Network Recycle Bin feature – having that enabled may prevent this sort of thing.
– This example is run on a QNAP TS-659 Pro, your mileage may vary. I’ve found QNAP NAS devices to be good performers and have a great flexibility of options.
1. Connect an external drive
First, get an external drive connected to the NAS. In my experience external drives “Docks” don’t work as well as simple enclosures. QNAP also has a compatibility list for each NAS device on their site (here’s the one I’ve been working from).
As an example of how tricky this can be: My first attempt was with a Vantec NexStar NST-D100SU external drive dock. The NAS didn’t recognize the drive in this at all. I then connected a Lacie 2TB Porsche Design P’9231 drive to the NAS and it only detected a 620MB drive (not the 2TB, I expected). I then picked up a Western Digital My Book Live 2 TB drive, connected it and saw the full 2TB. Both are USB 2, and as “close to” compatible as I could find.
You may not find the exact same thing, but if you look for something in the same brand or similar type range as this, you’ll be better off than just a random external drive enclosure.
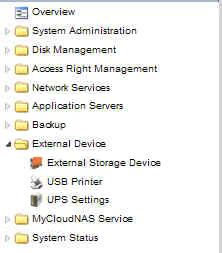
Connect the drive and make sure you see in the administration web front-end (usually in the menu under -> External Drive –> External Storage Device. When your QNAP NAS recognizes this drive, it will be listed as USBdisk1.
Once connected, format this drive EXT4 using the entire drive’s space. pay attention to that space because it will need to cover all of the space you’re trying to recover. Once that is done, your new drive will be mounted as the share USBdisk1 – What I do is use the share admin tool in the web admin to make sure I have access to read and write files in that share.
2. Get the recovery software
![]() You’ll need an application to run the recovery process with. This is called PhotoRec and it comes in the TestDisk package. You can download it here. I used the Linux i386 version shown at left. This is going to run locally on your QNAP NAS device. Once you have that compressed file, create a directory
You’ll need an application to run the recovery process with. This is called PhotoRec and it comes in the TestDisk package. You can download it here. I used the Linux i386 version shown at left. This is going to run locally on your QNAP NAS device. Once you have that compressed file, create a directory
3. Get an SSH tool and connect
If you’re running Windows (in my case I am), go grab the tool called Putty (download here) which will let you connect to a secure shell of your NAS device. Using a Mac? You’ll do this with the Terminal application. Once you’re ready, connect to the NAS’s IP using SSH and the admin login and password for the NAS (if I recall, QNAP’s defaults are a user of admin and password of admin).
4. Run the recovery
This one takes several sub-steps, and will all happen in your SSH window.
- Change (cd) to the folder where you’ve stored the files downloaded in step 2. In may case I had them in /USBdisk1/rec – so I changed to that directory.
- Raise the permissions of the recovery tool (chmod), you just want to run it, so as a quick way to get going, give everything 777 permissions (chmod 777 *).
- Run PhotoRec (photorec_static) in the shell by issuing a ./photorec_static command
- PhotoRec: If you’re ask to create a log file, say yes
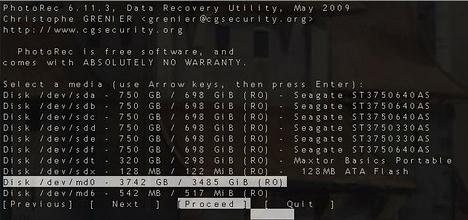
- You’ll see a huge list of drives, you’ll want to move down to highlight the /dev/md0 – which would likely be your RAID Drive. Once highlighted, move your cursor down to “Proceed” and press enter.
- If you’ve lost the partition, PhotoRec will ask you to describe it (I would choose the defaults). In my case, this part didn’t come up.
- Next, your going to see a screen that gives you the choice of partition or whole disk. Highlight the partition and then move the cursor to file opt. This is important because you’ll be able to choose different file types that you want the application to search through. This will also help if you’re external drive isn’t completely as big as you want it to be.
- Next, select the EXT3/EXT4/… file system
- Then, choose to look at free space (good for mistakenly deleted files) or the whole partition, likely better for a corrupted volume. In my case I was looking through free space.
- The next screen will ask you where to put the extracted files – MAKE SURE you aren’t placing them on the NAS, use (in out example) /share/USBdisk1
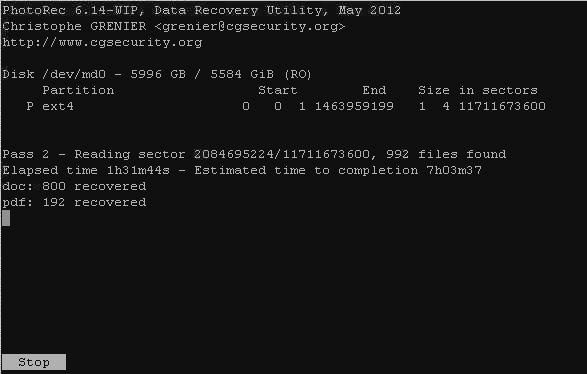
- Now, your ready to proceed. All goes well, this process will start creating files on your recently connected USB disk. Run times will vary, but as you see below, I’m looking at 7 more hours.
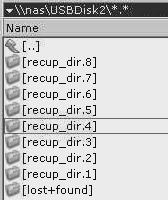
When files start coming out, PhotoRec will start creating directories with 500 files each in the location you selected. They’ll start looking like this:
The trouble is, you won’t be able to determine the file name for most of them or the content. So, one method I’ve seen mentioned is to place them in a document indexer (Like Microsoft Search) and use that to search details and content of the files.
So, that’s the story. This doesn’t take into account the process of a full drive restore or using other tools. For further reading, take a look at this forum topic on QNAP’s website. The author’s inspired my attempt at recovering using this method, and ultimately this article.
.
IV – How To Solve “photorec_static ermission denied” Error;
How to Change permission for this file;
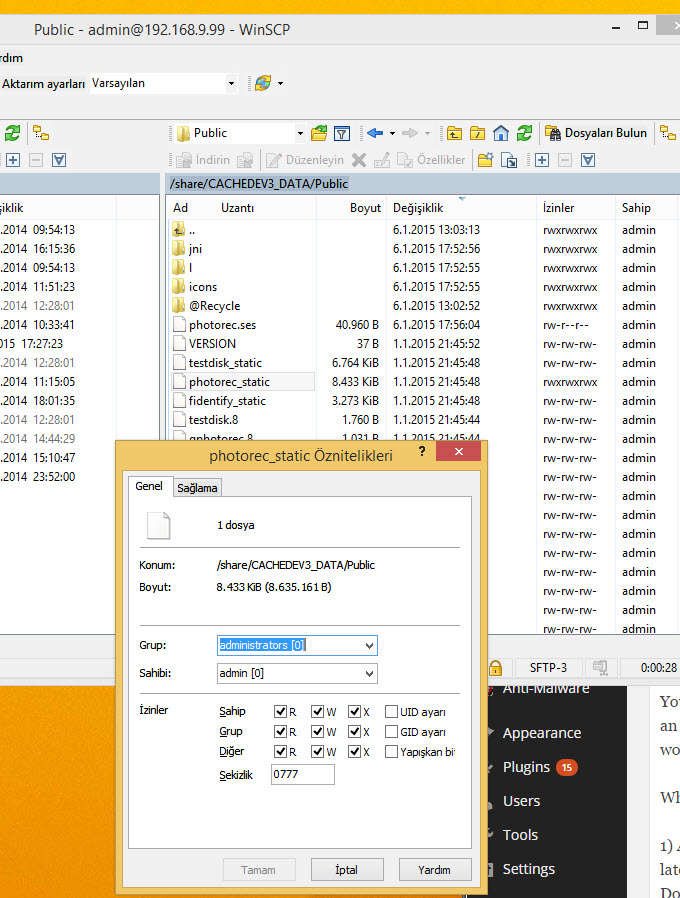
1 – Connect Qnap via Winscp

.
2 – Right cliok on “photorec static”
.
3 – change permissions 0666 to 0777. Now this should work!

hi, i want to try this method
I think I deleted my files or have trouble making raid5
Could you help me?
Hi,
In Turkey our company doesnt allow us to help this kind of recovery process, so If you are not good at Linux commands I advice you to use R-Stuio.
Its really easy to use and you can easly find lots of document with a little google search!
Thank you very much, it really helped!
Ran it on TS-869 Pro with 8 x 3Tb in RAID 6 – worked perfectly, but took almost 3 days.
First of all excuse my english
Thanx for this guide, i followed step by step and i recovered folders and files deleted by error.
I just wanted to make a aportacion: in step three, when I execute photorec or testdisk, i get a permission denied message, so you will need to chmod the testdisk folder before execute it.
Dear Kiko;
Your definetly right, so I fix this document once again.
I tried to run photorec on my QNAP TS212P but got this error: cannot execute binary file
Do I need to use this version instead of the x86_64 version (from the TestDisk/PhotoRec downloads page):
Marvell 88F628x Linux 2.6.32 Synology DS111, DS211, DS212+ NAS, Seagate BlackArmor NAS 220, QNAP ARM based including TS-410
Hey;
+Before trying to recovery, can you check if your files still in your NAS or not?
http://qnapsupport.net/?page_id=440
+For photorec, try to install “Linux, kernel 2.6.x i386 version and it should work!”
+Also no need to panic; you can easly restore datas with recovery softwares on 1 or 2 HDD models. If you have RAID 1 or single HDD, just plugin HDD to a PC and follow my “I Accidently Delete a file, so is there a Chance to Recover Datas?” R-Studio Recovery document;
http://qnapsupport.net/?page_id=318
+If you have RAID 0, you should plug both HDD’s on PC.
http://qnapsupport.net/?page_id=596
Ps: Plug out HDD when Qnap power is off, and before power on your NAS again, plugin back HDDs back again to the same slots;
Pingback: how to recover deleted photos from android - android firmware download | android firmware download
Hi, do you have a way to submit questions? I had typed up a comment/question earlier here but I think it got lost or didn’t submit correctly. I typed up my question on the QNAP forums but I haven’t gotten any response.
http://forum.qnap.com/viewtopic.php?f=25&t=119724
I am trying to figure out what has happened to my drive and the best way to recover it. I am running Test Disk partition recovery on it now to see what it finds. It does show some partitions on it but only the “qnap” files show in the first partition so that is why I am running a deep analysis but it will probably take until the end of the weekend to finish..
Hi, will this process overwrite the contents of my external drive?
No, but you better use a fresh external HDD
So I went through everything you mentioned here and read all the comments. Nothing worked. I even tried installing all of this into the sbin folder. I tried the 64 bit, and the NAS one for Synology and Qnap. Still nothing. The file would not execute. Then I tried the 32 bit version because I have the same exact Qnap TS-695 Pro. Picked it up on Ebay.
The 32 bit version of this app worked perfect, just perfect.
There is more to this story. Recovering 3 gig takes 20 days on a slow system and 10 days on a kick ass I7. The issue is who wants to leave their computer running for 20 days straight? Well guess what? The Qnap mentioned above has a VGA port and it displays console/terminal ssh. So all you have to do is plug in a USB keyboard, connect the VGA port to a monitor, and do all this from the Qnap device. That way you don’t sacrifice 20 days of your PC/server to recover the files. Let the NAS device do it for you. When you disconnect the VGA monitor and keyboard the NAS continues extracting. When you reconnect and touch any button but the Enter key, it refreshes and your session is still running. Nothing shy of awesome in my book. I spent four days trying to figure out how not to tie up my PC’s to accomplish this.
20 Days for 3GB , wow thats a long time
I had unintentionally sent around 600GB to the Qnap Recycle bin and for some weird reason the NAS screwed my Data , so to recover this data , based on what your saying (in theory) I would have to let in run for 4000 Days or 10 Years to recover it all
Shall I post back in 10 years to tell you how I get on ?
So my deleted 600GB would take 10 years in theory ?
Hello,
does photorec work on a QNAP based on ARM ?
Thanks for your reply.
Julien
For anyone who needs to recover files on an ARM based Qnap (TS212 for example), download the “Marvell 88F628x Linux 2.6.32″ version from the Testdisk page.
After you have copied the folder to the QNAP and carried out the chmod function you will probably encounter an error like “Terminfo file is missing” when trying to run photorec.
If you run these two commands and try running photorec after, it should work…
export TERM=linux
export TERMINFO_DIRS=./
./photorec
Hope this helps!
Sürekli olarak bu hatayı alıyorum. Linx sistemlere ve Putty kullanımına yabancı değilim..
-sh: /share/Public/photorec_static: cannot execute binary file
[/share/Public] #
Hi. I get stuck at [Run PhotoRec (photorec_static) in the shell by issuing a ./photorec_static command] with an error of cannot execute binary file. Can you give a hint?