I - Quick Setup for QNAP ZFS Supported ES (Enterprise Storage) Series NAS
.
I - Quick Setup for QNAP ZFS Supported ES (Enterprise Storage) Series NAS
Introduction to the QNAP ES NAS
The QNAP ES NAS is a high-availability enterprise storage system designed to support dual storage controllers and simplify management efficiency in a budget-friendly manner. The ES NAS is suitable for a wide range of workloads in enterprise cloud environments and is a best-of-breed multiprotocol storage in an iSCSI SAN environment. From the advanced ZFS-based QES NAS operating system and near-unlimited number of snapshots to its native inline file compression and deduplication support, the ES NAS is equipped with enterprise-class hardware and software. QES is also based on the user-friendly QTS NAS operating system, which enables consolidated management of various storage systems across different product lines and reduces the learning curve of users. In addition, the ES NAS can accommodate any number of SSDs. Implementing a read cache across an array of SSDs is the most common method to accelerate application performance and resolve increased workloads during workload ramp-up, and unexpected resource usage spikes.
The dual controller is powered by an Intel ® Xeon® E5 processor with 96GB RAM (48GB per controller). This superior computing power enables faster movement of data between different components of the system. As a result, the read and write performance for I/O requests is also improved. The employment of BBU and NVRAM protects the data in the DRAM if a power supply failure should occur. The cable-less design throughout the entire system assists in heat dissipation and improves overall reliability. Furthermore, the Field Replaceable Unit (FRU) design in many of its hardware components allows you to replace damaged parts – including storage controllers, fan modules, power supply units, and battery backup units (BBU) – to attain a higher level of system serviceability and reliability.

Basic configuration and preparation for installation
The high-availability architecture of the ES NAS
To fully benefit from the high-availability capabilities with multiple-port and multiple-host support of the ES NAS, the overall network layout (including the ES NAS, host servers, switches, etc) must be configured in a way that eliminates single points of failure. The following is an example of a network configuration that supports high availability architecture:
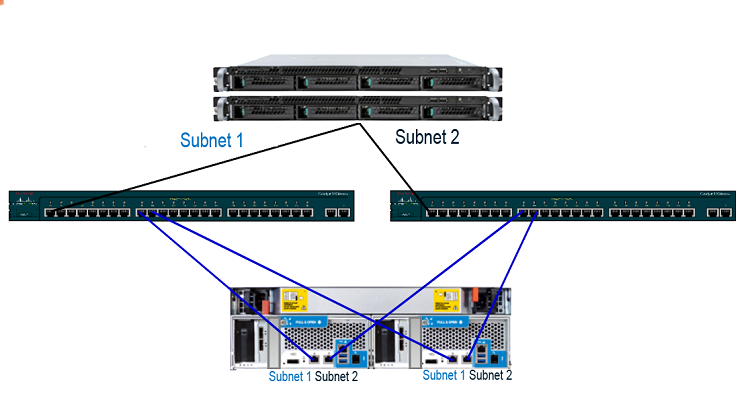
- 1st-tier failover implementation (server cluster): Deploy at least 2 host servers (with VMware ESXi or Microsoft Windows Hyper-V installed) to form a failover cluster so that if one server fails, the other can assume its role.
- 2nd-tier failover implementation (redundant network switches): The above figure shows a configuration with two hosts connecting to two Ethernet switches – both of which provide connections to both controllers.
- 3rd-tier failover implementation (dual-controller ES NAS): The dual-controller ES NAS has two active controllers that can be used simultaneously for load balancing and failover. With these three implementations, there is no single point of failure between the storage and servers.
- 4th-tier failover implementation (RAID): Using appropriate RAID configurations can protect against data loss if a disk fails. The ES NAS is built with ZFS’s RAID scheme.
- 5th-tier failover implementation (dual redundant power supplies): Both power supplies provide power concurrently to ensure that if one fails the system will remain online.
Disk drives and installation
The ES NAS series supports solid-state drives (SSD) and hard disk drives (HDD). The ES NAS natively supports Serial Attached SCSI (SAS) HDD/SSDs. To use SATA HDDS, users must purchase additional SAS-to-SATA interposer cards. The ES NAS series supports the following storage configurations:
- All-SSD arrays: SSDs are the best choice for I/O-intensive workloads and business-critical storage solutions. In addition, implementing a read cache across an SSD array is the most common solution to accommodate increased workloads. The ES NAS supports an SSD read cache to maintain the required IOPS.
- Intermix of SSDs and HDDs: The ES NAS supports all-SSD drives as well as intermix of SSDs and HDDs for balancing cost and performance requirements for a variety of usage cases such as virtual desktop infrastructure (VDI) and web servers.
- All-HDD arrays: This configuration offers the best cost/capacity ratio. It is suitable for storing infrequently-accessed “cold” data. It is also suitable for sequential workloads such as video editing and surveillance applications.
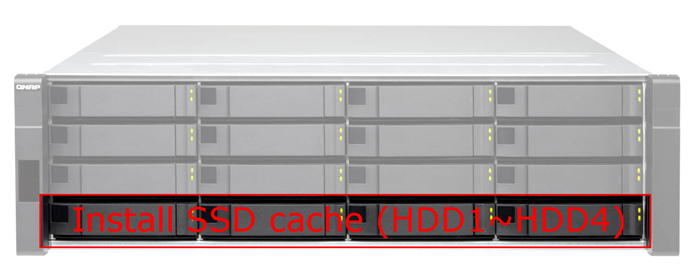
We recommend implementing an intermix of HDDs and SSDs with cache acceleration. For this type of configuration, SSDs should be installed in the bottom row of the NAS (bays 1 to 4). The ES NAS will use HDD1~HDD4 for system configuration and cache and HDD5~HDD16 for data storage. This type of configuration prevents the interference of the storage pool management with QES system operations. The disks that are used for data storage can also be easily migrated to another storage system.
Search and install the NAS with Qfinder Pro
Qfinder Pro is a utility that allows you to quickly search and manage your QNAP NAS under the same network. With Qfinder Pro, you will never need to memorize the IP addresses of QNAP NAS in your LAN. We recommend installing this utility and using it to search and set up your NAS.
Download and install Qfinder Pro
Go to the QNAP website and download Qfinder Pro for your operating system:
https://www.qnap.com/i/en/utility/
Follow the instructions to install Qfinder Pro.
- Run the QNAP Qfinder. If the QNAP Qfinder is blocked by your firewall, unblock the utility first.
- Select the installation language. It is recommended to close all other running programs before you proceed.
- Read the license agreement, check “I accept the terms of the License Agreement,” and click “Next”.
- Select if you would like to create Desktop Shortcuts or Quick Launch Shortcuts. Then click “Next”.
- Choose the Installation location and click “Next”.
- Click “Finish” to finish the installation.
Search and connect to a NAS via Qfinder Pro
1. Open Qfinder Pro, then it will automatically search for QNAP NAS in your local network. You should see two IP addresses for the two controllers of the same ES NAS. The status shows “?” to indicate that the ES NAS hasn’t been configured before. It also shows that the default IP addresses for the two controllers are: 169.254.100.100 and 169.254.100.101.
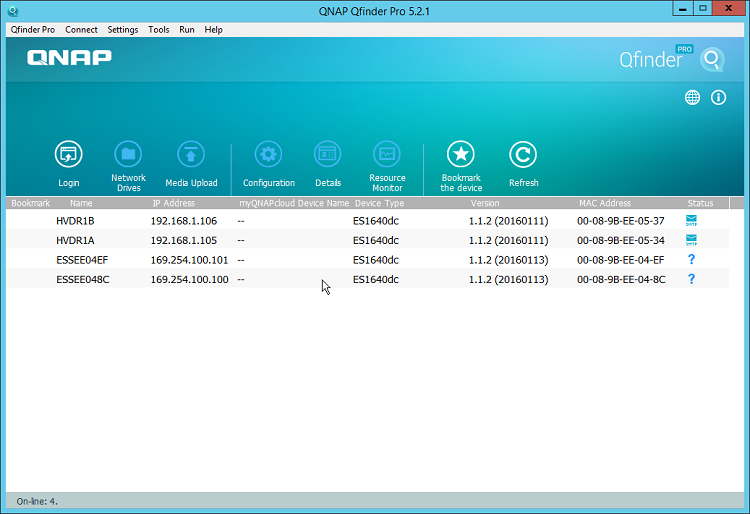
Note: If you cannot find your NAS, please ensure that your computer is on the same network as your NAS. (The default IP addresses for the two controllers are: 169.254.100.100 and 169.254.100.101.) For instructions on how to configure a static IP Address on your Windows, please visit the Microsoft TechNet website: https://technet.microsoft.com/en-us/library/cc754203(v=ws.10).aspx
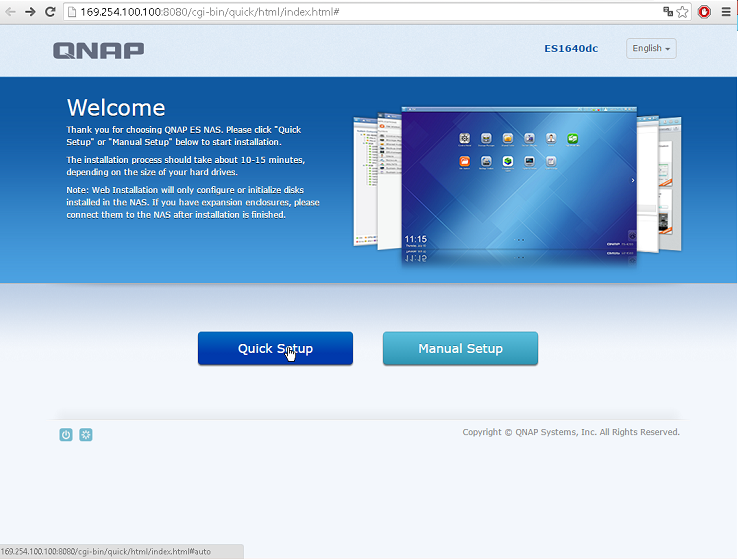
2. After installing Qfinder Pro, launch it to search for your NAS. Double click on your NAS in Qfinder Pro to start the Smart Installation Guide. Follow the on-screen instructions and the Qfinder Pro Setup Wizard will guide you through the setup process. Click “Quick Setup” to run basic setup for NAS initialization or “Manual Setup” to configure the NAS with more advanced settings.
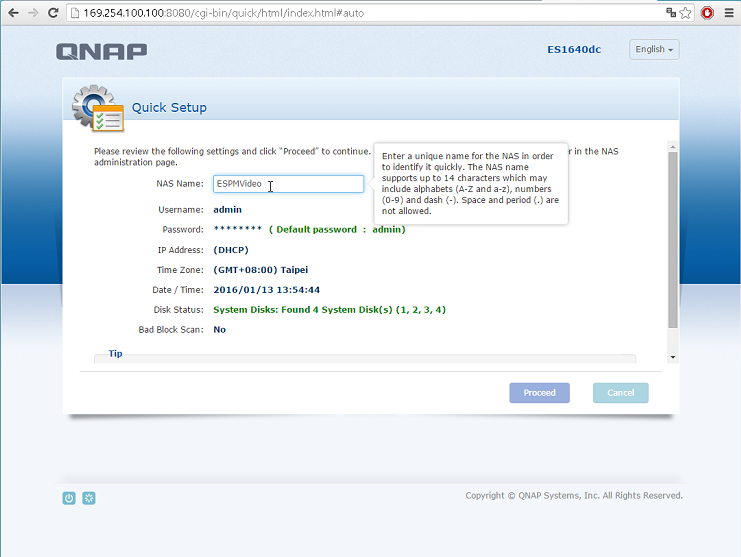
3. You can configure basic settings on this page, including IP addressing and the username and password. Click on the field to modify its setting and then click “Proceed”.
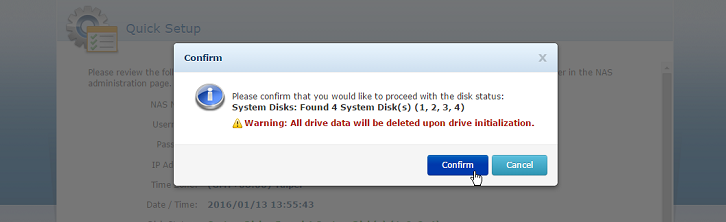
4. A confirmation screen appears. Click “OK” to confirm initializing the system drives. Click “Cancel” to cancel initializing the system drives.
5. The NAS will reboot now.

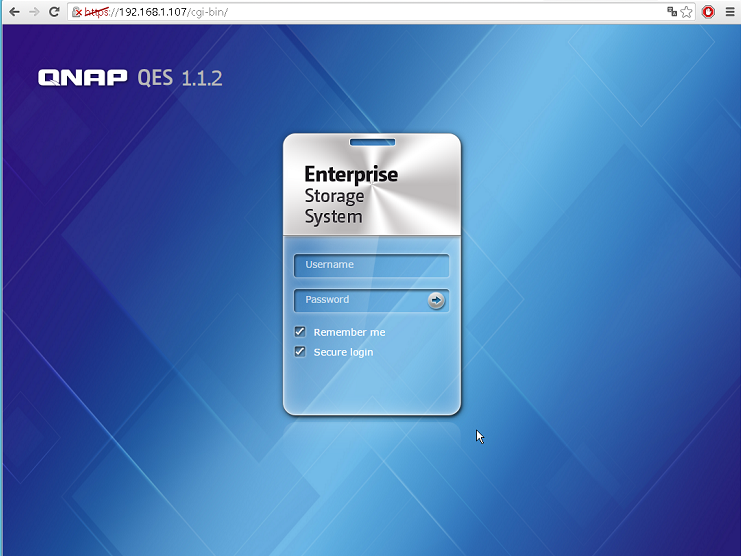
6. After the reboot completes, double click on your NAS in Qfinder Pro to go to the login page. Log into QES with your QES account username and password (the default username and password is admin/admin).
7. The system will prompt you for confirmation of disk initialization if there are raw disks found. Click “Yes” to continue disk initialization and “No” to abort this operation.
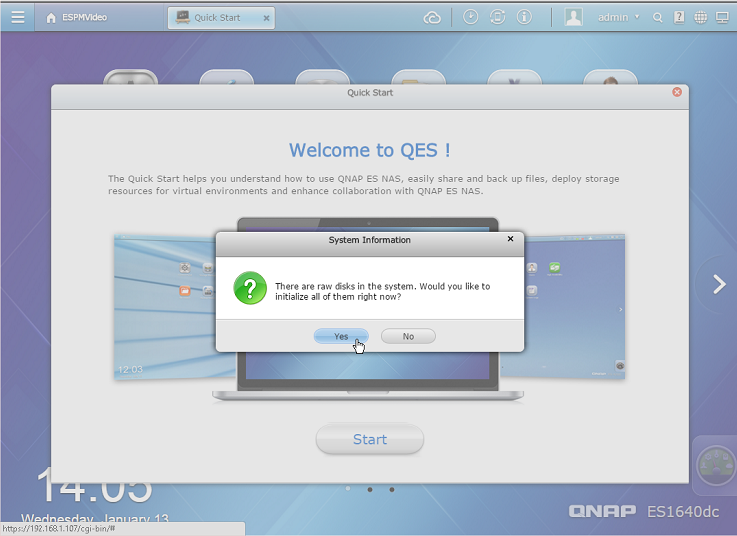
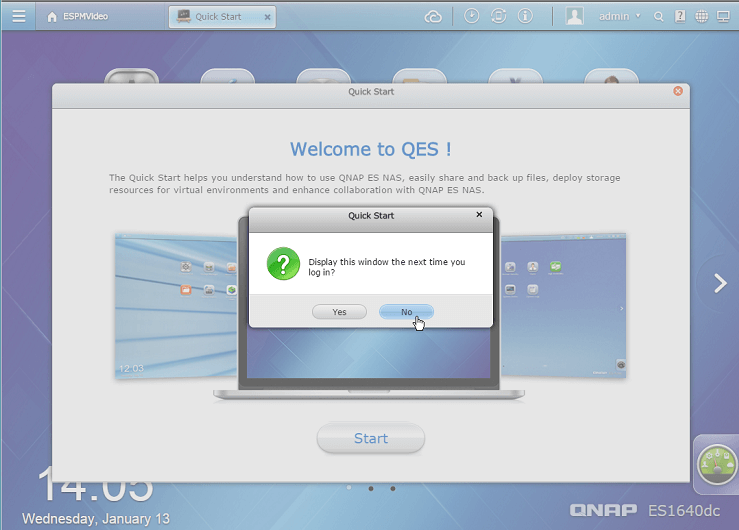
8. The Welcome screen displays. Click “x” in the upper right corner. Then choose whether to display the Welcome screen next time you log in.

https://www.qnap.com/i/en/tutorial/con_show.php?op=showone&cid=226
.
