+"Lun Stuck At Removing & Other Qnap iSCSI Lun Problems" document added;
http://qnapsupport.net/lun-stuck-at-removing-other-qnap-iscsi-lun-problems/
+"High CPU & RAM Usage Problems & How To Understand Which Service Use Resource" Document added;
http://qnapsupport.net/high-cpu-ram-usage-problems-how-to-understand-which-service-use-resource/
+"The File or Directory is Corrupted and Unreadable Error On iSCSI Lun Folder" Document added
http://qnapsupport.net/the-file-or-directory-is-corrupted-and-unreadable-error-on-iscsi-lun-folder/
+"How To Hide Folder & Disable Recycle Bin For Other Users" Document added;
http://qnapsupport.net/how-to-hide-folder-disable-recycle-bin-for-other-users/
+"How To Mount Qnap ISCSI Lun On NAS & Backup To Azure?" Document Added
http://qnapsupport.net/how-to-mount-qnap-iscsi-lun-on-nas-backup-to-azure/
+"Backup Job Unsupported Filenames Problem: “Warning: Skip the /nas/Backup/folder1/.streams” file which has an unsupported filename!" Document Added;
http://qnapsupport.net/backup-job-unsupported-filenames-problem-warning-skip-the-nasbackupfolder1-streams-file-which-has-an-unsupported-filename/
+"MySQL Problems, Cannot Access SQL Server After Update Firmware & How to Solve" Document extended;
http://qnapsupport.net/mysql-problems-how-to-solve/
+"Qnap Windows Access Smb 1.0 Share Problem After Windows Wannacry Update Patch" Document added
http://qnapsupport.net/qnap-windows-access-smb-1-0-share-problem-after-windows-wannacry-update-patch/
+"How To Recover Unreachible NAS with “Restore Factory Settings” Feature" Document added;
http://qnapsupport.net/how-to-recover-unreachible-nas-with-restore-factory-settings-feature/
+"Windows Server 2012/2008 iSCSI Lun File Problems: How To Start chkdsk Command" Document added;
http://qnapsupport.net/windows-server-lun-file-system-problems/
+"How To Stop Every Day At 02.00 Am “[Volume Volume1, Pool 1] Start To Reclaim Volume” Process" Document Added;
http://qnapsupport.net/how-to-stop-every-day-at-02-00-am-volume-volume1-pool-1-start-to-reclaim-volume-process/
+"Qnap Reboot Itself Randomly Even There is No Problem on RAID, What Should I Do?" Document extended
http://qnapsupport.net/qnap-reboot-itself-randomly-even-there-is-no-problem-on-raid-what-should-i-do/
+"Error Page Not Found Or The Web Server Is Currently Unavabile. Please Contact The Website Admin For Help" Document added;
http://qnapsupport.net/error-page-not-found-or-the-web-server-is-currently-unavabile-please-contact-the-website-admin-for-help/
+"How To Unmap Lun, Move Lun To Another Target or Delete Lun on Qnap" Document added;
http://qnapsupport.net/how-to-unmap-lun-move-lun-to-another-target-or-delete-lun-on-qnap/
+"Qnap Smb Service Totaly Broken After Firmware Update? How To Fix" document extended;
http://qnapsupport.net/enable-trusted-domains-doesnt-work-how-to-reinstall-to-fix-smb/
+"How To Purchase And Use myQNAPcloud SSL Certificates & How To Use SSL Certificates" Document Added;
http://qnapsupport.net/how-to-purchase-and-use-myqnapcloud-ssl-certificates-how-to-use-ssl-certificates/
+"Load Balance Setup: Which Is The Best Port Trunking Option?" Document Added;
http://qnapsupport.net/load-balance-setup-which-is-the-best-port-trunking-option/
+"Qsync Failed To Inıtialize Problem & How To Restore Homes Folder" Document fixed;
http://qnapsupport.net/qnap-qsync-problems-and-how-to-fix/
+" Qnap Blue Login Screen Problem" Document Added;
http://qnapsupport.net/qnap-blue-login-screen-problem/
+"Cannot Access NAS With \\NasName But Can Access Via \\IPAdress. Why?" Document Added;
http://qnapsupport.net/cannot-access-nas-with-nasname-but-can-access-via-ipadress-why/?lang=en
+"Qnap SMB / Cifs Backup Fails To Connect, Even Test Connection Seems Ok?" Document added;
http://qnapsupport.net/qnap-smb-cifs-backup-fails/?lang=en
+"Virtual Switch Blank Page Problem, How To Reinstall Network Config & “You don’t have permission to access /apps/netmgr/ on this server” Problem" Document added;
http://qnapsupport.net/virtual-switch-blank-page-problem-how-to-reinstall-network-config-you-dont-have-permission-to-access-appsnetmgr-on-this-server-problem/?lang=en
+"How To Create Multi Volume/Second RAID And Upload Folders To This Second RAID/Volume" Document added;
http://qnapsupport.net/how-to-create-multi-volumesecond-raid-and-upload-folders-to-this-second-raidvolume/?lang=en
+"What is QPKG & How To Install Application Manually & How To Reinstall App Center" Document Extended
http://qnapsupport.net/what-is-qpkg-how-to-use/?lang=en
+"Container Station Problems & How To Fix" Docuement Added;
http://qnapsupport.net/container-station-problemleri-ve-cozumu/
+"Read I/O error, sense_key=0×0, asc=0×0, ascq=0×0, CDB=28 00 57 09 ed 18 00 00 10 00 Errors & How To Fix" Document Added;
http://qnapsupport.net/read-io-error-sense_key0x0-asc0x0-ascq0x0-cdb28-00-57-09-ed-18-00-00-10-00-errors-how-to-fix/?lang=en
+"Qnap Lun Free Size Is Not Same on Windows ISCSI Disk? How To Fix Qnap Lun Dead Space" Document Added;
http://qnapsupport.net/qnap-lun-free-size-is-not-same-on-windows-iscsi-disk-how-to-fix-qnap-lun-dead-space/?lang=en
+"myQNAPcloud Name Registration Problems & How To Solve" Document Added;
http://qnapsupport.net/myqnapcloud-kayit-etme-problemleri-ve-cozumleri/
+"How To Be Sure If Its Qnap Hardware or HDD Issue?" Document Added
http://qnapsupport.net/how-to-be-sure-if-its-hdd-problem/?lang=en
+"Windows 7 / Windows 10 Backup Cannot Save To A Network Location On NAS, How To Solve!" Document Added;
http://qnapsupport.net/windows-7-windows-10-backup-isleminde-cannot-save-to-a-network-location-hatasi/
+"Qnap Exel / Word Files “Access Denied. Contact Your Administrator” Problem & How To Solve" Document added;
http://qnapsupport.net/qnap-exel-word-files-access-denied-contact-your-administrator-problem-how-to-solve/?lang=en
+"Qnap “System Reserved” Storage Takes Too Much Space? What Is Sys. Reserverd And How To Fix This" Document Added;
http://qnapsupport.net/qnap-system-reserved-storage-takes-too-much-space-what-is-sys-reserverd-and-how-to-fix-this/?lang=en
+"Qnap Login Interface Blue Screen Error After Firmware Upgrade & How To Solve" Document Added;
http://qnapsupport.net/qnap-login-interface-blue-screen-error-after-firmware-upgrade-how-to-solve/?lang=en
+"RAID Seems Unmounted and Mounting Volume Failed; How To Start e2fsck Command And Mount Volume" Document extended;
http://qnapsupport.net/raid-seems-unmounted-and-mounting-volume-failed-how-to-start-e2fsck-command-and-mount-volume/?lang=en
+"Qnapcloud UPnP Router Problem; I Can Access NAS Via Cloudlink, But name.myqnapcloud.com Doestn Work?" Document renewed!
http://qnapsupport.net/qnapcloud-upnp-router-problem-i-can-access-nas-via-cloudlink-but-name-myqnapcloud-com-doestn-work/?lang=en
+"How To Remove Second Volume And Expand First Volume Capacity" Document Added;
http://qnapsupport.net/how-to-remove-second-volume-and-expand-first-volume-capacity/?lang=en
+"Issue of Cloud Drive Sync Problems & How To Solve" Document Added;
http://qnapsupport.net/issue-of-cloud-drive-sync-problems-how-to-solve/?lang=en
+"PhotoStation Errors and How To Reinstall Database; Thumbnail Generation Failed A Few Photos, No Folder View And Albums Empty After Firmware, Photo Station Albums Gone, Photostation Not Showing All Files" Document Added;
http://qnapsupport.net/photostation-errors-and-how-to-reinstall-database/?lang=en
+"Container Station Only Shows My Nas And The Refresh İcon, But No Folders At All… How To Fix" Document added;
http://qnapsupport.net/container-station-only-shows-my-nas-and-the-refresh-icon-but-no-folders-at-all-how-to-fix/?lang=en
+"About Qnap Warranty Issue" Document Added;
http://qnapsupport.net/about-qnap-warranty-issues/?lang=en
+"Qnap Unable To Play MKV Files Anymore After Firmware Update And Gives “The Video Does Not Support Online Playback or Does Not Exist” Error?" Docuemnt Added;
http://qnapsupport.net/qnap-unable-to-play-mkv-files-anymore-after-firmware-update-and-gives-the-video-does-not-support-online-playback-or-does-not-exist-error/?lang=en
+"Qnap Download Station Stops Working Suddeny And Gives This Error; Download Station Is Currently Offline" Document Added;
http://qnapsupport.net/qnap-download-station-stops-working-suddeny-and-gives-download-station-is-currently-offline/?lang=en
+"RAID Seems Unmounted and Mounting Volume Failed; How To Start e2fsck Command And Mount Volume" Document Added;
http://qnapsupport.net/raid-seems-unmounted-and-mounting-volume-failed-how-to-start-e2fsck-command-and-mount-volume/
+"How To Understant Which Broken HDD Cause RAID Rebuilding Process Slow Down" Document Added;
http://qnapsupport.net/how-to-understant-which-broken-hdd-cause-raid-rebuilding-process-slow-down/
+"How To Add Or Remove Spare Disk From RAID" Document Added;
http://qnapsupport.net/how-to-add-or-remove-spare-disk-from-raid/?lang=en


worked brilliantly. Thanks for the help
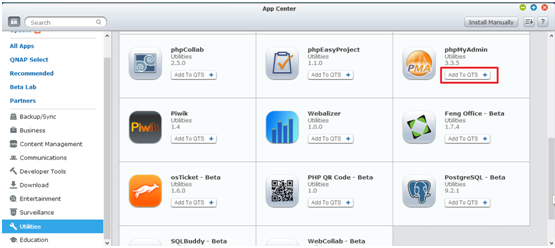
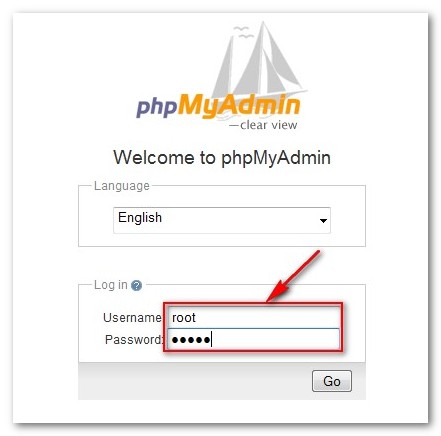
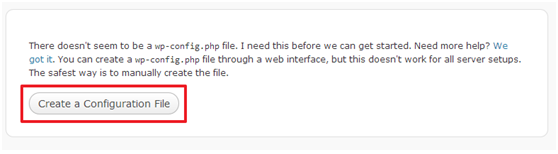
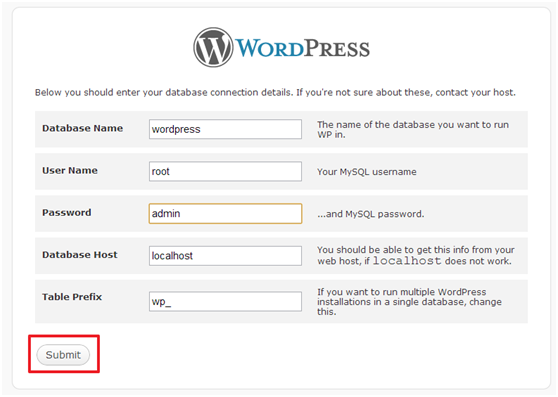
Hi, the tutorial is good, but prior to all you need to aktivite MySql Server in the Qnap. The error in loginpage from phpmyadmin is that the password is false.
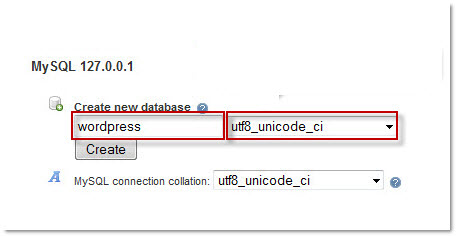
And what is the correct order of Installation. I think first activate MySQL, then install MyPhpadmin and create the wordpress Database, at last install WordPress.
Greeting Thomas
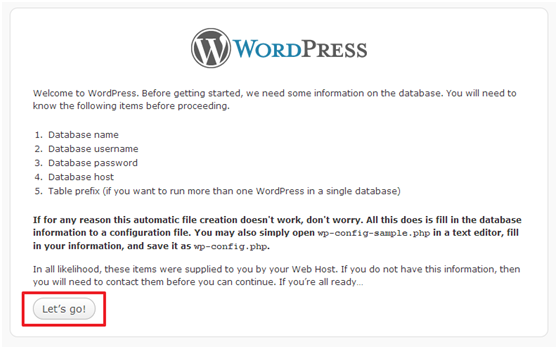
I used the procedure above to create a site, but when I view it I need to add http://mysite.net/WordPress to see the site. Is there a way to set the QNAP web serve up to load WordPress with this reference. http:/mysite.net/?
Thanks
You have to setup your virtual host under web server – 2nd page – little tabs at the top.