I – Turn Your SmartPhone To Ip Camere With Vcam Application
II – Use Your Webcam As IP Camera
.
I – Turn Your SmartPhone To Ip Camere With Vcam Application
Overview
The Vcam mobile app can turn your mobile device into a network camera. With the Vcam mobile app, you can record any moment around you to your Turbo NAS. The Vcam solution provides a great way to deploy a home surveillance system without purchasing expensive IP cameras.
Starting Vcam
Please make sure Vcam is installed on your mobile device. You can install the QNAP mobile app “Vcam” from Google Play or the Apple App Store.
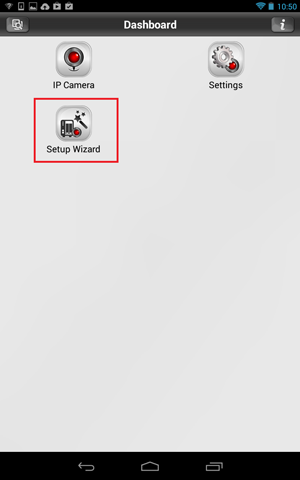
Please click “Setup Wizard” to enter the Vcam quick setup wizard.
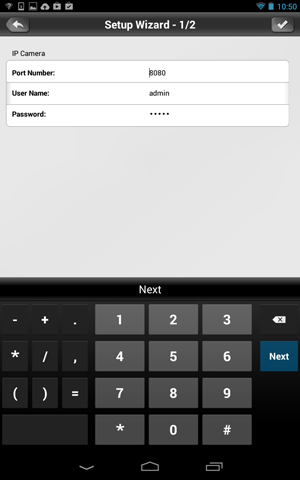
Please enter the “Port number”, “User Name” and “Password”. Then click “Next” to go to the next page. The port number must be within range of “1025 ~ 65535”.
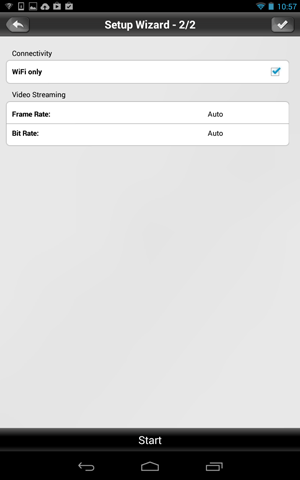
You can configure the Connectivity and Video Streaming here. You can choose “WiFi only” or “3G and WiFi”. We recommend that you choose “WiFi only” here. Vcam will use only mobile devices that have WiFi connectivity.
After you finish configuration, please click “Start” to Vcam.
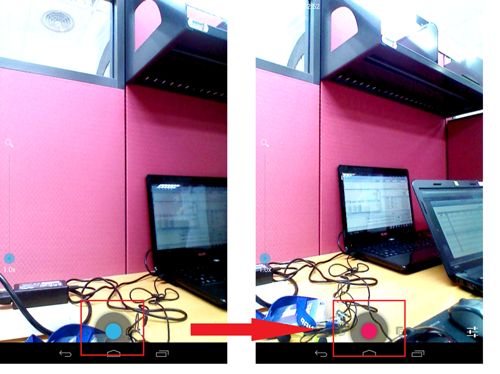
Press the Blue Button to enable recording. If the button turns red then it is ready to record.
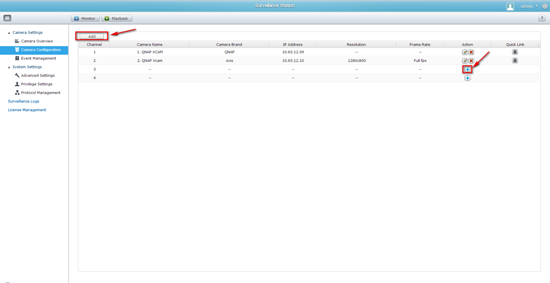
Please go to “Surveillance Settings” > “Camera Settings” > “Camera Configuration” > “Add” or click the “ ” to add the Vcam camera.
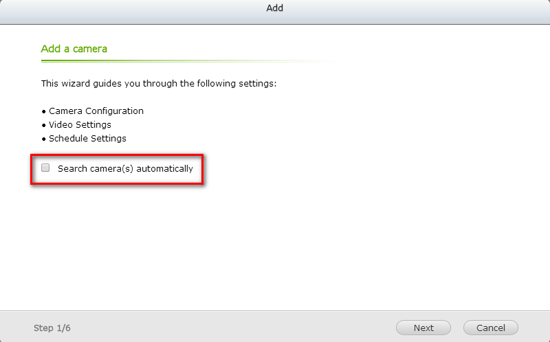
Please uncheck the option “Search camera(s) automatically” and click “Next”.
Please enter the camera configurations as followed, then click test to check the connection between the camera and Surveillance Station.
- Camera brand : QNAP
- Camera model : QNAP VCAM
- Camera Name : You can set the camera as you want.
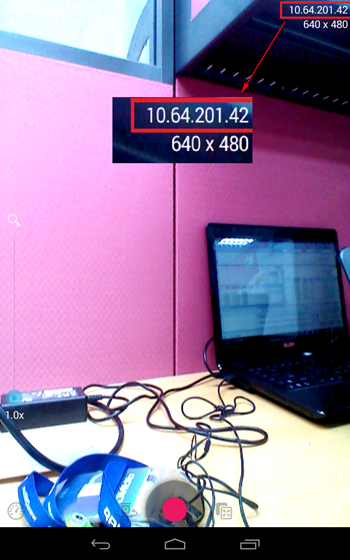
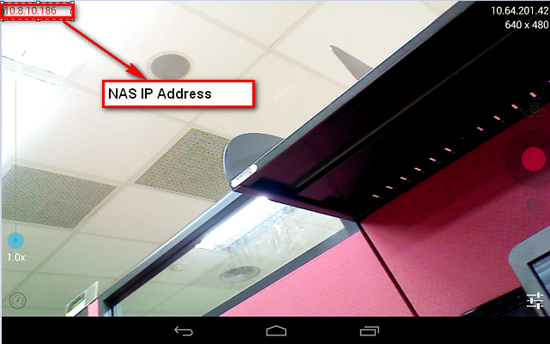
- IP Address : Please set the IP Address of your mobile device. You can check the IP Address in the upper-right corner (check the picture below). If your mobile device does not get a IP Address, please check your network environment again.
- Port : Please configure the Port number you set for Vcam.
- User Name : Please configure the user name you set for Vcam.
- Password : Please configure the password you set for Vcam.
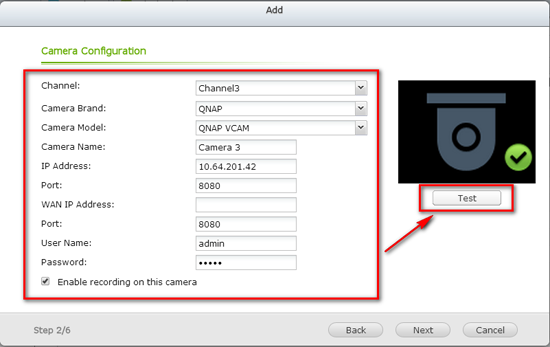
If connection test passes, you can click “Next” to configure the Video Settings. Please configure the Video Compression settings here and click “Next” to configure the recording schedule.

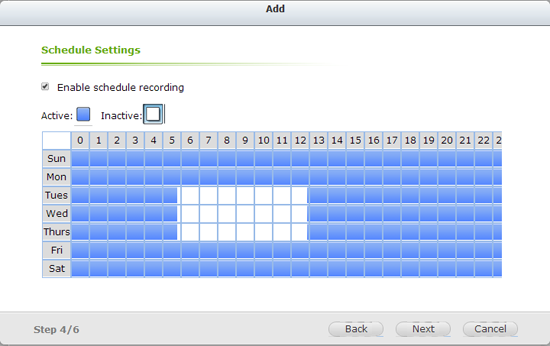
On this page, you will see the “Schedule Settings.” On the table, 0~23 represents the time period. For example, 0 means 00:00~01:00, 1 means 01:00~02:00. You can set a continuous recording in any period that you want.
Then you will be able to confirm the settings on the next page.

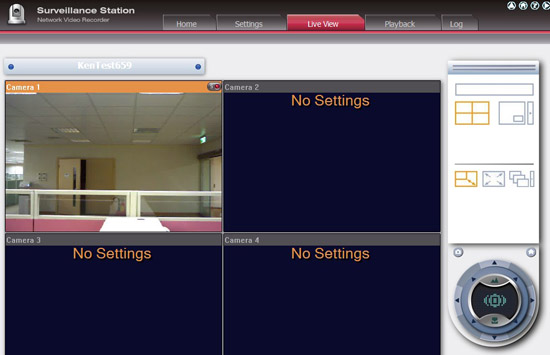
After you have added the network cameras to the Surveillance Station, you can check the monitoring screen. You can observe that the NVR IP Address is shown on the upper-left side. If NAS IP address is not shown, this means that the connection was not successfully established.
Please go to the “Monitor” page. Then you can start monitoring & playback the recordings Surveillance Station.
Camera function:
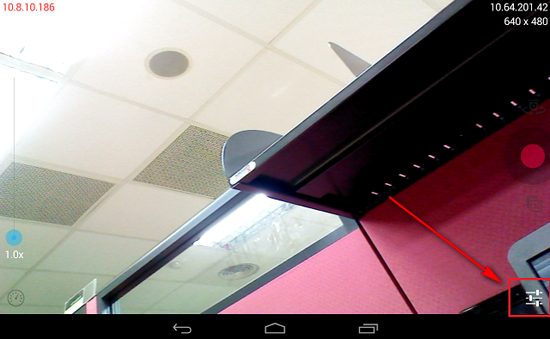
You can click the button shown in the below picture to adjust the camera function that your mobile device provides. Please note that some functions may not be supported by your mobile device.
|


Limitation:
- Vcam is only supported by Surveillance Station 5.0 or newer versions.
- It is possible that power will be consumed faster than charging when the video stream is set to compression H.264 and resolution 1280*720.
- Due to hardware & network limitations, the real “Frame rate” and “Bit rate” may not reach the number you set on your mobile device.
- For performance concerns, we highly recommend that you use Vcam with a WiFi connection.
- Video Compression H.264 is currently not supported in the iOS version.
- Video Compression H.264 may not work on some mobile devices due to hardware limitations. The following are the mobile devices that have passed our lab testing:
|
.
II – Use Your Webcam As IP Camera
Affordable webcam surveillance
Video surveillance systems can be too expensive and difficult to maintain for general home users. QNAP NAS, by supporting webcam monitoring and recording, offers an affordable and easy-to-use option for home and office security. The Surveillance Station of the NAS monitors your home and office 24/7, captures still images, and saves them into compressed MJPEG video clips on the NAS storage. You can view the live video stream and the recorded files remotely via the web interface of the NAS anytime, anywhere.
Webcam surveillance requirements
To get started, you need to get a webcam with built-in UVC (USB Video Class) driver. You may refer to the following lists for the UVC-compliant webcams:
- Logitech UVC Webcam List
http://logitech-en-emea.custhelp.com/app/answers/detail/a_id/6471/related/1 - Linux UVC Webcam List
http://www.ideasonboard.org/uvc/
Note:
1. The third-party sources can only be used as a reference and QNAP cannot guarantee the full compatibility.
2. The supported resolution and frames per second (FPS) are automatically detected based on the webcam hardware. The maximum resolution will always be used.
- ARM-based NAS: 640×480, 320×240, or 160×120 at 2FPS
- X86-based NAS: 960×720, 640×480, 320×240, or 160×120 at 5FPS
3. Maximum one webcam is supported by the NAS.
Configure Surveillance Station for webcam recording
1. Connect a USB webcam
Connect a USB webcam to a USB port of the QNAP NAS. If the webcam is supported, it will be listed as a log showing generic UVC camera in “System Administration” > “System Logs” on the NAS.
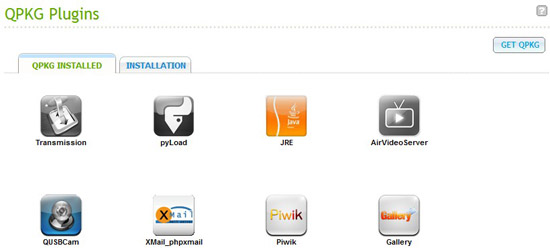
2. Install the QUSBCam QPKG add-on
The QUSBCam QPKG add-on can be downloaded from the QNAP website QPKG
Install the QPKG add-on from “Application Servers” > “QPKG Plugins” > “Installation” of the NAS. If the USB webcam is detected, the QUSBCam QPKG add-on will be automatically enabled. Otherwise, it will be disabled after installation.
3. Configure Surveillance Station
Note: The Surveillance Station is only supported on Internet Explorer 7.0 or above.
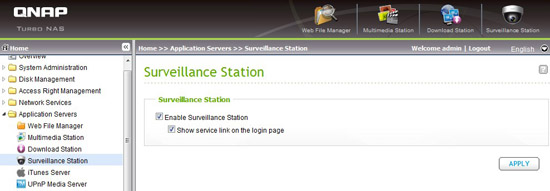
a. Go to “Application Servers” > “Surveillance Station” and tick both checkboxes “Enable Surveillance Station” and “Show service link on the login page” then click “Apply” to save the settings. Now you should see that the Surveillance Station icon on the top of the page is no longer grayed out. Simply click the icon to go to its page.
b. Configure the Surveillance Station with the following required settings:
Camera Model: Generic JPEG
HTTP URL: /video.cgi
IP Address: localhost
Port: 8168
User Name: root (or any text)
Password: —- (or any text)

Note: Before applying the settings, you may click “Test” on the right to ensure the connection to the webcam is successful.
After you have added the webcam to the NAS, go to the “Live View” page. The first time you connect to this page by an IE browser, install the ActiveX control in order to view the image of the webcam. You can start to use the monitoring and recording functions of the Surveillance Station!
Configure scheduled recording on QNAP NAS
The Surveillance Station supports scheduled recording. To use this function, go to “Settings” > “Schedule Settings”.
Select the camera and specify the recording period. In the table, 0-23 represents the time range in hour. For example, 0 means 00:00-01:00, 1 means 01:00-02:00.
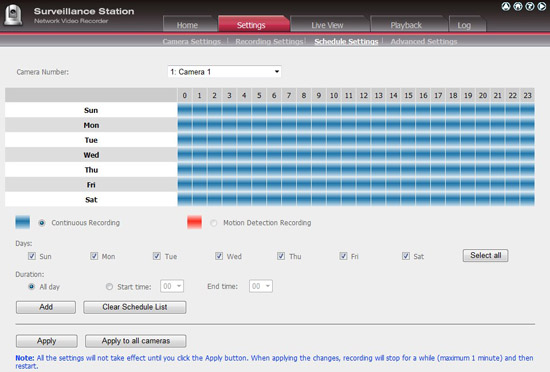
You may set the schedule by one of the following ways:
- Select “Continuous Recording” (blue blocks), then click the blocks on the time table to mark the recording schedule.
- Check the boxes for weekdays (Sunday to Saturday), then select “All day” or specify the time period. Click “Add” and the schedule will be applied to the time table.
After configuring the schedule, click “Apply” to save the settings.
Play back recordings
To search for the recordings on the NAS, go to the “Playback” page of the Surveillance Station.
Select the camera from the “Video Channel” list. Specify the date and time and click . All the video data that match the search criteria will be shown on the playlist. You may play the video on the IE browser or download the video to your computer.


How To Use Your Anroid/iOS Smartphone As Webcam
Check Here – http://goo.gl/XTCMJ7