I – Before Starting
II – How to Upgrade Firmware With Qnapfinder
III – How to Upgrade Firmware With Qnap Interface
IV – How to Upgrade Firmware With Putty
V – How to Upgrade Firmware With Qnap Live Update Feature
VI – Trouble Wih hDownloading Qnap Firmware?
VII – Qnap Firmware Update Troubleshooting;
VIII – I Got Problem With Installing Qnap Fimrware / Qnap Firmware Seem as 1.0.0 (1119T) Firmware, How Can I Fix This Problem?
.
I – Before Starting
For Firmware Update, you must have an installed System. You cant update Firmware without any HDD installed, except some models.
You can updgrade firmware By 4 ways;
First Download Qnap Firmware From http://www.qnap.com
After Download completes, unzip image file to your desktop;
.
II – How to Upgrade Firmware With Qnapfinder
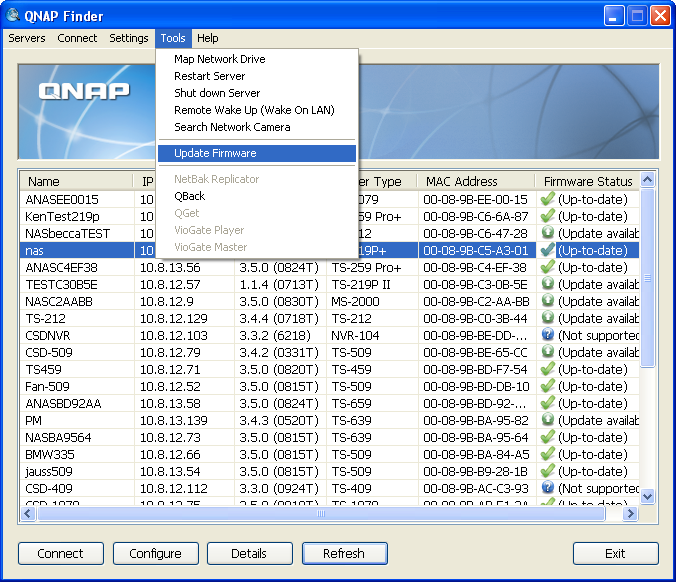
Open Qnapfinder, choose your Qnap. At the top of the menus, choose tools ->firmware Update. This is the best,easiest and safe way to update,
Update Firmware by Finder
The NAS firmware can be updated by the QNAP Finder. Select a NAS model and choose “Update Firmware” from the “Tools” menu.
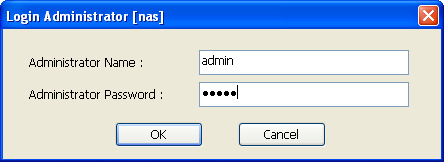
Login the NAS as an administrator.
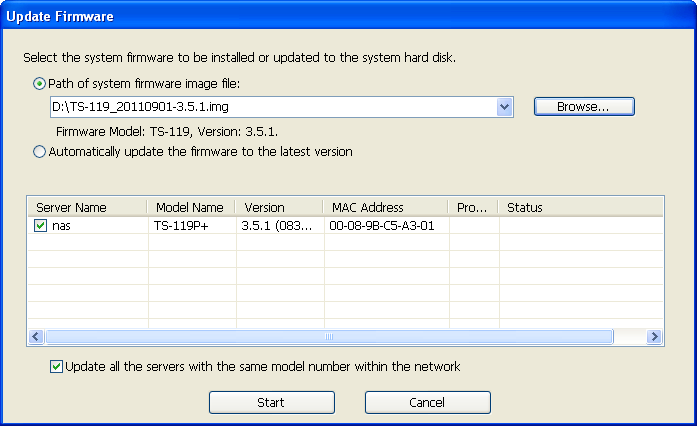
Browse and select the firmware for the NAS. Click “Start” to update the system.
|
Note: The NAS servers of the same model on the same LAN can be updated by the Finder at the same time. Administrator access is required for system update. |
III – How to Upgrade Firmware With Qnap Interface
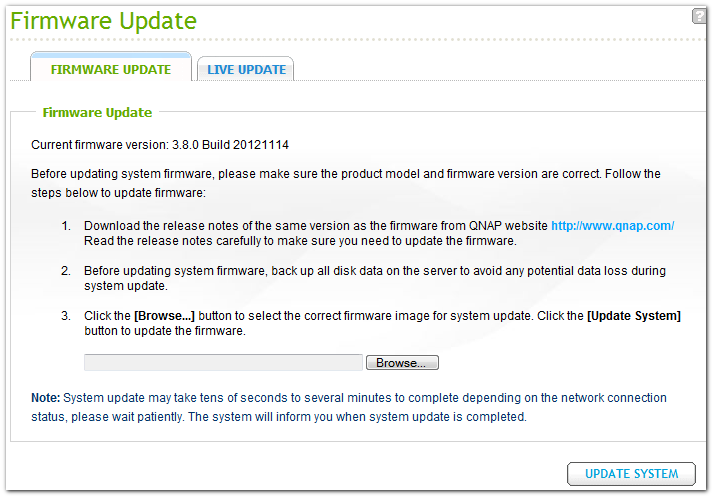
Login Qnap and go Administration page ->firmware update and show your Qnap image file.
Update Firmware by Web Administration Page
|
Note: If the system is running properly, you do not need to update the firmware. |
Before updating the system firmware, make sure the product model and firmware version are correct. Follow the steps below to update firmware:
| 1. | Download the release notes of the firmware from the QNAP website http://www.qnap.com. Read the release notes carefully to make sure it is required to update the firmware. |
| 2. | Download the NAS firmware and unzip the IMG file to the computer. |
| 3. | Before updating the system firmware, back up all the disk data on the NAS to avoid any potential data loss during the system update. |
| 4. | Click “Browse” to select the correct firmware image for the system update. Click “Update System” to update the firmware. |
The system update may take tens of seconds to several minutes to complete depending on the network connection status. Please wait patiently. The NAS will inform you when the system update has completed.
.
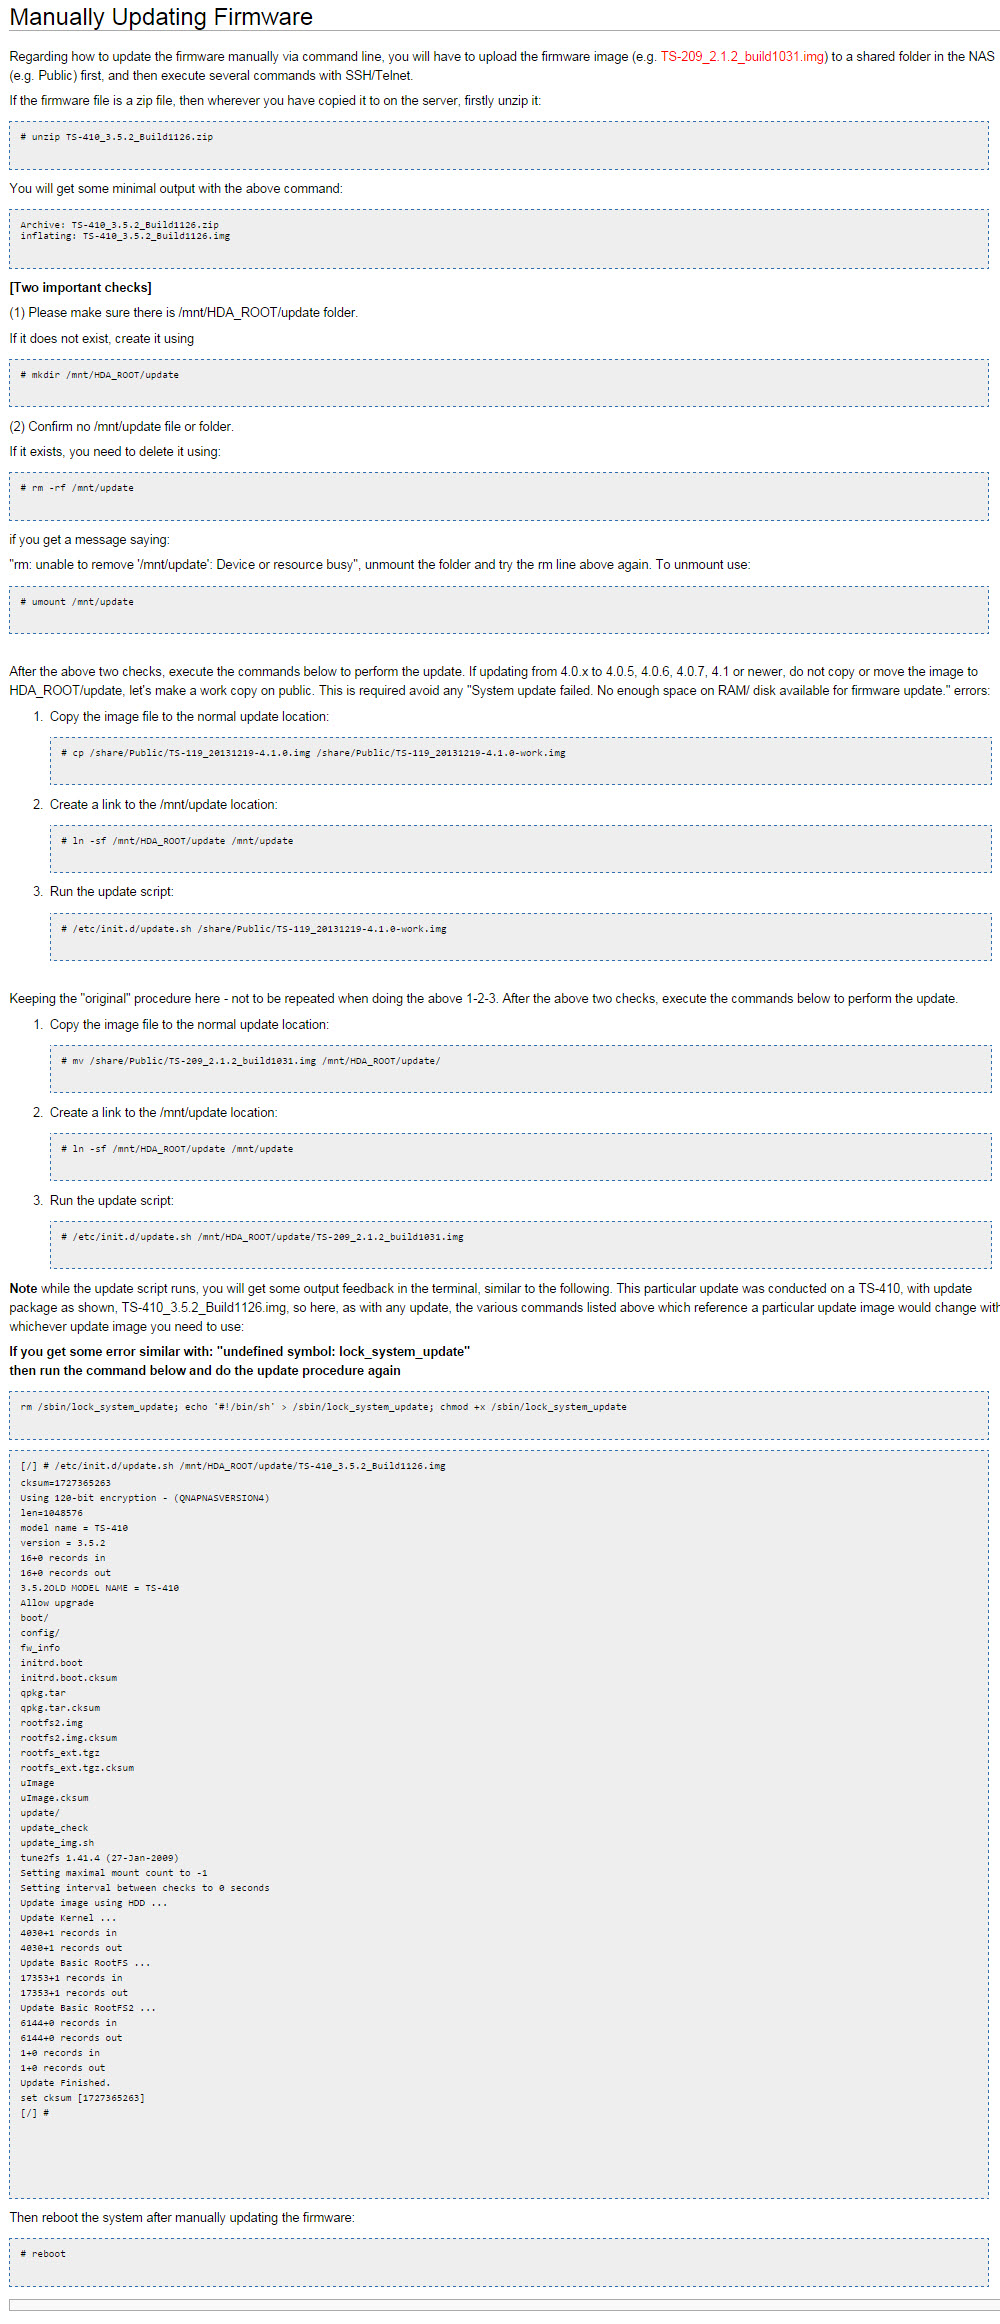
IV – How to Upgrade Firmware With Putty
1 – Download Qnap firmware, and unzip it to Public Folder. Your Unzipped Image file should be looking like this : 809U_3.4.2_Build0331.img
2 – Login Qnap via Putty and type this commands;
# mkdir /mnt/HDA_ROOT/update
# mv /share/Public/TS-809U_3.4.2_Build0331.img /mnt/HDA_ROOT/update/
# ln -sf /mnt/HDA_ROOT/update /mnt/update
# /etc/init.d/update.sh /mnt/HDA_ROOT/update/TS-809U_3.4.2_Build0331.img
just reboot the device with this command;
# reboot
From : http://forum.qnap.com/viewtopic.php?p=236036
Also Offical Wikipedi Update Process;
.
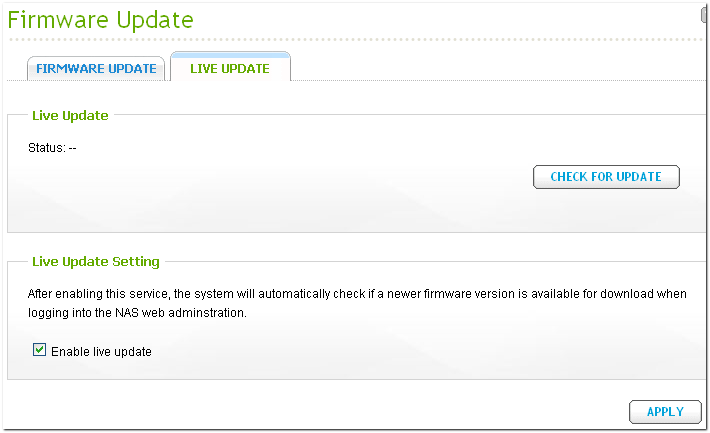
V – How to Upgrade Firmware With Qnap Live Update Feature
Trust me and stay away from this option. But If you want to learn how;
Live Update
Select “Enable live update” to allow the NAS to automatically check if a new firmware version is available for download from the Internet. If a new firmware is found, you will be notified after logging in the NAS as an administrator.
Click “CHECK FOR UPDATE” to check if any firmware update is available.
Note that the NAS must be connected to the Internet for these features to work.
.
VI – Trouble With Downloading Qnap Firmware?
First, go http://www.qnap.com, then Support ->Download

Choose your NAS device from Category, and your NAS model at the right Dropdown menu. If your device model is not in that list, Choose “Archive” from the left dropdown menu.

You can Choose older firmware if you want. Download from Europe;

After Download completes, you can Install Firmware.
.
VII – Qnap Firmware Update Troubleshooting;
Qnap gives error when I try to install firmware;
Make sure you have an installed device, then try to update firmware
Make sure you download right firmware. Ts-459 and Ts-459U firmware is not the same thing.

If you still get probem about installing firmeware, Please contact with Qnap support.
Qnap Firmware Stuck at %20;
Download a lower Firmware version from this link;
http://web.qnap.com/download.asp
Choose an older Firmware with swithing right dropdown menu with “All”

Restart Qnap and try firmware update again.
.
VIII – I Got Problem With Installing Qnap Fimrware / Qnap Firmware Seem as 1.0.0 (1119T) Firmware, How Can I Fix This Problem?
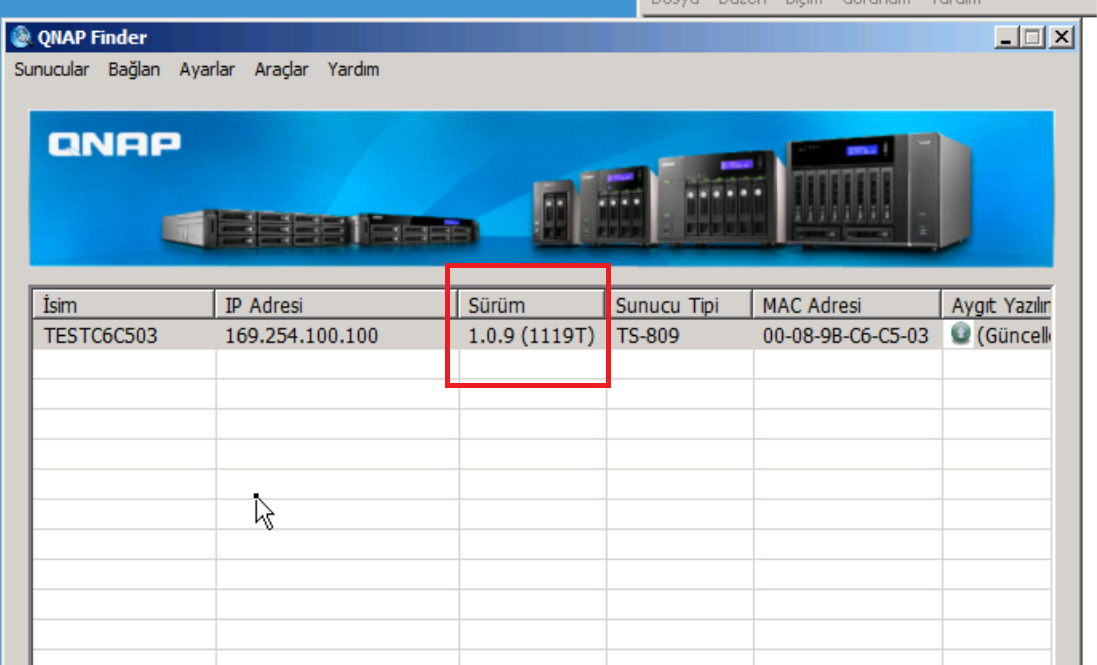
How to Fix;
- This procedures are used to update the flash / DOM (disk on module) firmware on the NAS.
- Make sure no HDD installed before update.
- Flash image are required for NAS with 16MB flash or 128MB DOM.
- For NAS with 512MB DOM, just use the firmware on QNAP download site (http://www.qnap.com/download.asp).
- This updated procedures are generally used when the NAS can be found by QNAP Finder but cannot be initialized with HDD(s).
- QNAP NAS also store firmware on the HDDs. If you have initialized the NAS with HDDs before, this update procedures will cause the firmware version mismatch between the NAS and the HDDs. You need to update the firmware again after boot up with HDDs installed.
Download link of the flash image:
HS-210
http://eu1.qnap.com/Storage/tsd/flashimage/HS-210_20140612-4.1.0.Flash.img
TS-110
http://us1.qnap.com/Storage/tsd/flashimage/TS-110_20140612-4.1.0.Flash.img
TS-112, TS-112P
http://us1.qnap.com/Storage/tsd/flashimage/TS-112_20140612-4.1.0.Flash.img
TS-119, TS-119P+, TS-119PII
http://us1.qnap.com/Storage/tsd/flashimage/TS-119_20140612-4.1.0.Flash.img
TS-120
http://us1.qnap.com/Storage/tsd/flashimage/TS-120_20140612-4.1.0.Flash.img
TS-121
http://us1.qnap.com/Storage/tsd/flashimage/TS-121_20140612-4.1.0.Flash.img
TS-210
http://us1.qnap.com/Storage/tsd/flashimage/TS-210_20140612-4.1.0.Flash.img
TS-212, TS-212P, TS-212-E
http://us1.qnap.com/Storage/tsd/flashimage/TS-212_20140612-4.1.0.Flash.img
TS-219, TS-219P, TS-219P+, TS-219PII
http://us1.qnap.com/Storage/tsd/flashimage/TS-219_20140612-4.1.0.Flash.img
TS-220
http://us1.qnap.com/Storage/tsd/flashimage/TS-220_20140612-4.1.0.Flash.img
TS-221
http://us1.qnap.com/Storage/tsd/flashimage/TS-221_20140612-4.1.0.Flash.img
TS-410
http://us1.qnap.com/Storage/tsd/flashimage/TS-410_20140612-4.1.0.Flash.img
TS-410U
http://us1.qnap.com/Storage/tsd/flashimage/TS-410U_20140612-4.1.0.Flash.img
TS-412
http://us1.qnap.com/Storage/tsd/flashimage/TS-412_20140612-4.1.0.Flash.img
TS-412U
http://us1.qnap.com/Storage/tsd/flashimage/TS-412U_20140612-4.1.0.Flash.img
TS-419P, TS-419P+, TS-419PII
http://us1.qnap.com/Storage/tsd/flashimage/TS-419P_20140612-4.1.0.Flash.img
TS-419U, TS-419U+, TS-419UII
http://us1.qnap.com/Storage/tsd/flashimage/TS-419U_20140612-4.1.0.Flash.img
TS-420
http://us1.qnap.com/Storage/tsd/flashimage/TS-420_20140612-4.1.0.Flash.img
TS-420U
http://us1.qnap.com/Storage/tsd/flashimage/TS-420U_20140612-4.1.0.Flash.img
TS-421
http://us1.qnap.com/Storage/tsd/flashimage/TS-421_20140612-4.1.0.Flash.img
TS-421U
http://us1.qnap.com/Storage/tsd/flashimage/TS-421U_20140612-4.1.0.Flash.img
TS-239
http://us1.qnap.com/Storage/tsd/flashimage/TS-239_20120801-3.7.3.Flash.img
TS-439
http://us1.qnap.com/Storage/tsd/flashimage/TS-439_20120801-3.7.3.Flash.img
TS-439U
http://us1.qnap.com/Storage/tsd/flashimage/TS-439U_20120801-3.7.3.Flash.img
TS-639
http://us1.qnap.com/Storage/tsd/flashimage/TS-639_20120801-3.7.3.Flash.img
TS-509
http://us1.qnap.com/Storage/tsd/flashimage/TS-509_20120801-3.7.3.Flash.img
TS-809
http://us1.qnap.com/Storage/tsd/flashimage/TS-809_20120801-3.7.3.Flash.img
TS-809U
http://us1.qnap.com/Storage/tsd/flashimage/TS-809U_20120801-3.7.3.Flash.img
SS-439
http://us1.qnap.com/Storage/tsd/flashimage/SS-439_20120801-3.7.3.Flash.img
SS-839
http://us1.qnap.com/Storage/tsd/flashimage/SS-839_20120801-3.7.3.Flash.img
.
2 – Update Procedures:
- Power off the NAS
- Remove all the HDDs
- Power on the NAS
- After a short beep and a long beep(about two minutes after first short beep), run the QNAP Finder(Make sure the Finder is the latest version).
- QNAP Finder should find the NAS and its IP
- Select the NAS and click “Tools” -> “Update Firmware”
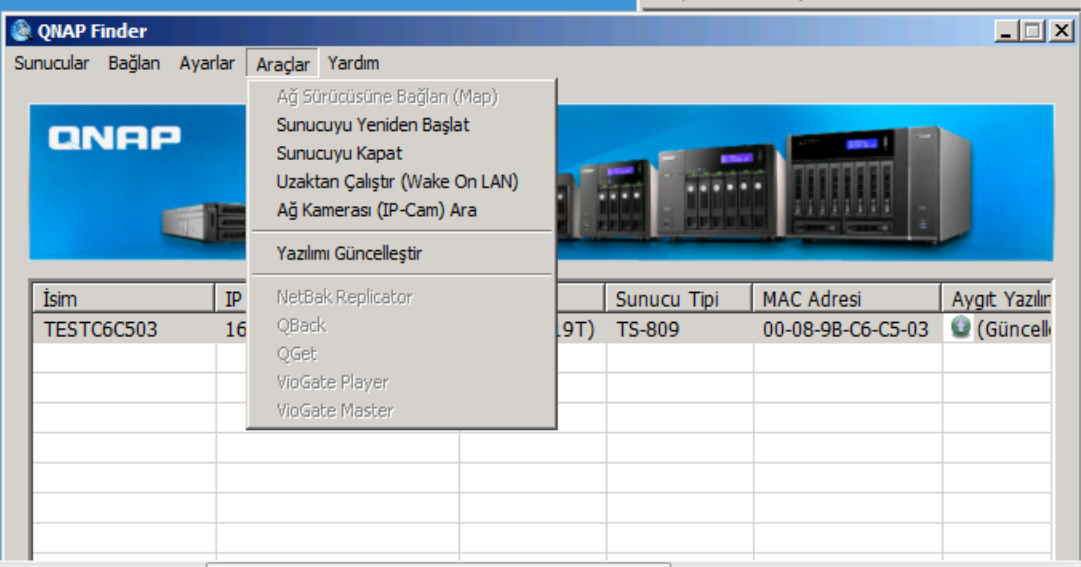
- Input default username and password (admin/admin)
- Select the image files on your PC for the NAS.

- After firmware update, the NAS will be reboot.
- Make sure the firmware have been updated
- Power off the NAS
- Plug all the HDD back
- After power on, follow the messages on the Finder to initialize the NAS.
From : http://wiki.qnap.com/w/index.php?title=NAS_Firmware_Update_When_No_HDD(s)_Installed
Qnap Firmware (Yazılım) Güncellemesi Nasıl Yapılır.How To Update Qnap Firmware,
There are steps missing in the putty procedure the /mnt/HDA_ROOT/update/ directoy does not exists.
Meanwhile I tought you made a mistake by using update_pkg directory and unable to log to NAS now.
Its is better to point to this procedure. http://wiki.qnap.com/wiki/Manually_Updating_Firmware.
Fixed!
Remove Battery!
In my case, non of the recovery methods worked. i had a broken firmware because of an failed update.
i was able to boot up the qnap 212 without harddisks and need to push reset button while pushing power button for some seconds until it beeps twice. then qnap boots up with dhcp and resettet password and so an. then connect with qfinder and try firmware update with and without harddisks. it always stopped with some error that its unalbe to write firmware because of some network error. makes no sense…
in my case this worked: when you unscrew the green circuit board, theres a battery on the backside. take it out, pull the powercable and wait a few minutes. after that, put the battery back in, boot up the qnap holding reset button pushed until it beeps twice, take qfinder, connect an harddisk (sorry, data lost) an run the config assistant including firmware update.
Pingback: What Is Firmware Upgrade For Android | android firmware download
Pingback: What Is Firmware Update Android | android firmware download