I – Introduction: “Allow you to manage your NAS account easily with AD”
II – Prerequisites: Before Join Qnap To AD
III – How to Join Qnap To Active Directory on 3.8.4 Firmeware & Earlier Versions
IV – How to Join Qnap To Active Directory on 4.xx Firmeware & Later Versions
V – Advanced Options tab
VI – Verify the settings
VII – Note about Windows 7
.
I – Introduction: “Allow you to manage your NAS account easily with AD”
“Allow you to manage your NAS account easily with AD”
Introduction
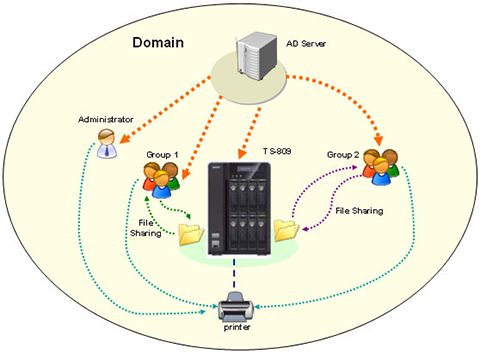
Active Directory® is a Microsoft directory used in Windows environments to centrally store, share, and manage the information and resources on your network. It is a hierarchical data centre which centrally holds the information of the users, user groups, and the computers for secure access management.
Advantages of joining the QNAP NAS to Active Directory:
- Convenient account setup: By joining the NAS to the Active Directory, all the user accounts of the AD server will be imported to the NAS automatically. The AD users can use the same set of user name and password to login the NAS. This saves the time and effort of the server manager to create the user accounts one by one on the NAS.
- Efficient access control: The NAS allows the server manager to configure the access rights (read only, read/write, or deny access) to the network share folders.
.
II – Prerequisites: Before Join Qnap To AD
To join the Turbo NAS to an Active Directory with Windows Server 2008 R2, you must update the NAS firmware to V3.2.0 or above.
Follow the steps below to join the Turbo NAS to the Active Directory (Windows Server 2008).
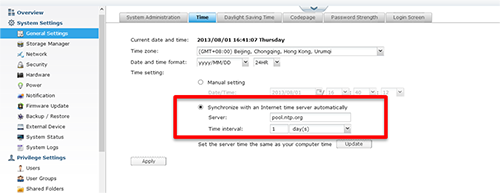
Login the NAS as an administrator. Go to “System Settings” > “General Settings” > “Time”. Set the date and time of the NAS, which must be consistent with the time of the AD server. The maximum time difference allowed is 5 minutes.
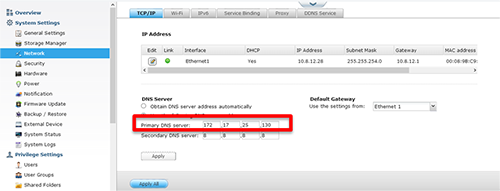
Next, set the IP of the primary DNS server as the IP of the Active Directory server that contains the DNS service. It MUST be the IP of the DNS server that is used for your Active Directory. If you use an external DNS server, you will not be able to join the domain.
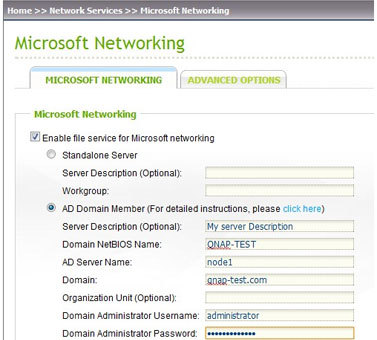
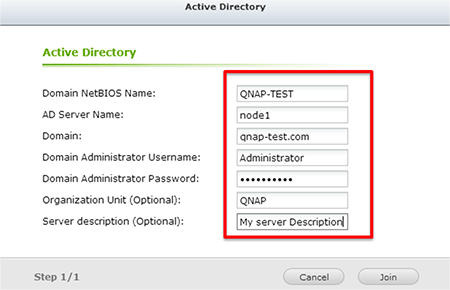
a. Domain NetBIOS Name
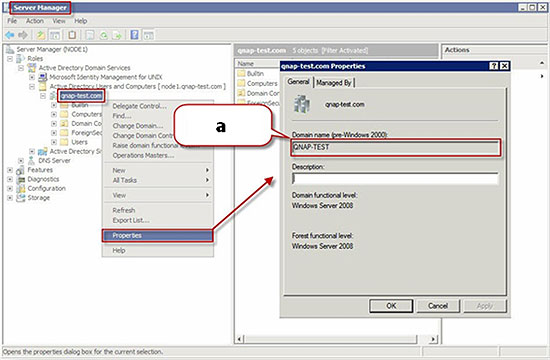
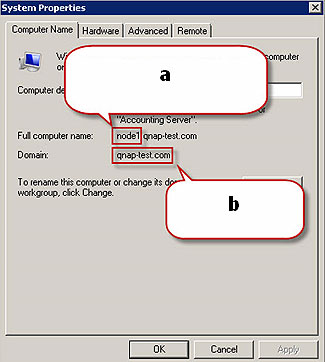
a. This is your ‘AD Server Name’
b. This is your ‘Domain Name’
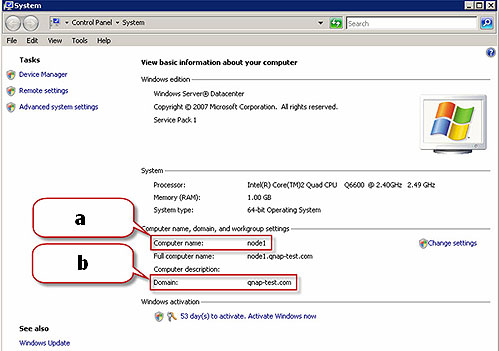
Notes: Above example is based on Windows Server 2008. For Windows Server 2003, please see the image below to check the “AD Server Name”.
a. In Windows 2003 Servers, the AD server name is ‘node1′ NOT ‘node1.qnap-test.com’
b. The ‘Domain name’ remains the same.
.
III – How to Join Qnap To Active Directory on 3.8.4 Firmeware & Earlier Versions
Go to “Network Services” > “Microsoft Networking”. Enter the information of the AD domain.
Note:
If you failed to join the AD domain, please review step 1:
Check the time difference between your NAS and your domain controller.
Check that the DNS server of your NAS is the same as your Domain Controller DNS. It MUST be your domain DNS server. If you use an external DNS server, you will not be able to join the domain
.
IV – How to Join Qnap To Active Directory on 4.xx Firmeware & Later Versions
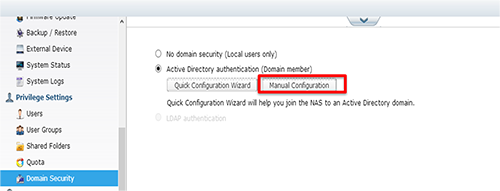
Go to “Privilege Setting” > “Domain Security” > “Active Directory authentication” > “Manual Configuration”. Enter the information of the AD domain.
- Set up the time and DNS information
- Check the AD server name and the domain name
- Join the Active Directory
Note:
If you failed to join the AD domain, please review “Set up the time and DNS information” :
- Check the time difference between your NAS and your domain controller.
- Check that the DNS server of your NAS is the same as your Domain Controller DNS. It MUST be your domain DNS server. If you use an external DNS server, you will not be able to join the domain
.
V – Advanced Options tab
On 3.8.4 & Eralier;
On 4.xx &Later;
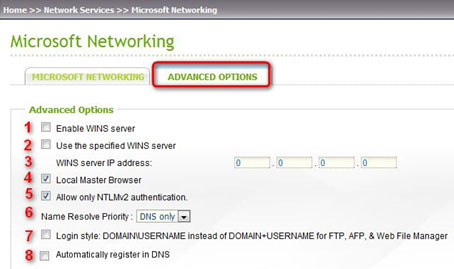
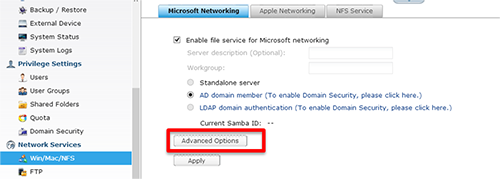
Go to “Network Service” > “Win/Mac/NFS” > “Microsoft Networking” > “Ad domain member” > “Advanced Options”.
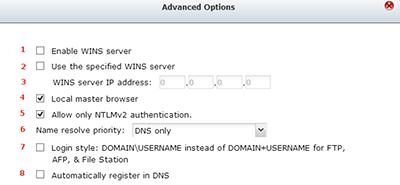
WINS Support:
Note that in most cases, it is not necessary to enter WINS server setting. In an Active Directory environment, it is suggested to use a pure DNS name resolution.
(1) Windows Shares Access: domainusername
(2) FTP: domain + username
(3) Web File Manager: domain + username
(4) AFP: domain + username
For example, to access a share folder by Web File Manager with a domain user account, you have to authenticate with domain + username if the option is not turned on.
If this option is turned on, all services will use the same username format
(1) Windows Shares: domainusername
(2) FTP: domainusername
(3) Web File Manager: domainusername
(4) AFP: domainusername
For example, to access a share folder by Web File Manager with a domain user account, you have to authenticate with domainusername if the option is turned on.
- Enable WINS server: This option has to be activated only if you do not have a WINS server on your network, and that some of your computers are on a different subnet. In such case you will have to set up all your computers to use this WINS server. Note that there must be only one WINS server on the network. All the clients have to be configured to use the same WINS server. If you are not sure about the setting, do not enable it.
- Use the specified WINS server: This option should be activated only if you have a WINS server on your network and your NAS should be a WINS client. Enter the IP address of your WINS server
- If you are not sure about the setting, do not enable it.
- Local Master Browser: This option allows the NAS to be a Local Master Browser which is responsible for maintaining the list of the computers on your network for its workgroup. The name of the NAS workgroup must be the same as that of your computer’s workgroup (often called “workgroup”). The setting is enabled by default. If you disable it, the NAS will not maintain the computer list, and the job will be done by another computer on the network. The default setting is enabled.
- Allow only NTLMv2 authentication: This option allows only NTLMv2 authentication and refuses LM and NTLM. If you are not sure about the setting, do not check this option. If you check this option, make sure all the computers on your network can use NTLMv2.
- Name Resolution Priority: This refers to the name resolution on the Windows network. If you enable WINS (option (1) or (2)), you will be able to choose the priority of the name resolution. The default setting is “DNS only” when all WINS settings are disabled. When WINS is enabled, the default setting is “WINS first, then DNS”. If you do not have any problems, keep the default values.
- Login Style:
By default in an Active Directory environment, the username formats for domain users are: - Automatically register in DNS: If this option is turned on, when the NAS is joined in Active Directory, the NAS will register itself automatically in the domain DNS server. This will create a DNS host entry for the NAS in the DNS server. If the NAS IP is changed, the NAS will automatically update the IP with the DNS server.
.
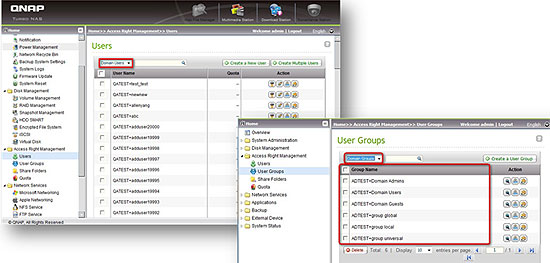
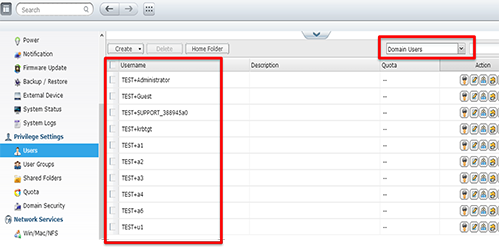
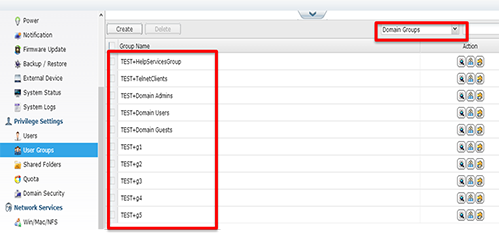
VI – Verify the settings
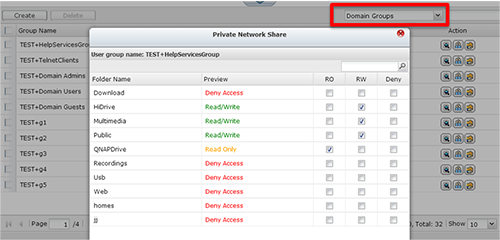
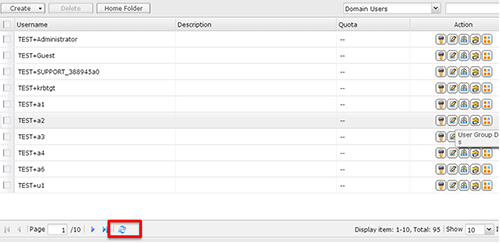
To verify that the NAS has been joined to the Active Directory successfully, go to “Privilege Settings” > “Users” or “User Groups”. A list of users and groups will be shown on the “Domain Users” and “Domain Groups” lists respectively.
On 3.8.4 & Earlier;
On 4.xx & Later;
Refresh the domain user and user group lists on web interface
If you have created new users or user groups in the domain, you can click the “reload” button . This will reload the user and user group lists from the Active Directory to the NAS. The process is done only for the web interface user list. The user permission settings will be synchronized in real time with the domain controller.
Notes:
- After joining the NAS to the Active Directory , the local NAS users who have access right to the AD server should use “NAS_name username” to login; the AD users should use their own user names to login the AD server (Domainusername).
- The local NAS users and the AD users (using domain name and username) are allowed to access the NAS via AFP, FTP and Web File Manager with firmware 3.2.0 and above. However, with firmware prior to 3.2.0, only local NAS users are allowed to access Web File Manager.
- To login the NAS by Windows Explorer, use “DomainUsername” as the login name.
- To login the AFP, FTP and Web File Manager services, use “Domain + Username” as the login name.
- WebDAV can be accessed by local users and groups only.
- For TS-109/209/409/509 series, if the AD Server is based on Windows 2008, the NAS firmware must be updated to v2.1.2 or later.
- To login the NAS by AFP, FTP, and Web File Manager services, use “Domain + Username” as the login name. To be able to use a standard Windows login format (DOMAINUSERNAME), you have to enable the option “Login style” in the “Advanced Options” tab in “Microsoft Networking” (see above).
VII – Note about Windows 7
If you are using a Windows 7 PC which does not belong to an Active Directory, to access a NAS with firmware prior to V3.2.0 and is also an AD domain member, please change the security settings of the client PC as below.
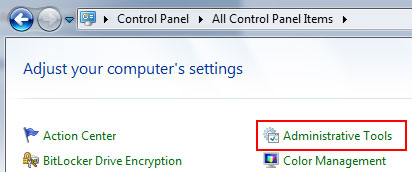
- On Windows 7, go to “Control Panel” > “All Control Panel Items”, and select “Administrative Tools”.
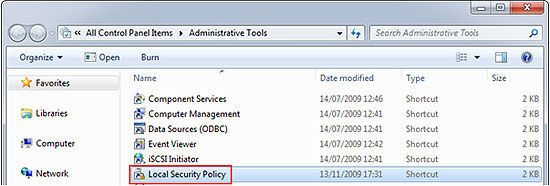
- Select “Local Security Policy”.
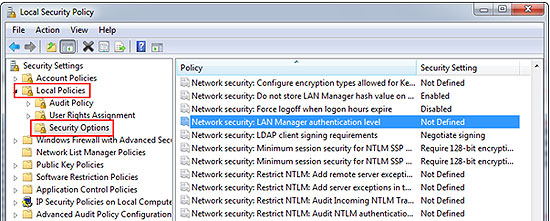
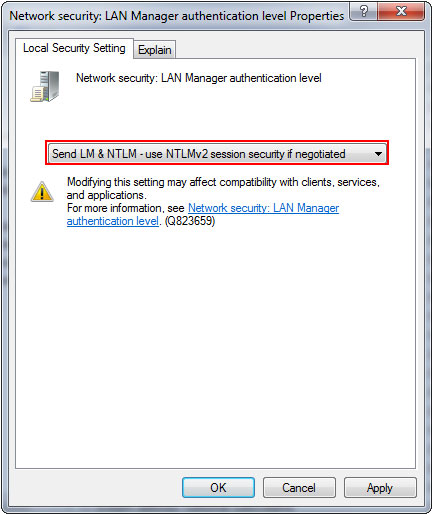
- Go to “Local Policies” > “Security Options”. Then select “Network security: LAN Manager authentication level”.
- Select the “Local Security Setting” tab, and select “Send LM & NTLMv2 – use NTLMv2 session security if negotiated” from the list. Then click “OK”.
After configuring the settings on Windows 7, you will be able to access your NAS from it, even if your NAS is a member of an Active Directory Domain.
