I – What is iSCSI and how can one benefits from it?
II – Create an iSCSI target volume (Before 4.1 Firmware)
III – Create an iSCSI target volume (4.1 Firmware Later)
IV – What is The Best iSCSI Performance Options
V – Connect to the iSCSI targets by Microsoft iSCSI initiator on Windows
VI – Connect to the iSCSI targets by Xtend SAN iSCSI initiator on Mac OS
VII – Connect to the iSCSI targets by Open-iSCSI Initiator on Ubuntu Linux
.
I – What is iSCSI and how can one benefits from it?
 iSCSI, (Internet Small Computer System Interface), an Internet Protocol (IP)-based storage networking standard for linking data storage facilities. By carrying SCSI commands over IP networks, iSCSI is used to facilitate data transfers over intranets and to manage storage over long distances. iSCSI can be used to transmit data over local area networks (LANs), wide area networks (WANs), or the Internet and can enable location-independent data storage and retrieval. (quoted from Wikipedia)
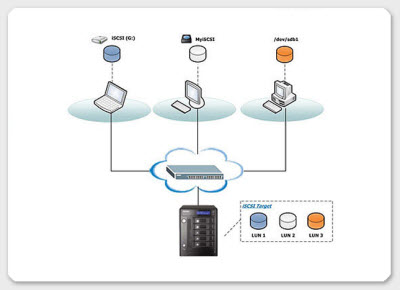
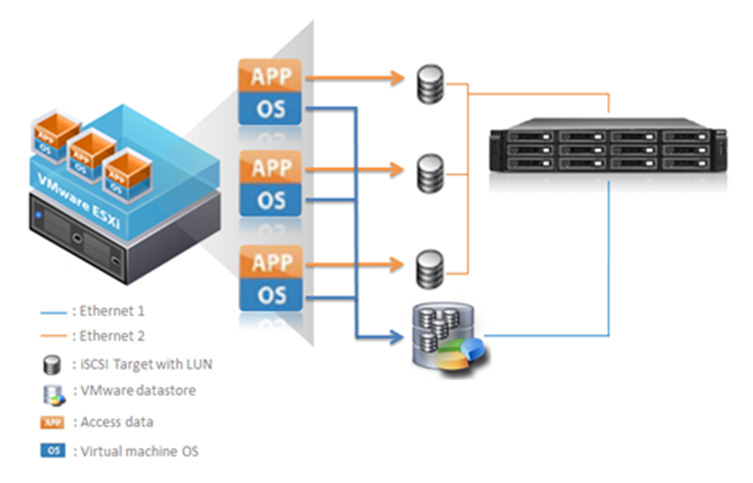
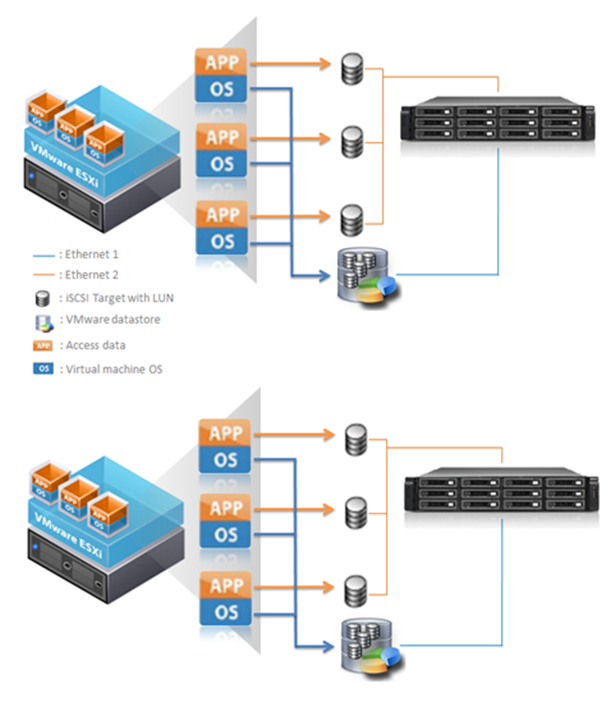
An all-in-one storage solution with high ability of expansion and low establishment cost is alway seeked by most SMB storage infrastructure planners who have budget concerns and overall ease of delpoyment. With the iSCSI service on QNAP Turbo NAS it can instantly be served as your storage expansion or backup destination of the application servers, such as database server, mail server, or Time Machine (for Mac OS X 10.5 or later) in the business environment. This article demonstrates how you can use the iSCSI target service on QNAP NAS for storage expansion on different operating systems. See below for the usage scenario.
Things to know before we start
In between the relationship of your computer and the storage device, your computer is called an ‘initiator‘ because it initiates the connection to the device, which is called a ‘target‘.
| Note: It is NOT suggested to connect to the same iSCSI target with two different clients (iSCSI Initiators) at the same time, because this may lead to data crash or disk damage. |
To begin, simply follow through the step-by-step guide below.
.
II – Create an iSCSI target volume (Before 4.1 Firmware)
Log in to your QNAP NAS, go to ‘Disk Management‘ > ‘iSCSI‘ > ‘iSCSI TARGET LIST‘ > ‘Create New iSCSI Target‘ to create a new iSCSI target.

Refer to the image below to enter the required information to create the iSCSI target.
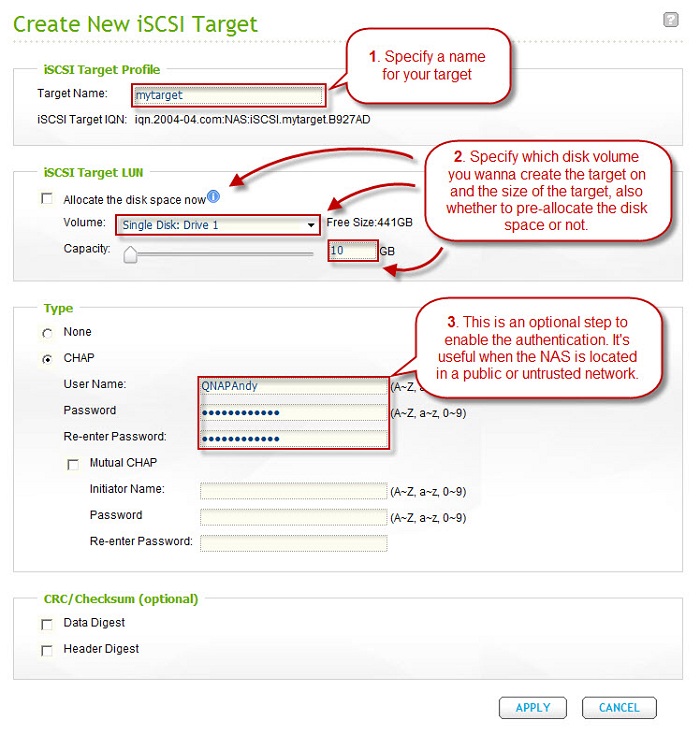
| *Allocating the disk space ensures that an iSCSI Target has enough disk space as specified. However, the disk will take longer to create (depends on the given size) and there must be enough space on the physical disk. |
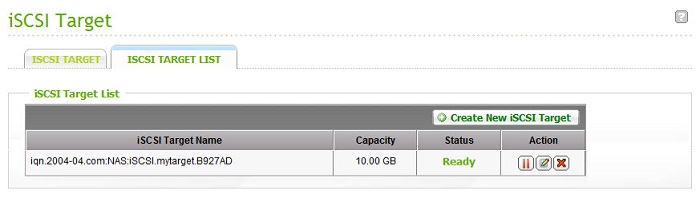
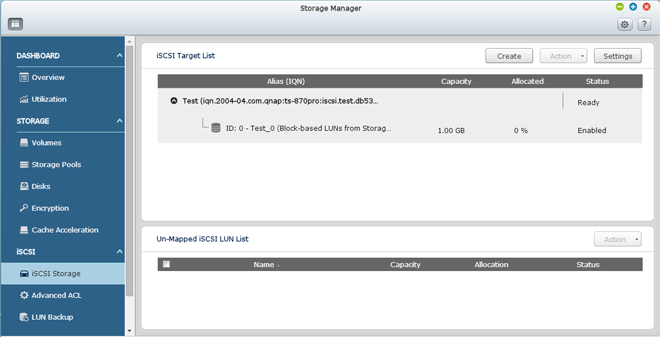
Upon the successfull creation the iSCSI target will be shown on the iSCSI Target page and with status showing ‘Ready‘.
| Advantages of Thin Provisioning on QNAP NAS With thin provisioning, the system administrator can flexibly allocate the disk space (on iSCSI Target) to the server applications to expand the storage capacity anytime regardless of their current storage size. The adding of the storage space on the servers can be easily done on different operation systems by the iSCSI initiator. Thin provisioning allows efficient storage management since the system administrator has to monitor only the storage capacity of one single server (QNAP NAS) rather than extra hard drives or tapes on other sub-storage systems. Over-allocation is allowed since the storage capacity of the NAS can be expanded by Online RAID Capacity Expansion |
To connect to the iSCSI target we’ve just created select the tab representing the operating system you use to proceed.
.
III – Create an iSCSI target volume (4.1 Firmware Later)
Create an iSCSI target
Between computer and storage facility, your computer (VM) is named “Initiator” while the storage facility is called “Target”. (Note: please do not associate two iSCSI initiators within the same iSCSI target to avoid crashing data.)
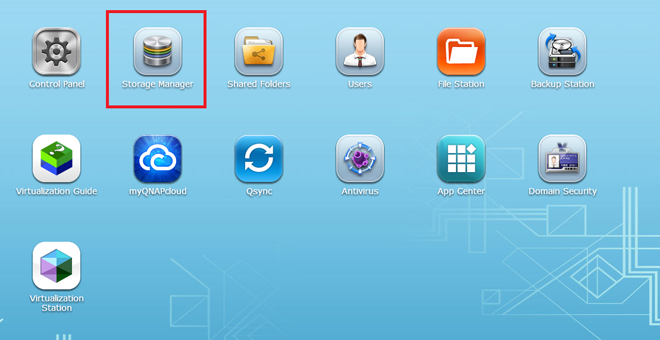
1. From Storage Manager in QTS
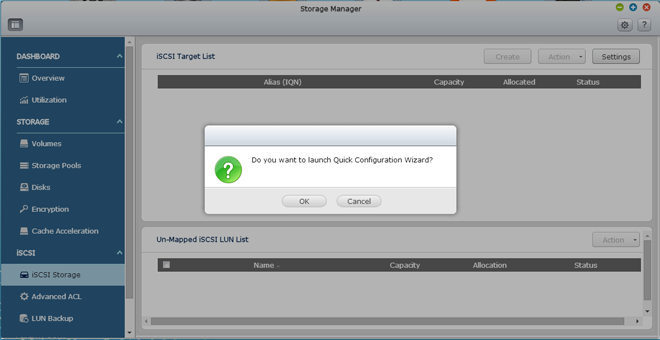
Log in to your QNAP Turbo NAS and go to “Storage Manager”.
Select “iSCSI Storage” and click [OK] to launch the Quick Configuration Wizard.
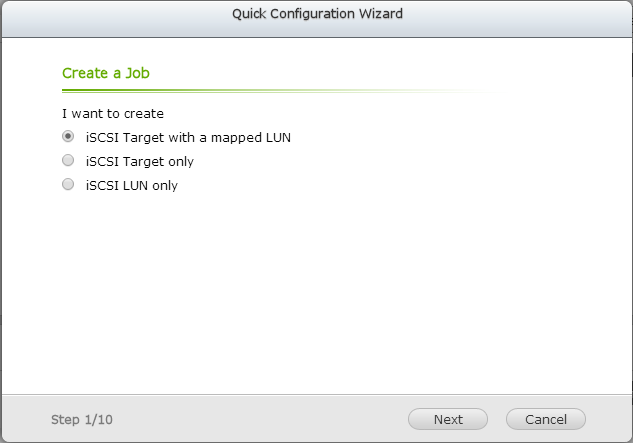
Check “iSCSI target with a mapped LUN” and click [Next].
Click [Next] to enter the Quick Configuration Wizard.

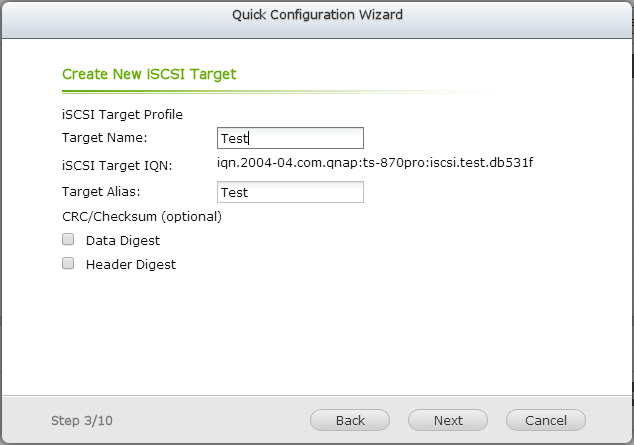
Please give a name for the iSCSI target and check CRC/Checksum if necessary (optional). After finishing this, please click [Next].
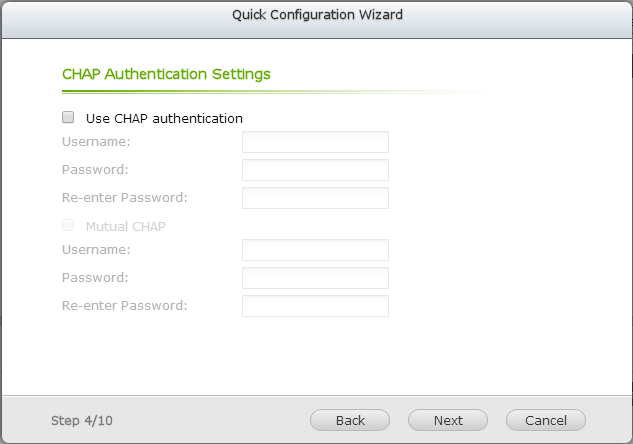
Check “Use CHAP authentication” if necessary to set a username & password to the iSCSI target. Afterwards, please click [Next].
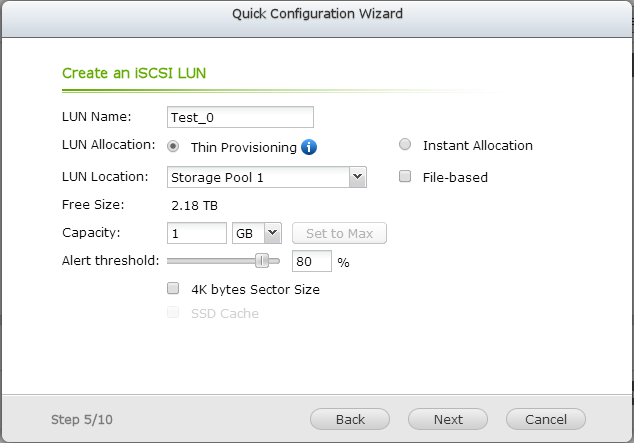
According to your needs, you can choose either “Thin Provisioning” or “Instant Allocation”. With “Thin Provisioning” you can optimize the usage of the storage capacity by allocating an amount of storage space equal to that actually used. On the other hand, if you would like to have fixed storage space, please select “Instant Allocation”. Follow up by whether you need to check “File-based” for iSCSI target (the default setting is Block-based.) Finally, give the storage capacity size to the iSCSI target and click [Next].
Advice: Use a block-based iSCSI LUN with “instant allocation”
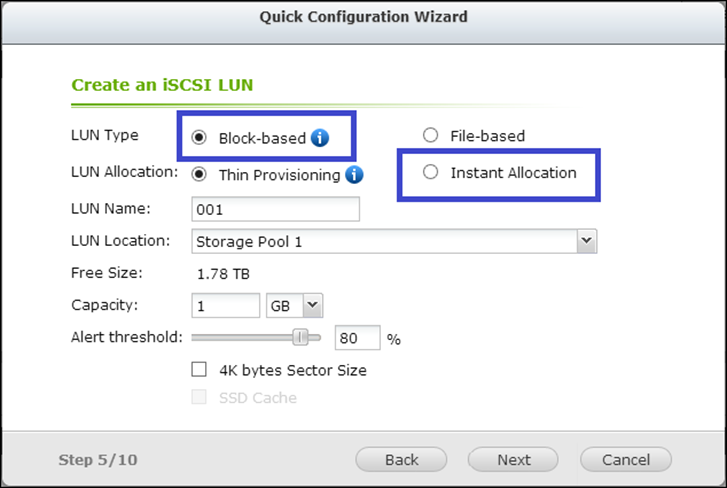
- The block-based LUN type (QTS 4.0.5 and above only) provides much less system overhead
- In particular, the read-write operations on large RAID array will be faster
-The thin-provisioned LUN must allocate new blocks if they are needed at the time of writing new data.
-This will cause CPU and memory overhead, which degrades the write performance.
-Instant allocation will take more time to allocate the total LUN initially, but will give faster write performance once the LUN is completely initialised.
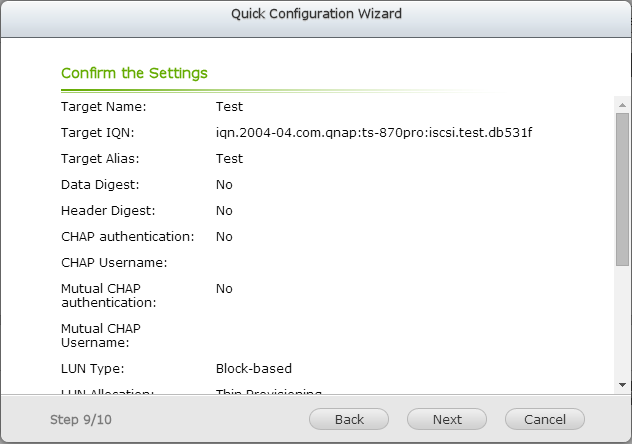
Please confirm the settings of the iSCSI target and click [Next].
You will have created the iSCSI target successfully and now you can click [Finish].
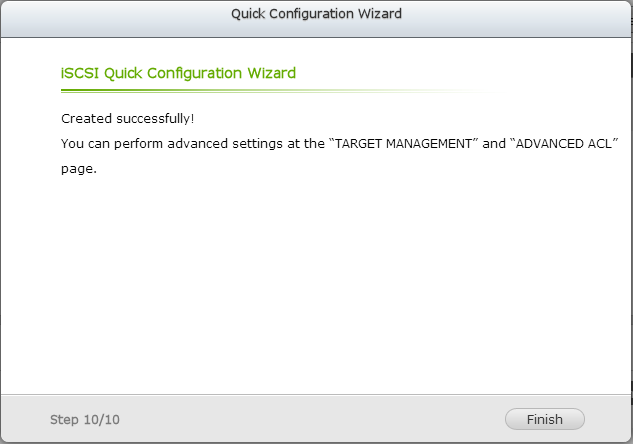
A new iSCSI target will be on the list and enabled.
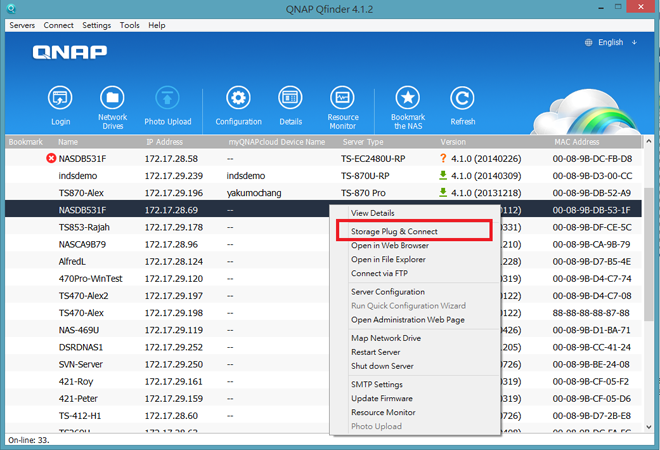
2. From Storage Plug & Connect in Qfinder
You can download QNAP Qfinder on the QNAP website:
http://www.qnap.com/i/en/product/app_page.php?block=1. Qfinder is a utility available for Windows, Mac, and Linux that allows you to quickly find & access your Turbo NAS over LAN. Please select your Turbo NAS, right-click on it, and select “Storage Plug & Connect”.
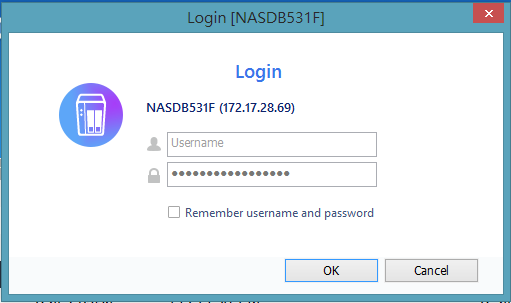
Please insert your Turbo NAS username and password.
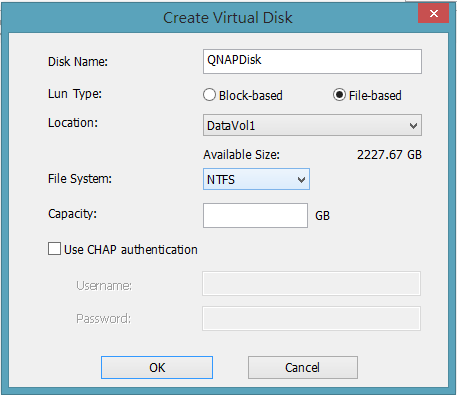
Please click [Create a Virtual Disk (iSCSI)].
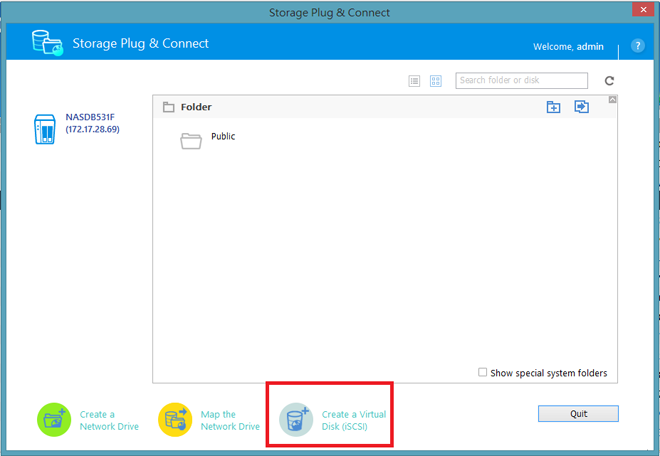
Please give a name, check either “Block-based” or “File-based” based on your needs, and give a storage capacity size to the iSCSI target. If setting a username & password to the iSCSI target is necessary, you can check “Use CHAP authentication” to set them up. Afterwards, please click [OK].
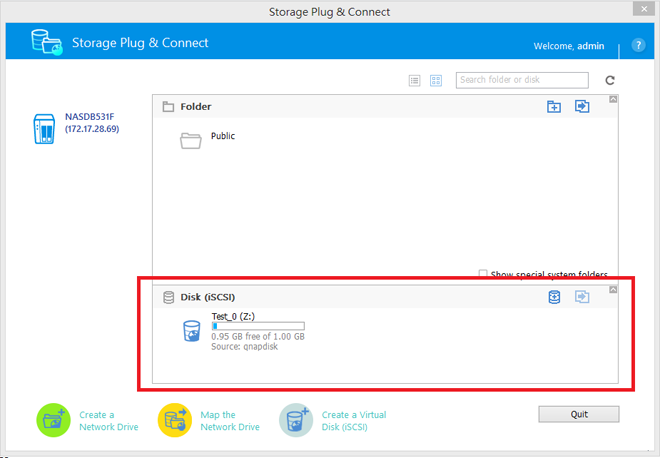
After configuration, a new iSCSI target will be shown on the window.
.
IV – What is The Best iSCSI Performance Options
Optimizing iSCSI Performance
In the environments that require high performance storage, such as virtualization, users are recommended to do the following to optimize the iSCSI and NAS hard disks performance:
| • | Use instant allocation: When creating an iSCSI LUN, select “Instant Allocation” to achieve slightly higher iSCSI performance. However, the benefits of thin provisioning will be lost. |
| • | Create multiple LUNs: Create multiple LUNs according to the processor number of the NAS. The information can be checked in “System Status” > “Resource Monitor.” If the NAS has four processors, it is advised to create four or more LUNs to optimize the iSCSI performance. |
| • | Use different LUNs for heavy load applications: Spread the applications such as database and virtual machines that need high Read/Write performance on different LUNs. For example, if there are two virtual machines which read and write data intensively on the LUNs, it is recommended to create two LUNs on the NAS so that the VM workloads can be efficiently distributed |
Virtualisation – Best Practices for iSCSI
In the virtualisation environment, the systems engineer wants to ensure the best performance of the system. How to maximise the performance of the iSCSI datastore?
1: Create each iSCSI target with only one LUN!
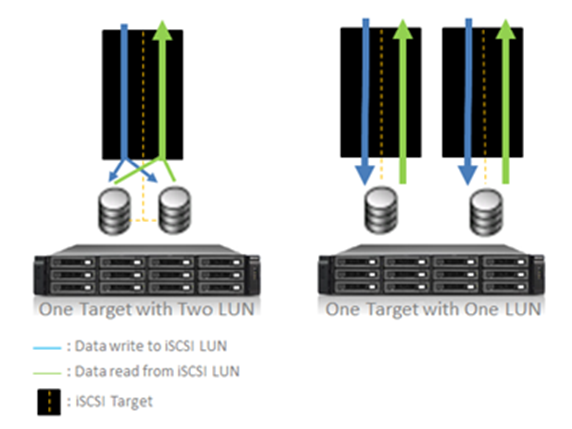
This will prevent bottleneck due to each target having only one I/O thread
The data bandwidth to each LUN will be higher
.
2: Use a block-based iSCSI LUN with “instant allocation”
- The block-based LUN type (QTS 4.0.5 and above only) provides much less system overhead
- In particular, the read-write operations on large RAID array will be faster
-The thin-provisioned LUN must allocate new blocks if they are needed at the time of writing new data.
-This will cause CPU and memory overhead, which degrades the write performance.
-Instant allocation will take more time to allocate the total LUN initially, but will give faster write performance once the LUN is completely initialised.
.
3: Separate the OS and data of the VM
Store the operating system (OS) and the data of a VM on different LUNs
Have a dedicated vmnic (virtual network interface) and network subnet to separate the VM OS datastore and the LUN/shares mapped to the VM for data storage
Example deployment topology:
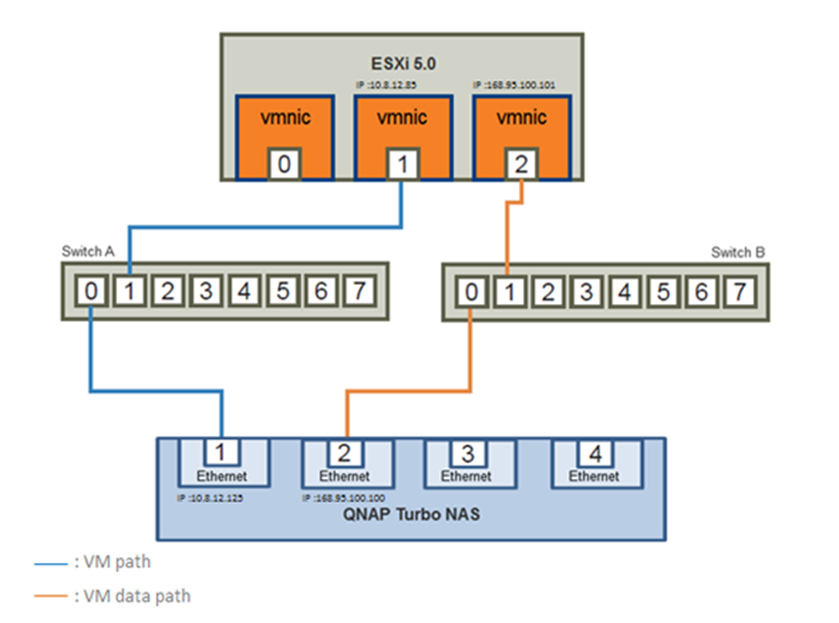
VM Host:
| vmnic | IP / subnet | Remark |
| vmnic 0 | 10.8.12.28/23 | Console management |
| vmnic 1 | 10.8.12.85/23 | NIC for VM datastore |
| vmnic 2 | 168.95.100.101/16 | NIC for VM data access |
QNAP Turbo NAS:
| NAS port | IP / subnet | Remark |
| LAN 1 | 10.8.12.125/23 | NIC for VM datastore |
| LAN 2 | 168.95.100.100/16 | NIC for VM data access |
.
4: Use multiple targets with LUNs to create an extended datastore to store the VMs
When a single LUN is connected to the VM hosts, the I/O has a single iSCSI queue on the NAS
If the LUN is shared with many VM disks, all I/O has to serialize through a single iSCSI queue
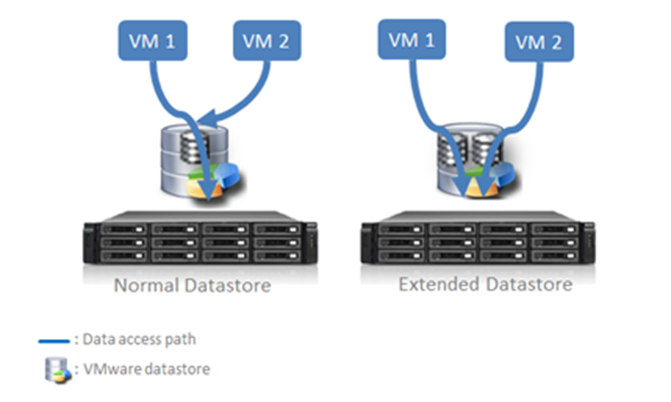
-Only one virtual disk’s traffic can traverse the queue at one time
-Create multiple targets with LUNs as an extended datastore to allow more iSCSI queues to deal with multiple VM disks
.
5: Limit the number of VMs per single datastore
If you just have one LUN as a datastore, you are recommended to implement no more than 10 virtual machines per datastore to avoid slowdown due to the iSCSI queue
The actual number of VMs allowed may vary depending on the environment
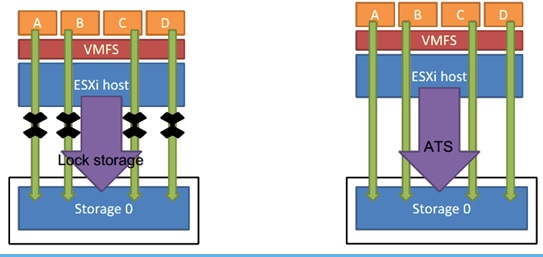
6: Use the latest firmware to support VAAI
VAAI on QNAP NAS supports the ATS primitive
This allows multiple VMs or hosts to use the iSCSI LUN without locking the LUN I/O exclusively during certain operations
.
V – Connect to the iSCSI targets by Microsoft iSCSI initiator on Windows
1. With Windows OS, using Microsoft iSCSI Initiator to connect iSCSI target
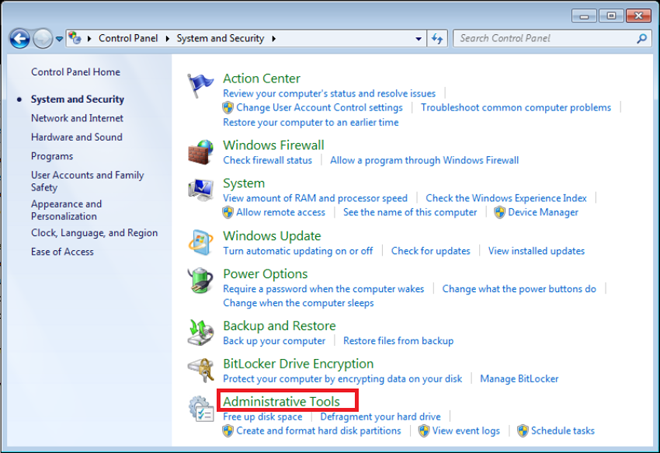
Using Windows 7 as an example, please enter the “Control Panel” and click “System and Security”.

Please click “Administrative Tools”.
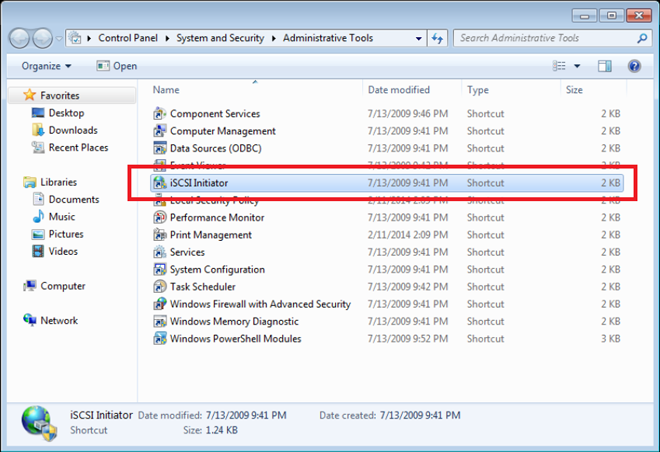
Please open “iSCSI Initiator”.
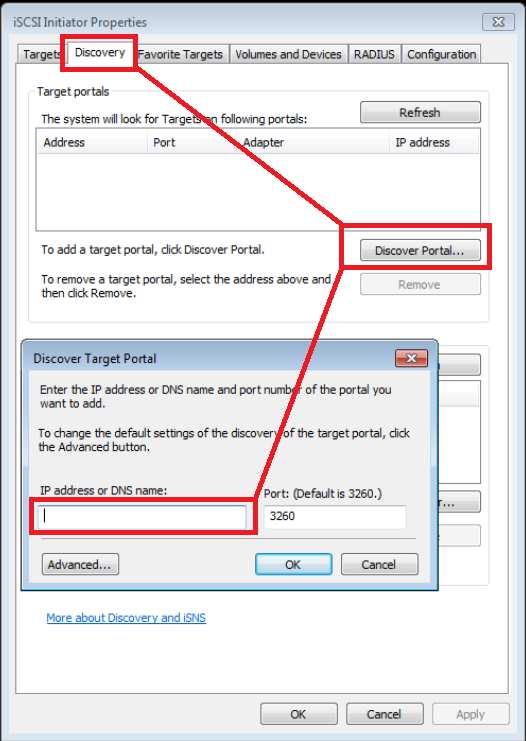
Choose the “Discovery” tab and click [Discover Portal…]. Please insert the Turbo NAS IP address where the iSCSI target was created, and click [OK].
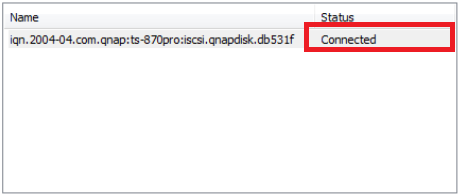
Please choose the “Targets” tab and an iSCSI target will be found. Select it and click [Connect]. If you set a username & password to the iSCSI target, please click [Advanced…] to insert them and then click [OK].
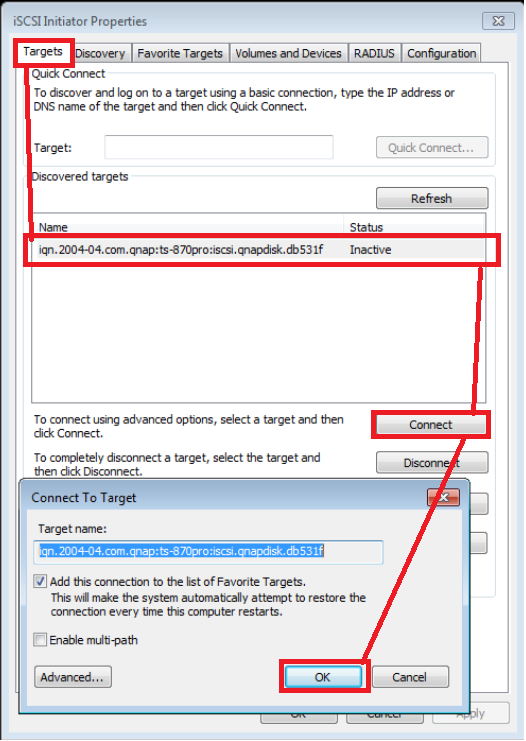
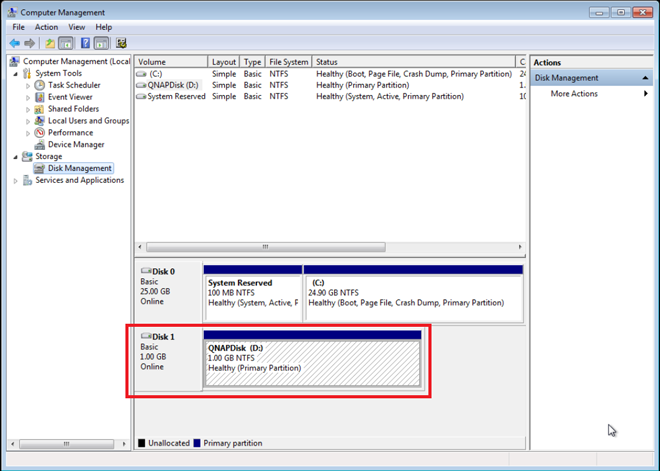
After finishing these steps, Windows 7 will notify you of a new disk added. You can enter “Disk Management” to check it out.
.
V – Connect to the iSCSI targets by Xtend SAN iSCSI initiator on Mac OS
Connect to the iSCSI targets by Xtend SAN iSCSI initiator on Mac OS
Since GlobalSAN iSCSI initiator was reported to have stability concern when dealing with heavy load, we have selected to use Xtend SAN iSCSI Initiator as an example in this application notes. If you would like to read the instructions about using GlobalSAN iSCSI initiator with QNAP NAS, please click here.
About Xtend SAN iSCSI Initiator
ATTO’s Xtend SAN iSCSI Initiator for Mac OS X allows Mac users to utilize and benefit from iSCSI. It is compatible with Mac® OS X 10.4.x to 10.6.x. For more information, please visit: http://www.attotech.com/products/product.php?sku=INIT-MAC0-001
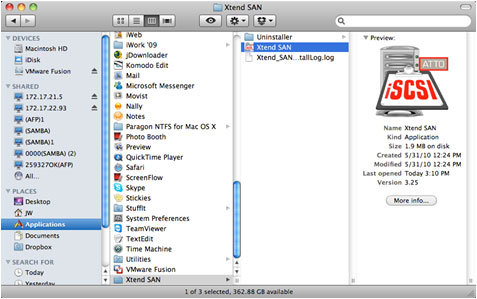
After installing Xtend SAN iSCSI Initiator, you can find it in “Applications”.
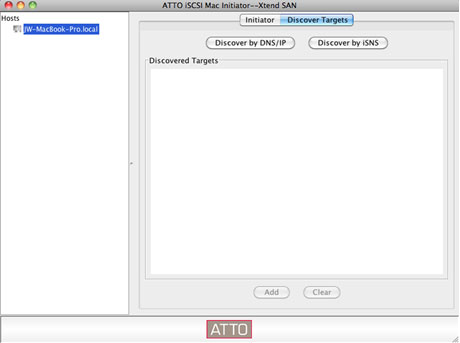
Click the “Discover Targets” tab, you can either choose “Discover by DNS/IP” or “Discover by iSNS” according to the network topology. In this example, we will use the IP address to discover the iSCSI targets.
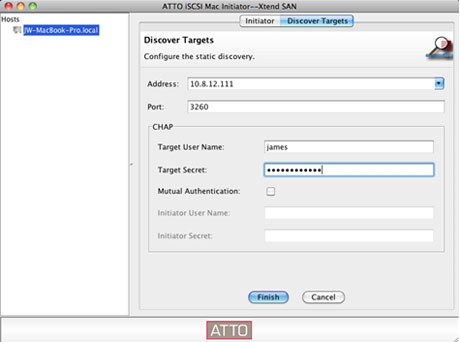
Follow the screen instructions and enter the server address, iSCSI target port number (default: 3260), and CHAP information (if applicable). Click “Finish” to retrieve the target list after all the data have been entered correctly.
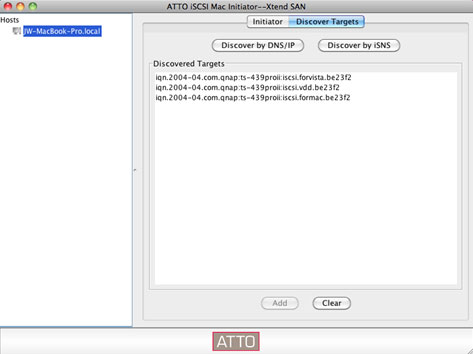
All the available iSCSI targets on the NAS server will be shown. Select the target you would like to connect and click “Add”.
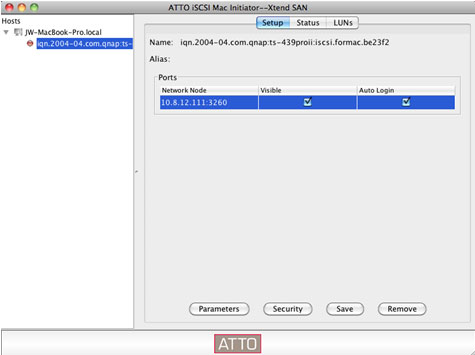
You can configure the connection properties of the selected iSCSI target in the “Setup” tab.
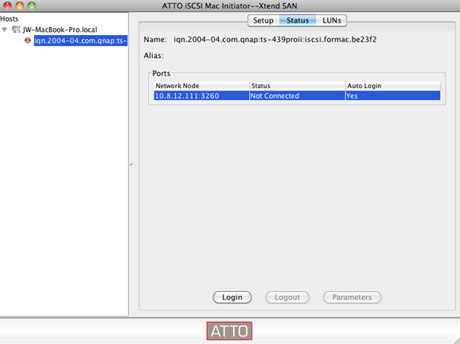
Click the “Status” tab, select the target to connect. Then click “Login” to proceed.
.
VI – Connect to the iSCSI targets by Open-iSCSI Initiator on Ubuntu Linux
With Ubuntu distribution, using Open-iSCSI Initiator to connect iSCSI target
Linux Open-iSCSI Initiator is built-in to Ubuntu 8.04 LTS and later versions. You can use commands to add an iSCSI target via the shell prompt. For more information on Ubuntu, please visit: http://www.ubuntu.com/ and for more information on Open-iSCSI: http://www.open-iscsi.org/
Please install the open-iscsi component first (Linux Open-iSCSI Initiator):
| # sudo apt-get install open-iscsi |
Please refer the steps below to use the Open-iSCSI Initiator to link an iSCSI target (QNAP Turbo NAS). If your iSCSI target needs CHAP information to login, you need to modify iscsid.conf such as “node.session.auth.username” and “node.session.auth.password”.
| # vi /etc/iscsi/iscsid.conf |
Please save iscsid.conf file and close it, then restart open-iscsi service.
| # /etc/init.d/open-iscsi restart |
Look for iSCSI targets (QNAP Turbo NAS). For example, NAS IP: 172.17.28.69, port: 3260.
| # iscsiadm -m discovery -t sendtargets -p 172.17.28.69:3260 |
Linux terminal will pop up the message below:
172.17.28.69:3260, 1 iqn.2004-4.com.qnap:NAS:iscsi.test.db531f
Please select an iSCSI node to link.
| # iscsiadm -m node -T THE_TARGET_iqn –login |
The Linux terminal will display the below message:
Login to [iface: default, target: iqn.2004-04.com.qnap: NAS:iscsi.test.db531f, portal: 172.17.28.69,3260] successful.
This command can be used to delete unnecessary iSCSI nodes:
| # iscsiadm -m node –op delete –targetname THE_TARGET_iqn |
This command can be used to check the status of iSCSI targets:
| # dmesg | tail |
Please use this command to create a partition and the iSCSI target will be associated with /dev/sdb. (“sdb” is the first added storage device. It will be different based on the amount of your storage devices.)
| # fdisk /dev/sdb |
Please use this command to format /dev/sdb1:
| # mkfs.ext3 /dev/sdb1 |
Please use those commands to mount /dev/sdb1:
| # mkdir /mnt/iscsi # mount /dev/sdb1 /mnt/iscsi/ |
Afterwards, you can use the command below to test the I/O transfer rate of the iSCSI target on Linux:
| # hdparm -tT /dev/sdb1 |
There are some commands regarding to “scsiadm”:
This command can be used to find iSCSI targets in a certain host by using the host’s IP address:
| # iscsiadm -m discovery –type sendtargets –portal HOST_IP |
This command can be used to login to the iSCSI target:
| # iscsiadm –m node –targetname THE_TARGET_IQN –login |
This command can be used to logout of the iSCSI target:
| # iscsiadm –m node –targetname THE_TARGET_IQN –logout |
This command can be used to delete the iSCSI target:
| # iscsiadm –m node –op delete –targetname THE_TARGET_IQN |
