I – Be Sure your HDD is In Compatbilitly List;
II – Be Sure You Got Both Powersupplys Are Connected.
III – Be Sure Your Raıd İs Clean, And Got Not Broken Hdd
IV – If You Are Using Ups, Be Sure You Use Compatible Ups Device
V - Disable Space Reclamation and SSD Trim
VI – Change Your NAS Firmware
VII – Change your Fan Speed from Automatic to Manual
VIII – Start a Memory Test
IX – If Prolem Still Exist, Create A Ticket On Qnap Support Team;
.
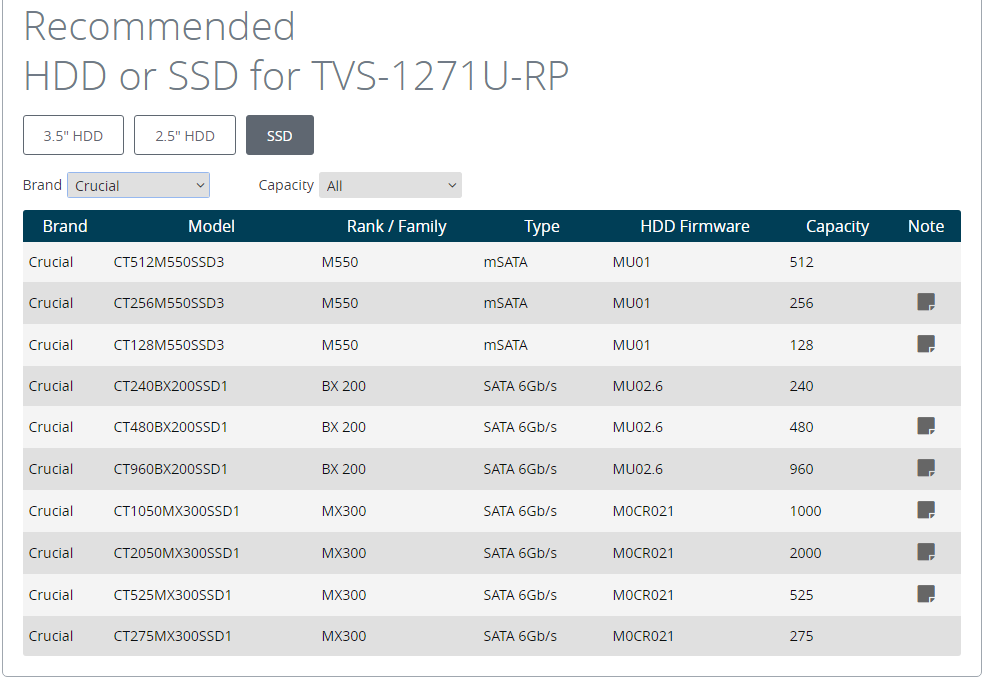
I – Be Sure your HDD is In Compatbilitly List;
Incompatible HDD or SSD cause your NAS crash. If your HDD is not in compatbility table, Qnap support team will reject to check your Problem. Please be careful about this. Also request Qnap support team to add these HDD models in compatiblity table, so Qnap engineers can start a compatibility test.
https://www.qnap.com/en/compatibility/?model=206&category=1
.
Costumers mostly use wrong SSD HDD for caching;
.
II – Be Sure You Got Both Powersupplys Are Connected.
Especially for 8+ Bay device, if you forget to plugin second power cable, this will cause your NAS crash & restart Itself.
.
III – Be Sure Your Raıd İs Clean, And Got Not Broken Hdd
Broekn HDD cause your NAS restart itself. If one of your HDD gives “Normal” or “Abnormal” error, change broken HDD with a new one. Start a File system check, and smart test for your HDD’s.
.
IV – If You Are Using Ups, Be Sure You Use Compatible Ups Device
If you do not use compatbile UPS device, this will cause your NAS crash & restart itself. Just plug out that UPS device and check if problem still exist or not.
.
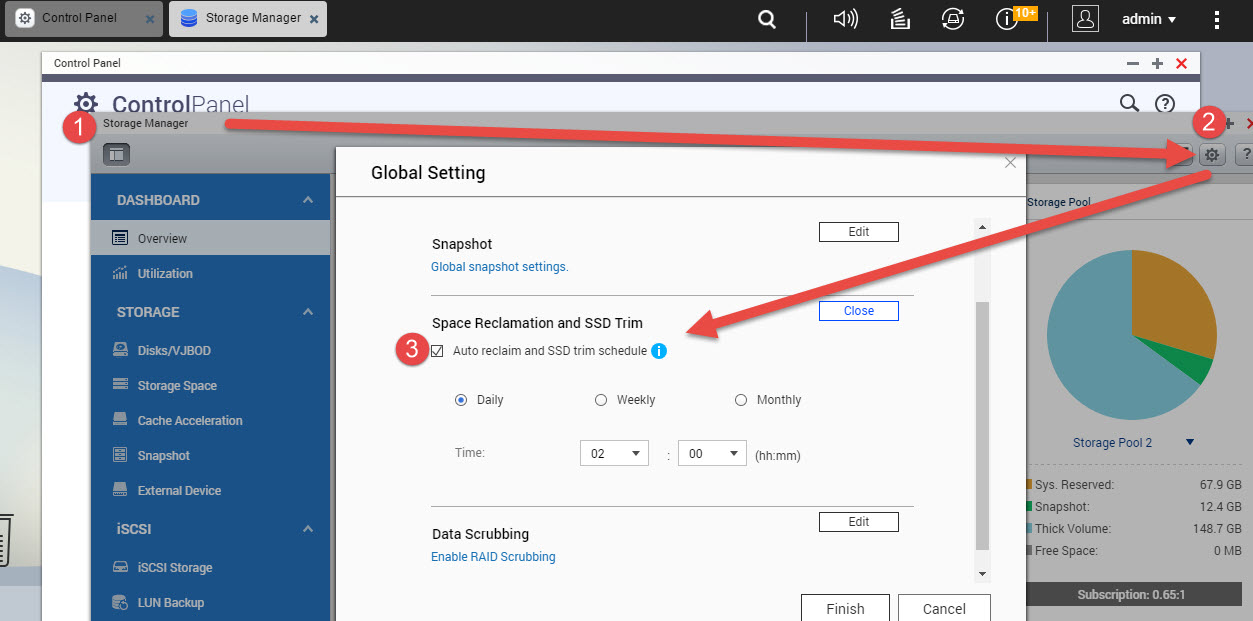
V - Disable Space Reclamation and SSD Trim
This cause problems, espacially if you are using incompatiblr SSD for cahce, this will cause your NAS “restart” itself at every 02.00.. just shut it down.
To Disable this, Go to Storage Manager ->Global Settings -> Space Reclamation and SSD Trim -> disable
.
VI – Change Your NAS Firmware
Sometimes a new released firmware cause this kind of problem, so downgrade your firmware to earlier version if this problem exist after firmware upgrade
.
VII – Change your Fan Speed from Automatic to Manual
Sometimes High-Head cause this problem, so for test, change fan speed from automatic smart fan to manual-high speed fan
.
VIII – Try a Memort Test
Sometimes an incompatible RAM may cause this error, so please start a RAM Test;
Memory Test
This page will detail how to run a full test of the NAS memory using the Memtest86+ utility.
This procedure only applies to NAS models with Intel CPU.
Konu başlıkları
[gizle]
Memory Test SOP for x86-based NAS
Applied QNAP NAS models
TS-x39 Series, TS-x59 Series, TS-x69 Series, TS-509, TS-809, TS-809U
Instructions for Performing the Memory Test
A. How to create a Memtest USB boot disk.
1. Go to http://www.memtest.org/#downiso and download the latest “Auto-installer for USB Key” file
2. Plug a USB flash drive to your PC and run the Memtest Auto-Installer to create a bootable USB
B. How to use the Memtest USB boot disk to test the NAS memory
1. Power off the NAS.
2. Remove all the hard disks.

3. Connect the NAS with a VGA monitor, USB keyboard, and the bootable USB disk.

4. Power on the NAS and press F11 key repeatedly.

5. Select the USB flash drive as your boot device. If you didn’t the menu and the system continues to process with the command line mode, please reboot the NAS and repeat the step 4.
[NOTE]: If there are two USB devices, don’t select “USB DISK MODULE PMAP”.

6. The memory test will begin automatically.

Memory Test SOP for TS-x79, TS-x70 Series, TS-451+ NAS
Applied QNAP NAS models
TS-x79 Series, TS-x70 Series, TS-451+
Instructions for Performing the Memory Test
A. How to create a Memtest USB boot disk.
- Go to http://www.memtest.org/#downiso and download the latest “Auto-installer for USB Key” file.
- Extract the zip file to the folder you downloaded it to.
- Plug a USB flash drive to your PC and run the Memtest Auto-Installer file extracted from the step above to create a bootable USB
B. How to use the Memtest USB boot disk to test the NAS memory
1. Power off the NAS.
2. Remove all the hard disks.

3. Connect the NAS with a VGA monitor, USB keyboard, and the bootable USB disk.

4. Power on the NAS and press the or key when you see the message to enter setup.

5. You will enter the BIOS Setup. Press the right arrow key to navigate to the Boot settings screen, and select “Hard Drive BBS Priorities”

6. Select “Boot Option #1″

7. Select “Generic USB Flash Disk” or similar name showing your USB disk
[NOTE]: If there are two USB devices, don’t select “USB DISK MODULE PMAP”. Similar for TS-451+, except you have to change boot order to specify USB flash first by using +/- keys. DON’T select UEFI USB flash device.

8. Press and select “Yes” to save and exit. On TS-451+. press to save and exit.

9. The memory test will begin automatically
.
IX – If Prolem Still Exist, Create A Ticket On Qnap Support Team;https://helpdesk.qnap.com/index.php?/Tickets/Submit
Dont forget to add your log files, resource monitor CPU/RAM usage screenshots
