From : http://www.codeproject.com/Articles/219533/QNAP-NAS-Memory-Upgrade-Hardware-Change-and-Perfor)
Introduction:
This is an article that I had originally published on my website and thought I would also share it here, after all many people may have this type of NAS device or similar, or may want to investigate their own ones to see if a similar modification can be performed on them.
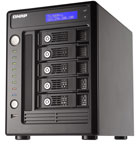
I had owned my QNAP TS509 Pro NAS (Networked Attached Storage) device for about 9 months, and one day while reading through the community forums on the QNAP site, I read it was possible to upgrade the memory on the device, and to be honest it wasn’t something I had even thought about doing.
Why Perform the Upgrade
Well first off, I like to tinker, secondly I had read that there was a small performance improvement to be made on the read/write speed. There are other benefits, which I will briefly touch on later, but the two listed were the motivating reasons for me performing the modification.
Memory is cheap and as the device was coming towards the end of the warranty period, I thought what the hell I’ll give it a go.
Warning Notice
Remember, you are also dealing with electronic components and should observe anti-static procedures, also be aware of hazardous electrical voltages and not forgetting if it all goes wrong, you could lose any data that is stored on the device, so if it’s that valuable, don’t bother, or make sure you have backed it up!
Shall We Begin?
This article covers two aspects to the modifications, both the hardware, and the performance. If you are like me, you also want to know the modification has been of value, so before you start remember to perform a system benchmark, then perform the modification, then perform the same performance benchmark test post modification. See the Performance Benchmarks section later for more on that.
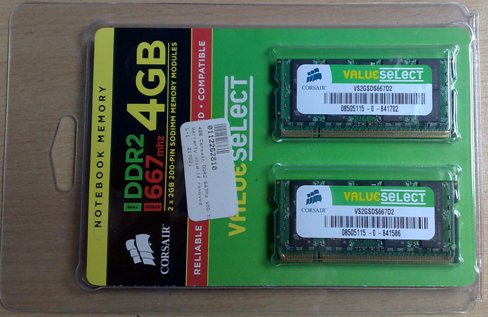
The NAS box used standard 200 Pin, 667MHz DDR2 SO-Dimm modules as used in laptops, the NAS box has 2 slots, and can take a maximum of 4GB, so I ordered a pair of 2GB modules from Corsair.
Installing The Memory
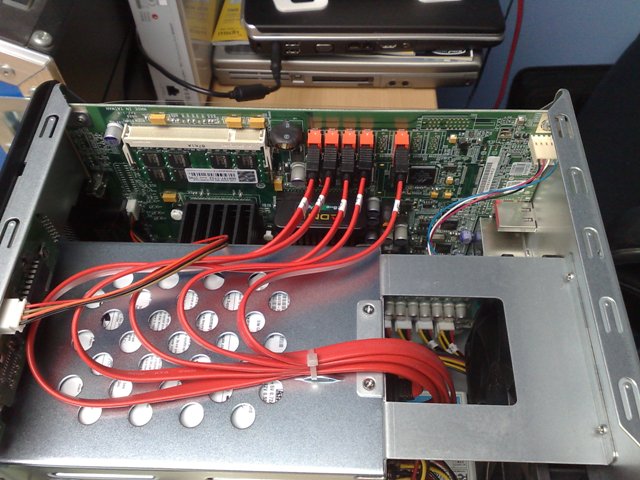
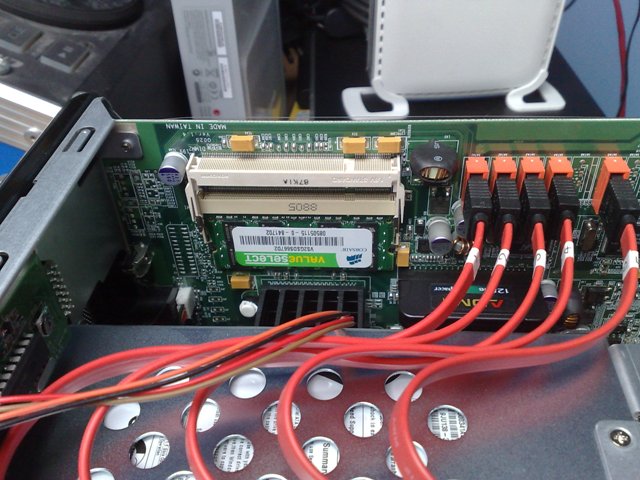
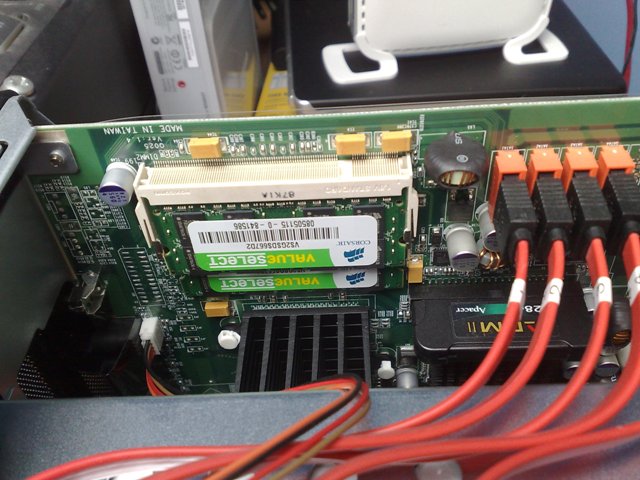
After removing the screws at the rear of the NAS box, slide the cover off the NAS. On the mainboard, you will clearly see the memory sockets at the top left. Take care not to dislodge any of the disk SATA cables. The SO-Dimm Sockets are the usual, spring latch at the sides which need to be pulled back, and then the module needs to be tilted forward and slid out.
After removing the old module, starting with the rear module, check the orientation and the header notch location, insert the new module, latch into place, then repeat the front socket.
Finally, just check that all the latches are in place, and no other cables have been dislodged and then replace the lid. You can wait until you have tested everything before putting the screws back in, but just don’t forget to do it!
As you can see in the images below, the memory was easily accessible, and replacement was a doddle.
 |
|
Old Memory In Place
|
 |
|
Old Memory Removed
|
 |
|
Rear New Memory Installed
|
 |
|
Front & Read New Memory Installed
|
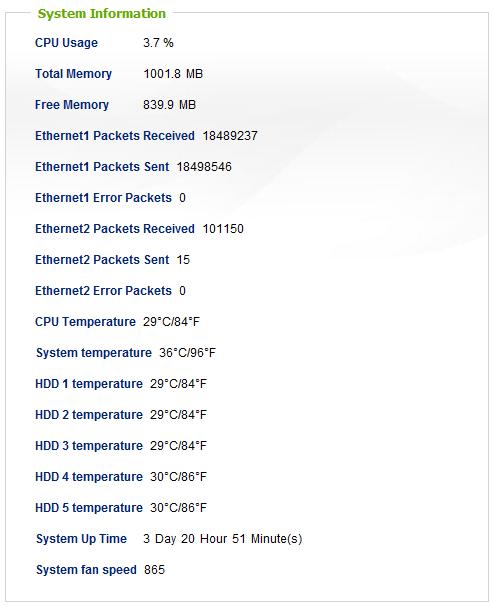
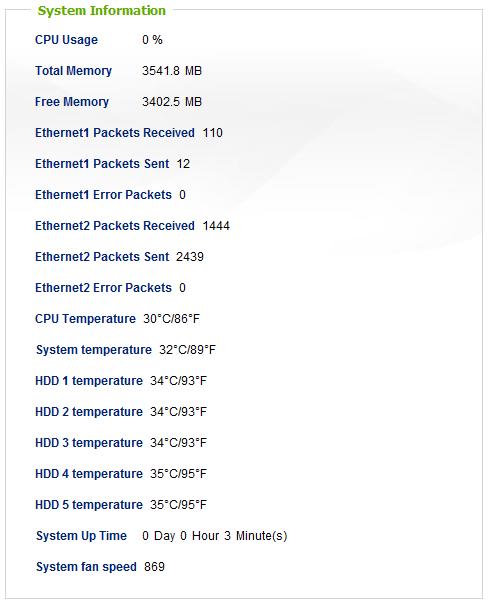
After the memory was installed, the unit was powered up and a snapshot was also taken from the System Information screen of the administration console. I had also taken a snapshot before I commenced the modification for comparison, and as you can see below, the system has happily recognised the memory. The POST bios screens also showed the memory, but did not get snap shots of these. NOTE: As you can see, this only reports around the 3500MB mark. This is of course due to the firmware running 32Bit Linux OS, and the memory address range is thus limited.
Performance Benchmarks
I have been using the freeware application Disk Benchmark II by Ives Heymans as it is a simple interface, and has the option to turn of caching and use unbuffered IO. As this is a freeware application with no restriction on distribution, I have included this here to save you from having to search for it from a reputable source. I am not aware if it is maintained or if newer versions exist, and have never come across any yet.
- Rd II Disk Benchmark .NET 2.0 – 36.09 KB
- Excel Workbook with Full Results and template for comparisons – 31.18 KB
Always perform a fresh reboot of the NAS and source PC before performing the benchmark, this will give improved consistent results, and also do not perform any other operations on either device which may impact the results accuracy due to CPU overhead or network constraints.
In order to perform the benchmark using the freeware tool above, first you map a windows drive to a folder share on the NAS box. Run up the software and select the mapped drive on the NAS box. It is important to ensure that caching has been disabled and that the unbuffered IO options are selected, otherwise the caching and buffering features of the windows OS may impact the results. Also, if there is anything else going on with the network, this may result in lower bandwidth availability for the tests and impact the results.
Run a series of tests on each of the data set sizes, and the software will also automatically test the various data block sizes to test the performance of the NAS at handling the various conditions.
Another thing to note whilst testing is how you have configured the volumes of the NAS box, if you have set the device up as a Raid Stripe, Raid Mirror, Raid 5, JBOD etc, each of these will return difference in performance. For example, the Raid 5 means that the NAS has to calculate parity for the data, and will give you a lower write performance compared to a stripe set.
If you are not familiar with RAID, then check out the Wiki entry for more information on the different types of Raid. The entry can be found at http://en.wikipedia.org/wiki/RAID.
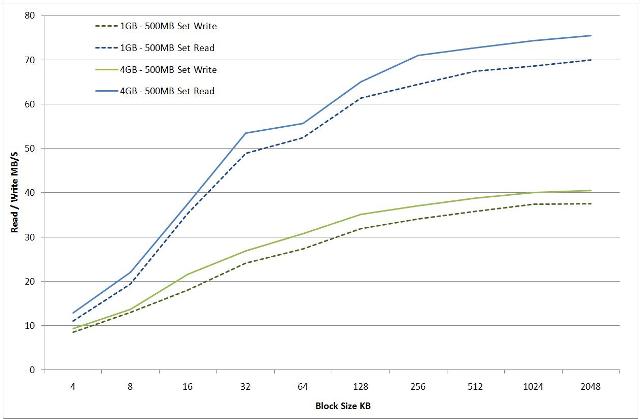
I ran the benchmark nine times (3 @ 20MB data set, 3 @ 100MB data set, 3 @ 500MB data set) and averaged the results for each data set size. This was done for both 1GB and 4GB memory. The NAS is configured in RAID 5, with a single volume spanning 5x 1.5TB disks.
As you can see for the 500MB data set below, there is a clear performance advantage as a result of the memory upgrade. The 20MB and 100MB data sets also showed the same percentage increases.
So that’s about it, yes there is a small benefit from the upgrade, so what are the other benefits that I said I would touch on? Well, the QNAP NAS boxes also have a number of other applications and features, from ITunes Servers, Joomla Servers, MySQL, MLDonkey, etc., so the additional memory allows larger caching and improves the transcoding of media files during streaming. Unfortunately, I don’t have any benchmarks for those benefits, but as with any PC upgrade, the first improvement should always be the RAM.
Well that’s it, I hope you enjoyed this little hardware tweaking article. Oh, and if you haven’t replaced the case screws yet, now’s the time to do it!
Is it Worth to Upgrade RAM on Qnap?Qnap üzerindeki RAM'i Arttırmak Gerçekten Gereklimi?,