I – Which İs The Best Port Trunking Option?
II – Set Port Trunking On Your Qnap Nas To İncrease The Bandwidth Via 802.3ad Protocol.
.
I – Which İs The Best Port Trunking Option?
Below are the 6 options available:
Balance-rr (Round-Robin) -> Must Be Configed From Switch First
Round-Robin mode is good for general purpose load balancing between two Ethernet interfaces. This mode transmits packets in sequential order from the first available slave through the last. Balance-rr provides load balancing and fault tolerance.
Supports static trunking. Make sure static trunking is enabled on the switch.
.
Balance XOR -> Must Be Configed From Switch First
Balance XOR balances traffic by splitting up outgoing packets between the Ethernet interfaces, using the same one for each specific destination when possible. It transmits based on the selected transmit hash policy. The default policy is a simple slave count operating on Layer 2 where the source MAC address is coupled with destination MAC address. Alternate transmit policies may be selected via the xmit_hash_policy option. Balance XOR mode provides load balancing and fault tolerance.
Supports static trunking. Make sure static trunking is enabled on the switch.
.
Broadcast -> Must Be Configed From Switch First
Broadcast sends traffic on both network interfaces. This mode provides fault tolerance.
Supports static trunking. Make sure static trunking is enabled on the switch.
.
IEEE 802.3ad (Dynamic Link Aggregation) -> Need Supported Switch, Must Be Configed From Switch First
Dynamic Link Aggregation uses a complex algorithm to aggregate adapters by speed and duplex settings. It utilizes all slaves in the active aggregator according to the 802.3ad specification. Dynamic Link Aggregation mode provides load balancing and fault tolerance but requires a switch that supports IEEE 802.3ad with LACP mode properly configured.
Supports 802.3ad LACP
.
Balance-tlb (Adaptive Transmit Load Balancing)-> General switches
Balance-tlb uses channel bonding that does not require any special switch. The outgoing traffic is distributed according to the current load on each Ethernet interface (computed relative to the speed). Incoming traffic is received by the current Ethernet interface. If the receiving Ethernet interface fails, the other slave takes over the MAC address of the failed receiving slave. Balance-tlb mode provides load balancing and fault tolerance.
.
Balance-alb (Adaptive Load Balancing) -> General switches
Balance-alb is similar to balance-tlb but also attempts to redistribute incoming (receive load balancing) for IPV4 traffic. This setup does not require any special switch support or configuration. The receive load balancing is achieved by ARP negotiation sent by the local system on their way out and overwrites the source hardware address with the unique hardware address of one of the Ethernet interfaces in the bond such that different peers use different hardware address for the server. This mode provides load balancing and fault tolerance.
.
Just Note;
static port trunking needs to be configured on the switch with the port trunking options Balance-rr, Balance XOR and Broadcast. Cheap non-manageable switches are therefore not compatible with any of those modes.
.
Which One Is Adviced? (As Costumer Report)
1 – “The best way ist just test every type of config. Without any special hardware and using a belkin router(only for testing) as a switch, i have found that with the option – Balance-rr – transfer rate is much better, actualy 4x better.”
2 – “IEEE 802.3ad works very vell in combination with a compatible managed switch.”
.https://forum.qnap.com/viewtopic.php?t=61675
.
II – Set Port Trunking On Your Qnap Nas To İncrease The Bandwidth Via 802.3ad Protocol.
Port Trunking, also known as LACP (Link Aggregation Control Protocol), allows you to combine multiple LAN interfaces for increased bandwidth and load balancing for multiple clients. It also provides failover capabilities to maintain network connectivity if a network port fails.
- 802.3ad (Dynamic Link Aggregation) is the No.5 mode according to the IEEE 802.3ad specification. It uses a complex algorithm to aggregate adapters by speed and duplex settings to provide load balancing and fault tolerance but requires a switch that supports IEEE 802.3ad with LACP mode properly configured.
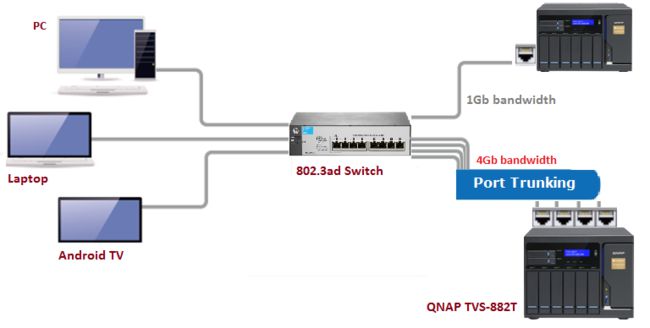
Note: Your switch must support 802.3ad.
Note: A NAS with multiple LAN ports is required.
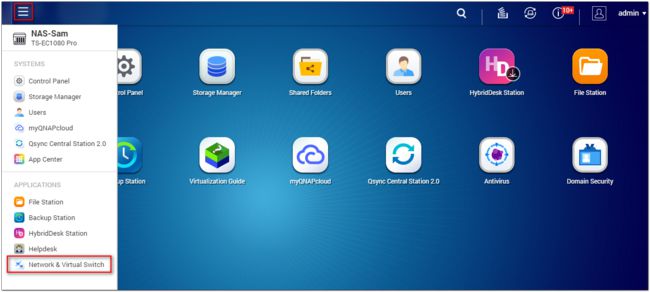
Follow these steps to set up your NAS.
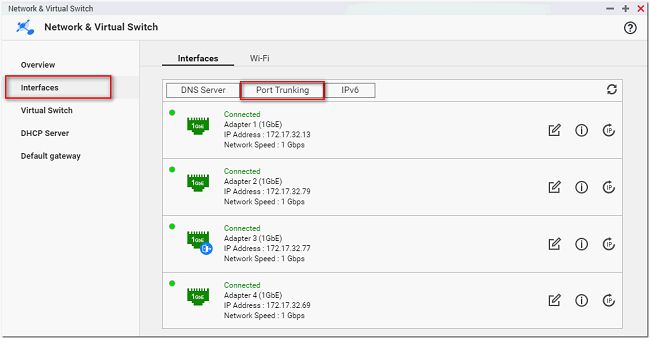
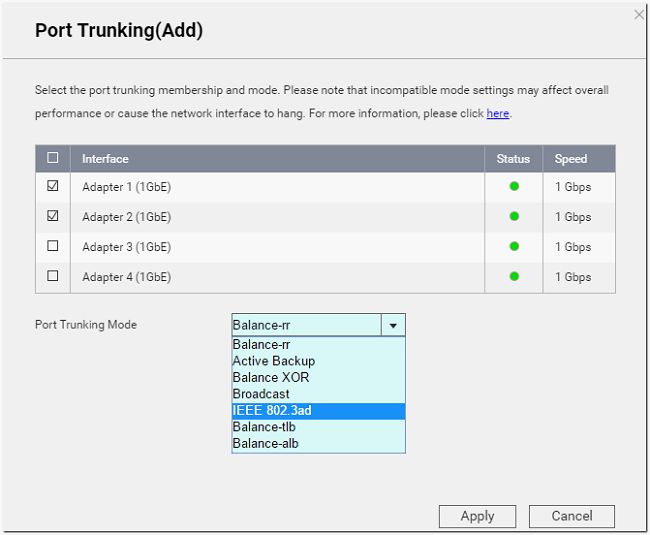
- Log into the NAS as an administrator. Go to “Main Menu” > “Network & Virtual Switch” > “Interfaces”. Click “Port Trunking”.
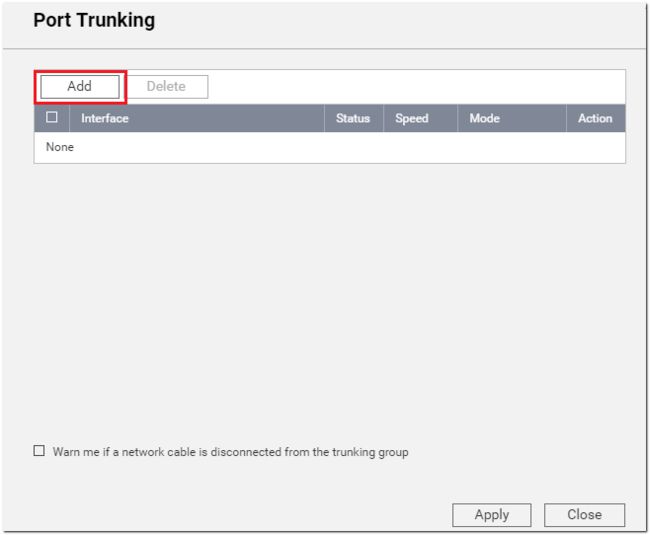
- Click “Add” from the pop-up window.
- Select the network interfaces to use and select 802.3ad for the Port Trunking Mode.
- Click the settings button beside 802.3ad.
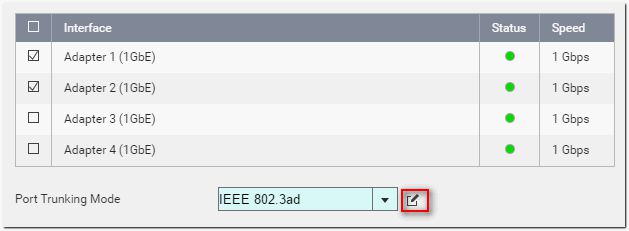
- Select a HASH policy for 802.3ad:
The default setting is “layer 2 (MAC)“. This is compatible with every switch but only offers load balancing by MAC address. We recommend using “Layer 2+3 (MAC+IP)” for greater performance but you will need to check that your switch supports it.

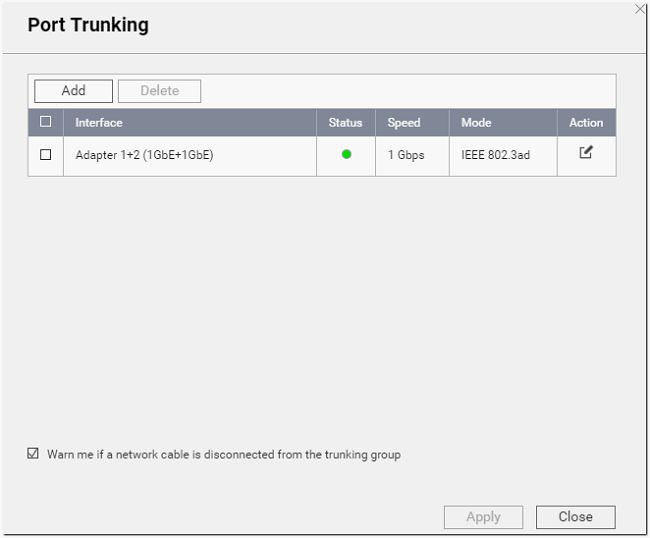
- Click “Apply” to finish.
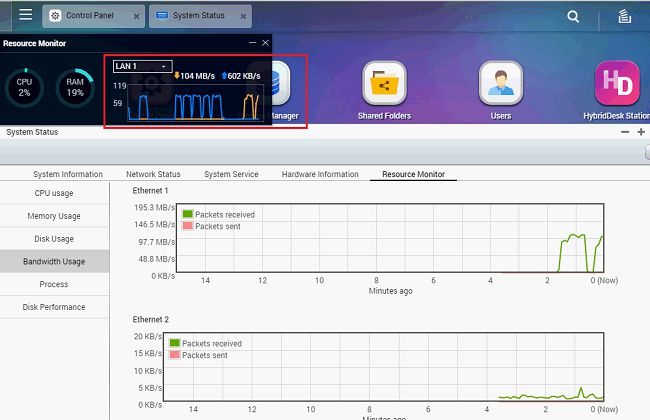
Test Results:
The test results of before and after Port Trunking is as follows.
- A Gigabit Ethernet Network
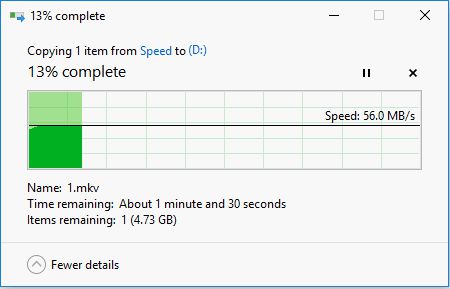
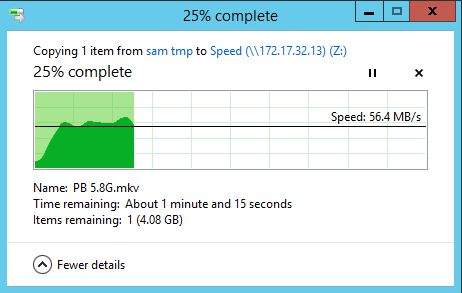
- One user downloading a large video file from the NAS:
- One user uploading a large video file to the NAS:

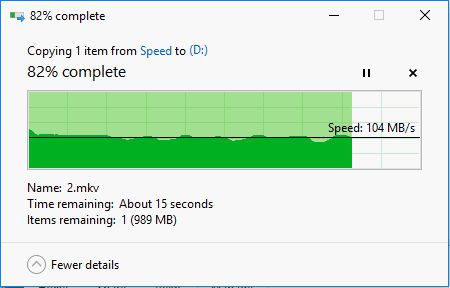
- Two users downloading a large video file from the NAS at the same time:
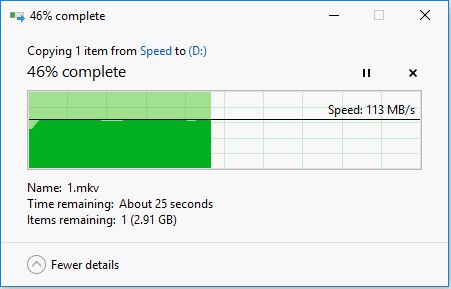
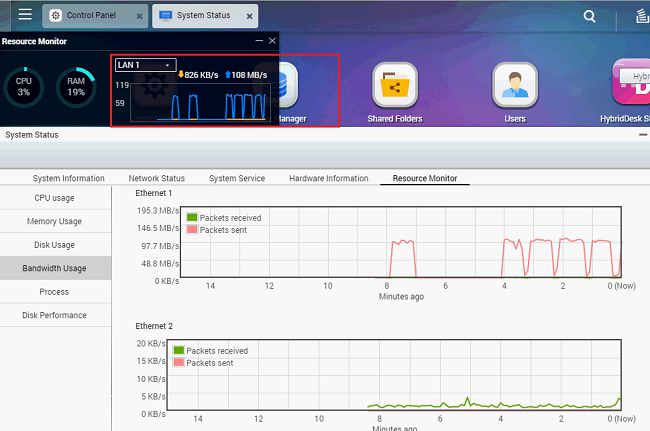
The throughput of the NAS reaches 108~110 MB/s (downloading):
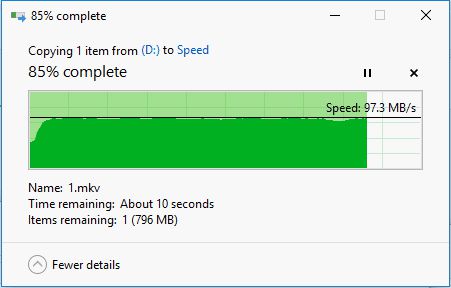
- Two users upload a large video file to the NAS at the same time:
The throughput of NAS reaches 102~104 MB/s (uploading):
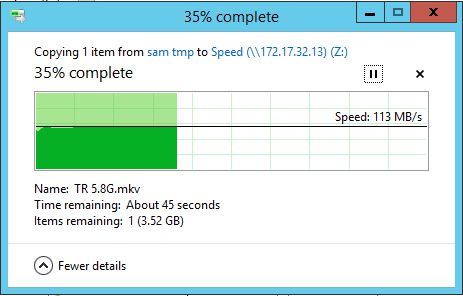
- One user downloading a large video file from the NAS:
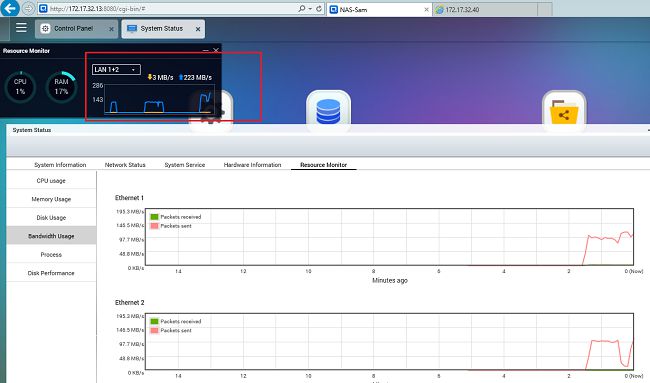
- Aggregating two Gigabit Ethernet Networks on the NAS
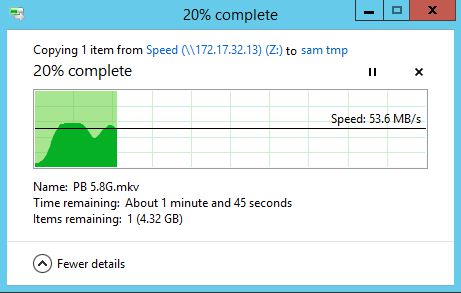
- One user downloads a large video file from the NAS:
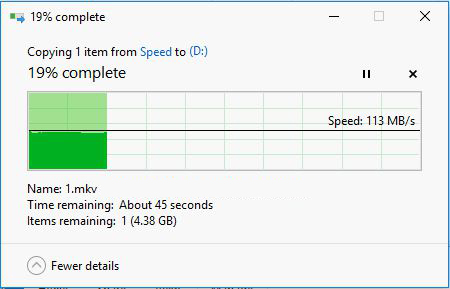
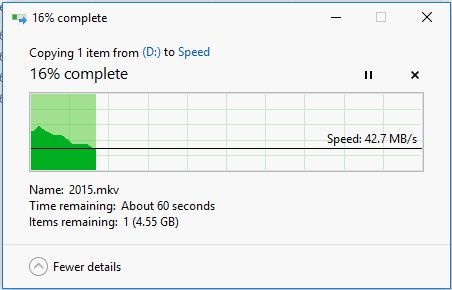
- One user uploads a large video file to the NAS:
- Two users download a large video file from the NAS at the same time:
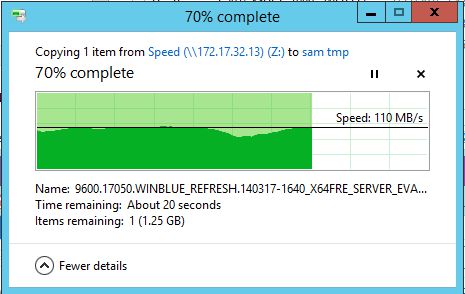
The throughput of NAS reaches 210~223 MB/s (downloading):
- Two users upload a large video file to the NAS at the same time:
The throughput of NAS reaches 200~210 MB/s (uploading):

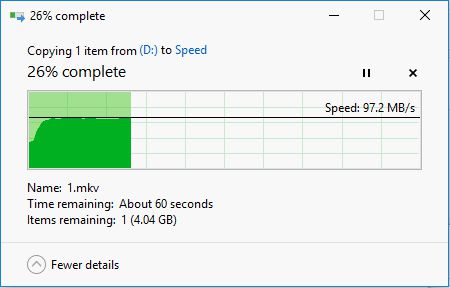
- One user downloads a large video file from the NAS:
As displayed by the test results, Port Trunking can increase bandwidth on a QNAP NAS . But please note the following:
- Port Trunking cannot break the speed limit of a single Ethernet device, but it offers a sufficient amount of bandwidth for multiple users connecting at the same time. For example, if two 1Gb NICs are used for Port Trunking, the aggregated network bandwidth will be increased to 2Gb, but the network speed will remain 1Gb.
- Available system resources and the maximum read/write speeds of the storage devices on the NAS will greatly influence the overall bandwidth.
.https://www.qnap.com/en-us/how-to/tutorial/article/set-port-trunking-on-your-qnap-nas-to-increase-the-bandwidth-via-802-3ad-protocol
.
Load Balance Setup: Which Is The Best Port Trunking Option?Load Balance Ayarları: Hangi Port Trunking Modu En İyisi?,