I - How To Use QNAP Qtier For Auto Tiering And Optimizing Your Storage Performance
.
I - How To Use QNAP Qtier For Auto Tiering And Optimizing Your Storage Performance
1. Challenges and Solutions
The most important factors determining storage performance are I/O (Read and Write) performance and capacity. When considering how to configure and deploy different types of drives, the pros and cons must be considered:
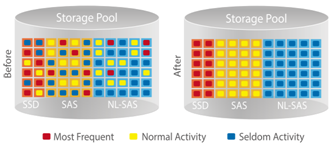
The best option here may also be the most inconvenient option as IT staff will need to plan and manually set what data should be placed into what kind of storage. This is when QNAP Qtier™ comes in handy. Qtier is a multi-tier storage management system that automatically moves data to different usage tiers based on how frequently it is accessed, making it easier for IT staff to maintain the storage and optimizing your data for everyday use.
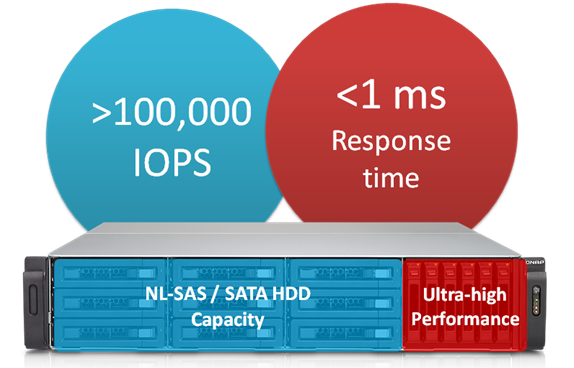
We used one server equipped with two Intel Xeon E5-2620v3 (6 cores, 12 threads) processors and a total of 24 workers in IOmeter to test Qtier’s performance with a TVS-EC1580MU-SAS-RP (using 6 x SAS-SSD RAID 10*). The result for 4k IO, 100% random read, 12 outstanding IO per worker, was 140,000 IOPs. The average IO response time was 0.3ms with 40 GbE interfaces and 0.7ms with 10 GbE interfaces.
*Full test specifications:
Server: Supermicro SYS-6028U-TR4T+
Memory: 16 GB
CPU: 2 Intel Xeon E5-2620 v3 2.40GHz
QNAP NAS: TVS-EC1580MU-SAS-RP
RAM: 12 GB
CPU: Intel Xeon E3-1246 V3 3.50GHz
Drives: Seagate SAS-SSD ST400FM0053*6, other are Seagate NL-SAS ST1000NM0023.
RAID configuration: RAID10 for SSD, RAID 5 for NL-SAS drives
Qtier is also compatible with QTS 4.2′s SSD cache function. This function can improve the cache hit rate by moving frequently-accessed randomly-read data to a SSD cache. On the other hand, Qtier moves data accordingly to data analysis results and by schedule. The following is the basic comparison of SSD cache and Qtier:
| Comparison | Qtier | SSD Cache | Full SSD |
|---|---|---|---|
| 1. Available SSD Space | Expandable as needed | Limited by available memory* | Expandable as needed |
| 2. Price | Low | Low | High |
| 3. Applicable storage | Volume/LUN | Volume/LUN | Volume/LUN |
| 4. Data Migration Method | Scheduled | Automatic | - |
| 5. Data migration Mechanism | Moves data to different tiers depending on access frequency |
Replicates frequently-accessed data to SSD storage |
All data stored on SSDs |
| 6. Application Scenarios | Used for predictable I/O workloads such as file/web/email servers, application virtualization or video editing. | Used for highly frequent data access environment such as application virtualization or video editing. | Used for applications requiring fast/intensive I/O such as databases or virtualized environments. |
* For more information regarding SSD Cache, please check here.
* SSDs used by Qtier cannot be used as an SSD Cache.
2. System Requirement
Qtier is only supported by specific NAS models. For more information, please refer to the Qtier introduction.
QNAP Qtier™ requires a minimum of 8GB RAM.
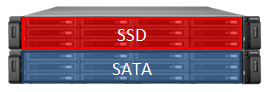
The NAS must also be using firmware 4.2 (or above), and have both SSD and HDD in the NAS* to use Qtier.
*To use the High-Speed Tier, you must also use SAS drives, which are only supported by models with “SAS” in the name.
3. Create Storage Space with Qtier
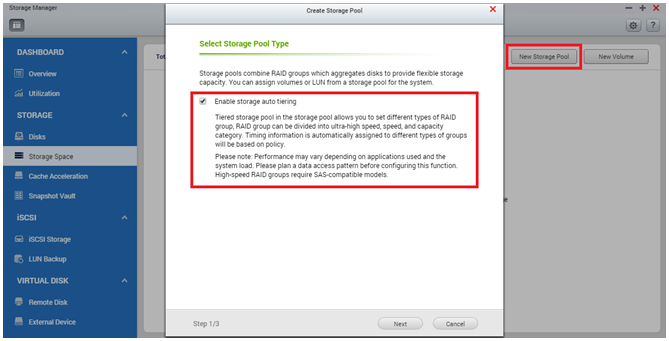
To use Qtier, you must first deploy different types of drives in the NAS*. Once the drives are installed and ready, create a new storage pool in “Storage Manager” > “Storage Space” > “Create New Storage Pool”. When you are using a model that supports Qtier, the first step of the storage pool creation wizard will prompt you to “Enable storage auto tiering”. Check the box and click “Next”.
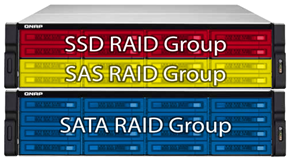
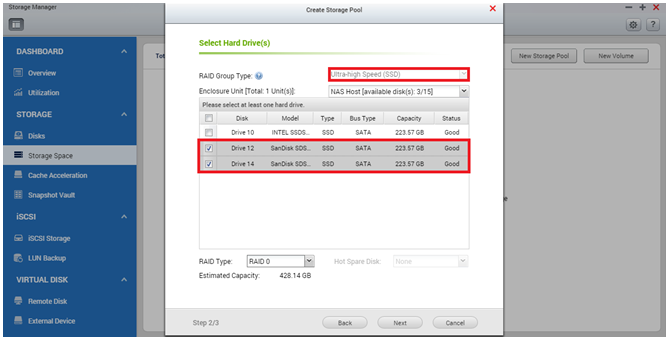
In the next step, you will find the “RAID Group Type” and the “Ultra-high Speed (SSD)” values selected. Now you can select the SSD drives that will be used to build the Ultra-high Speed Tier RAID Group of the storage pool. After confirming the selection, follow the wizard to finish creating the storage pool with the first tier.
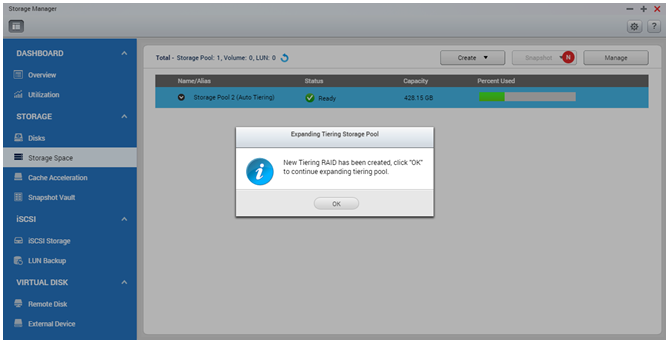
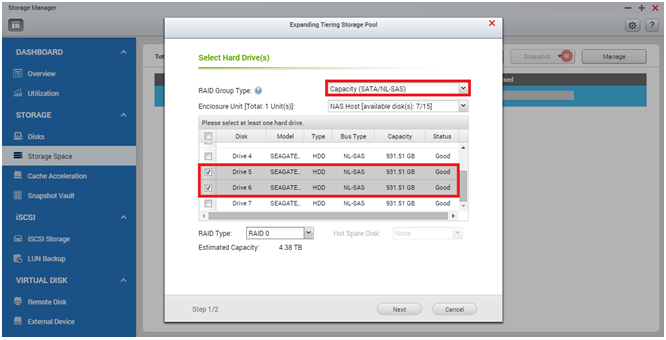
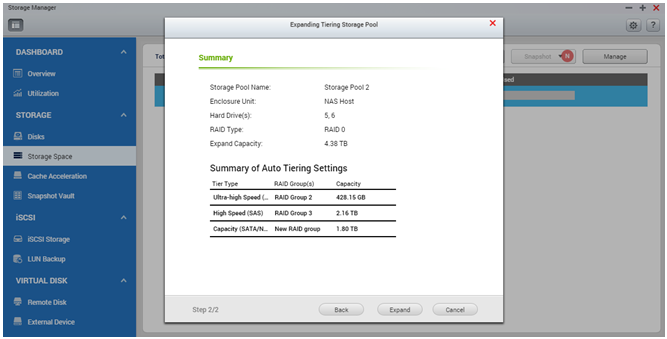
Once the storage pool is created, you will be prompted to set other tiers for the storage pool. You will be able to select different drive types that will be used in the different tiers of the storage pool*. The RAID Group “Capacity (SATA, NL-SAS)” is configured in the below example.
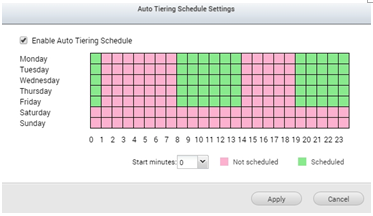
Once all the tiers are set, the system will prompt you to enable the Auto Tiering schedule. In this view you can select when the system should start relocating the data. As relocation may affect the storage I/O performance, it is recommended to schedule this action for non-working hours or when the storage is not frequently used*.
*Auto Tiering cannot be started immediately after a storage pool is created, as it will need time to retrieve information on when data is accessed. It also cannot be scheduled for full time otherwise the data access pattern may not be accurate.

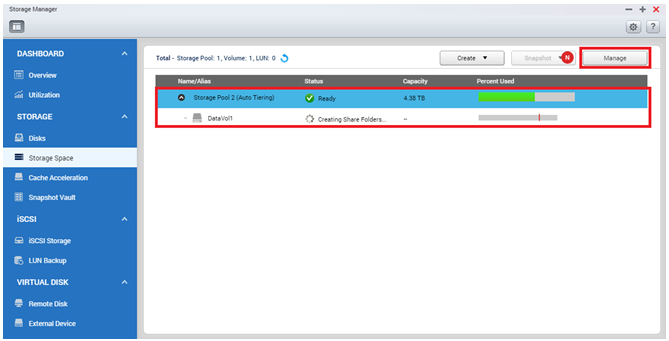
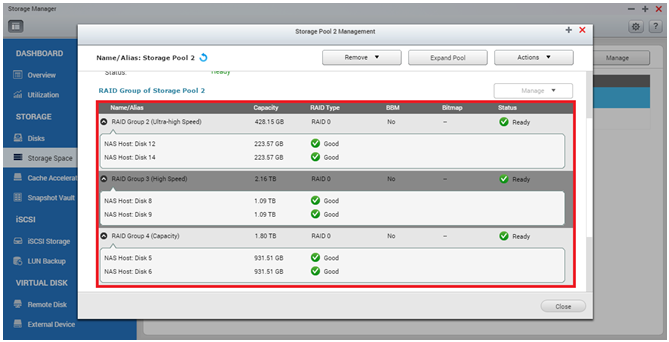
Once the schedule is set, now you can see that the new storage pool is marked “Auto Tiering” and you can now create a volume or LUN in it. The Auto Tiering task will be conducted according to the schedule and will analyze the written data in real-time by access frequency and then move different data to different tiers accordingly. By clicking “Manage” on the storage pool you can review the RAID groups you created for each tier and the Auto Tiering management options and summary will also be available in this view.
4. Configure and Monitor the Auto Tiering after Creation
4.1. Configure the Auto Tiering
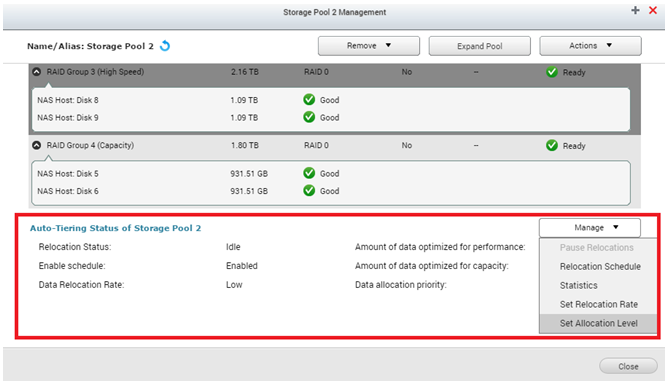
Select the storage pool and click “Manage”. You will see the summary of the Auto Tiering progress. The “Relocation Status” shows if the Auto Tiering is active or idle, and “Enable Schedule” shows if the schedule is enabled or not.
Two additional options can be set here:
- Data allocation rate: If it is set to low, the NAS will not use many system resources during data migration and therefore will minimize the performance impact. A high setting will prioritize the data migration and use additional system resources, potentially impacting other NAS services.
- Data allocation priority: It will ensure that all new data is written on the SSD tier unless it is full*. Following this logic, if capacity is selected, all new data will be written on the SATA tier and then moved to the SSD after being relocated by Auto Tiering.
These two options, as well as the schedule, will be configurable once you open the “Manage” tab in this view.
*If a tier is set to first priority but is full, the system will automatically write the data to the next tier.

4.2. Monitoring Auto Tiering
Except from the configurations, you will also see “Amount of data optimized for performance” and “Amount of data optimized for capacity”. These numbers are a summary of the data that have been moved up or down between different tiers in the last Auto Tiering schedule.
Using the “Statistics” button, you can monitor Auto Tiering in more detail. The “Used” column identifies the total space used in each tier, the “Total” column identifies the total space of each tier, the “Move up” and “Move down” shows the data that has been moved to different tiers in the last Auto Tiering schedule. “Name/Alias” and “RAID Type” assists in identifying what tier belongs to which RAID Group.

You can also check “History Report” to further detail of each tiering task including data moved up/down in a task, total used space after task completion, and the current tasks with a trend chart for easy monitoring.
https://www.qnap.com/i/en/tutorial/con_show.php?op=showone&cid=181
.
How To Use QNAP Qtier For Auto Tiering And Optimizing Your Storage PerformanceQnap Qtier Özelliği Sayesinde Nasıl Daha Performanslı Bir Yapıya Sahip Olabilirsiniz?,
