I – How To Purchase And Use myQNAPcloud SSL Certificates?
II – How To Use SSL Certificates To Increase The Connection Security To Your QNAP NAS
III – I Bought QNAP SSL Certificate And Even The SSL Certificate Us Considered To Be Valid, I Still Got “Your Connection İs Not Secure” Warnings?
.
I – How To Purchase And Use myQNAPcloud SSL Certificates?
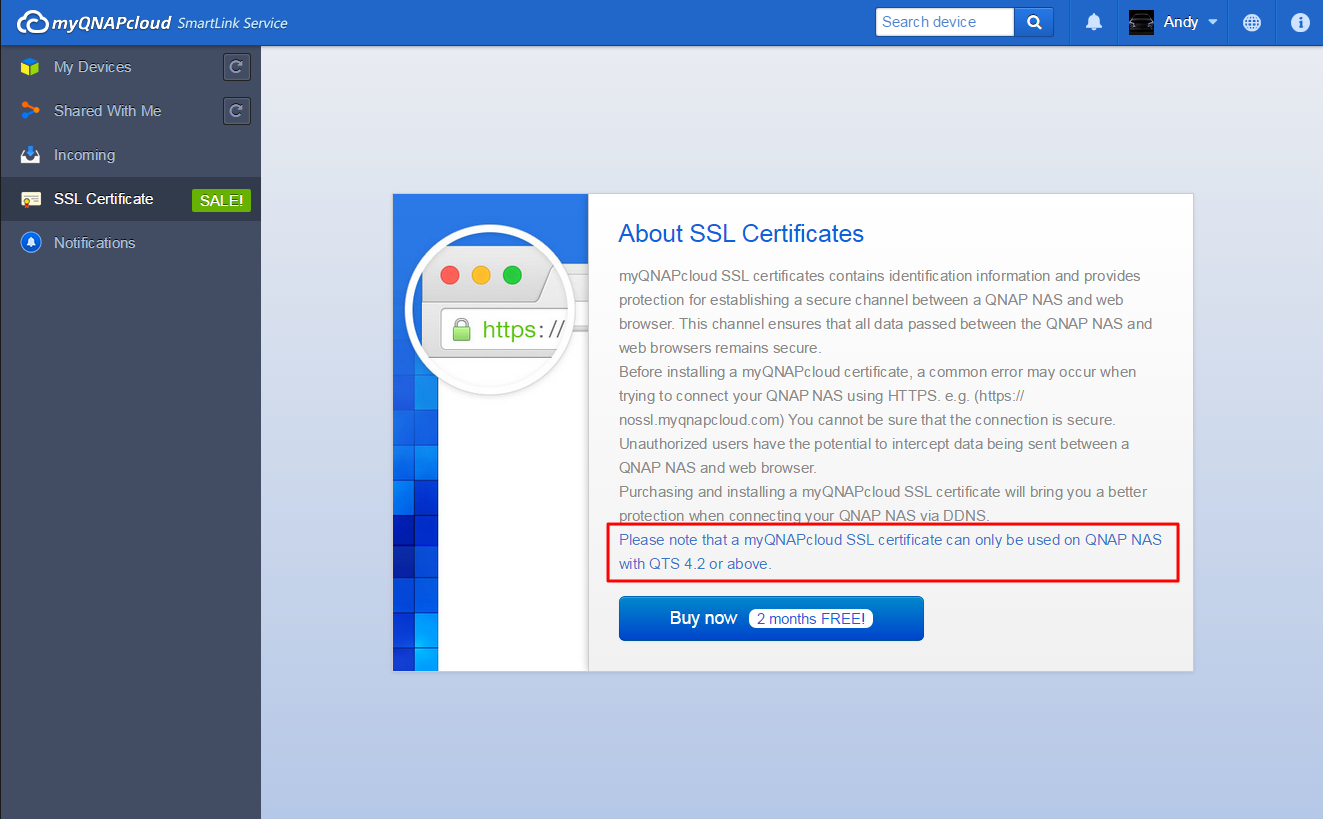
Why do I need a myQNAPcloud SSL certificate?
myQNAPcloud SSL certificates are used to provide a secured connection between the QNAP NAS and web browsers, providing authorization as well as encrypting the connection to secure data and transactions. Before installing a myQNAPcloud certificate, an error may occur when you try to connect to your QNAP NAS using HTTPS (for example: https://nossl.myqnapcloud.com). The data transmitted in the connection is not protected against security threats. Unauthorized users have the potential to intercept data being sent between a QNAP NAS and web browser.
Purchasing and installing a myQNAPcloud SSL certificate will provide better protection when connecting to your QNAP NAS via DDNS.
Please note that a myQNAPcloud SSL certificate can only be used on QNAP NAS with QTS 4.2 or above.
How to use myQNAPcloud SSL certificates?
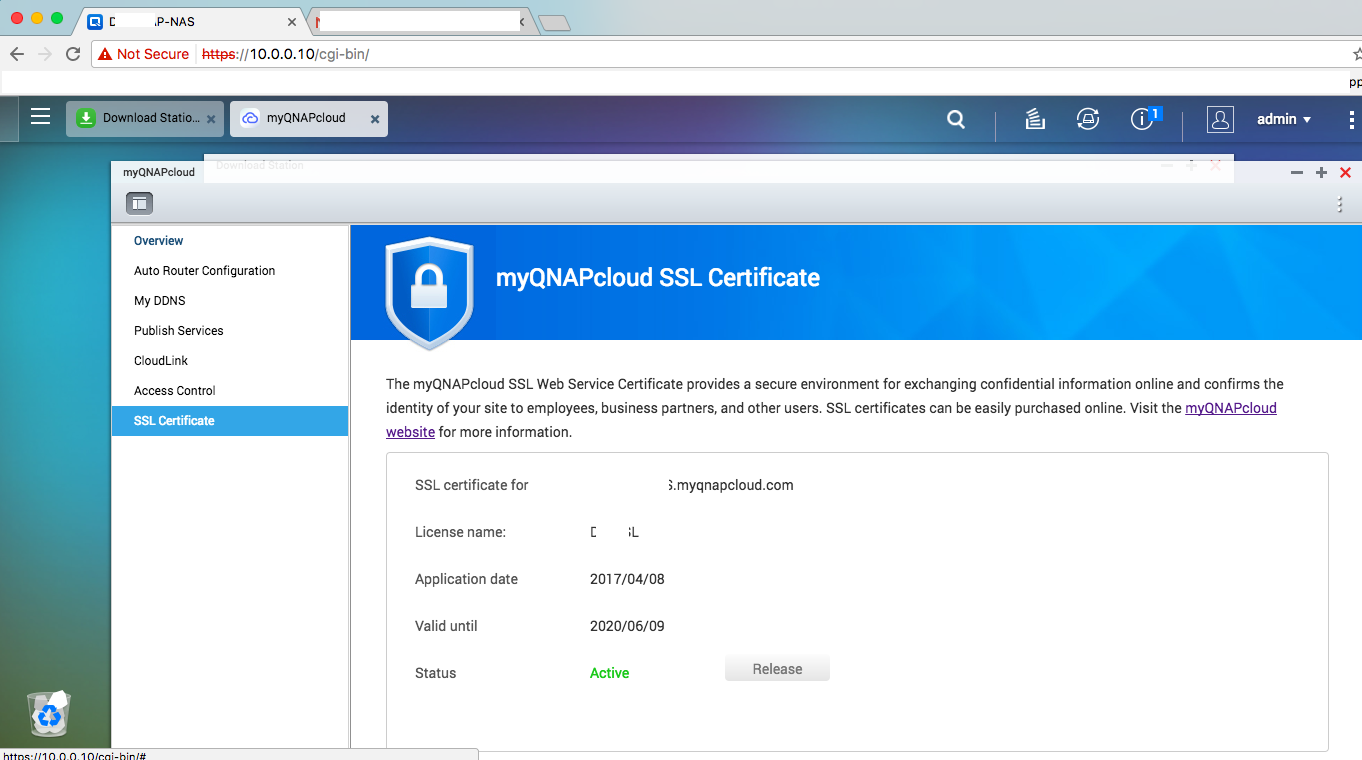
1. Sign in to the myQNAPcloud website with your myQNAPcloud account and select “SSL Certificate” on the left side.
2. Please check and confirm the terms and conditions to use this service. After choosing the desired quantity (note that each certificate can only be used on one device at one time,) select “Checkout” to proceed to the “Payment” page.

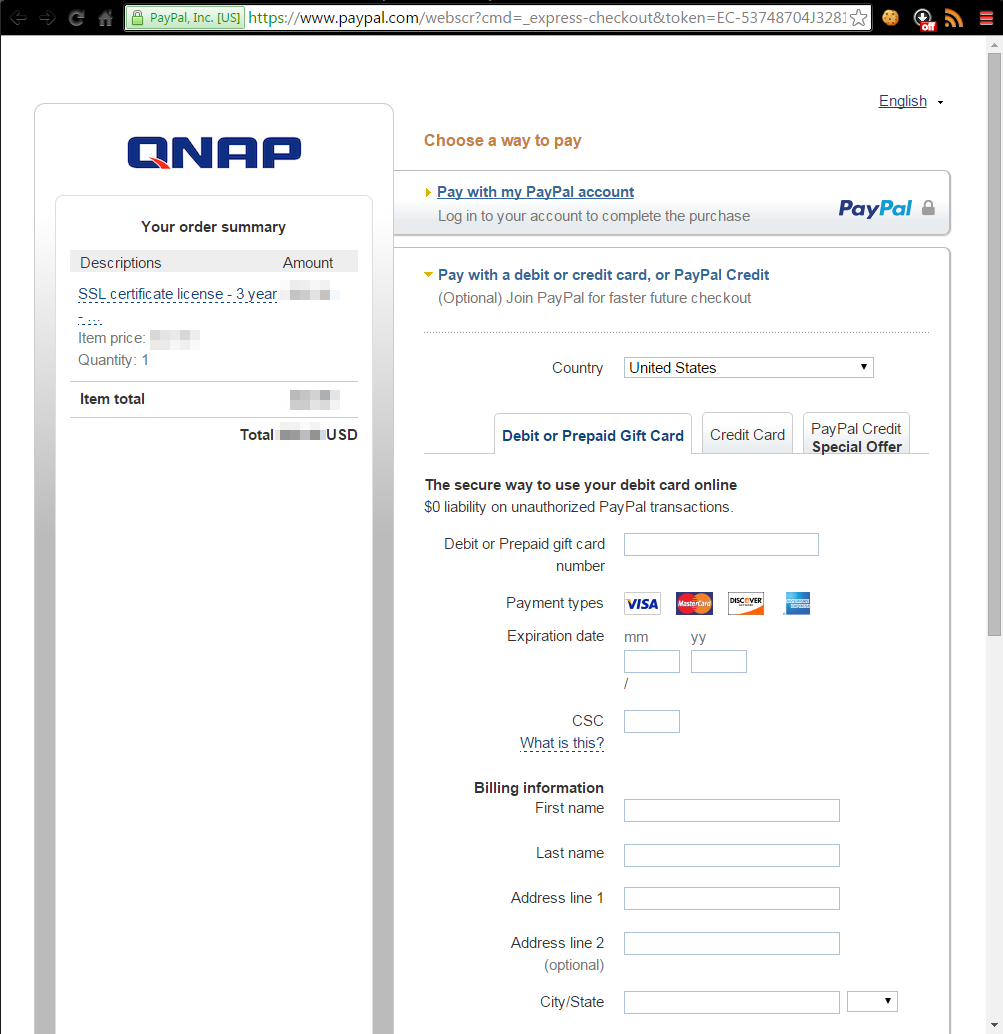
3. You can pay by PayPal or with your credit card. On the “Payment” page, select the card type you want to use and then enter your information. Then click “Continue” to proceed.
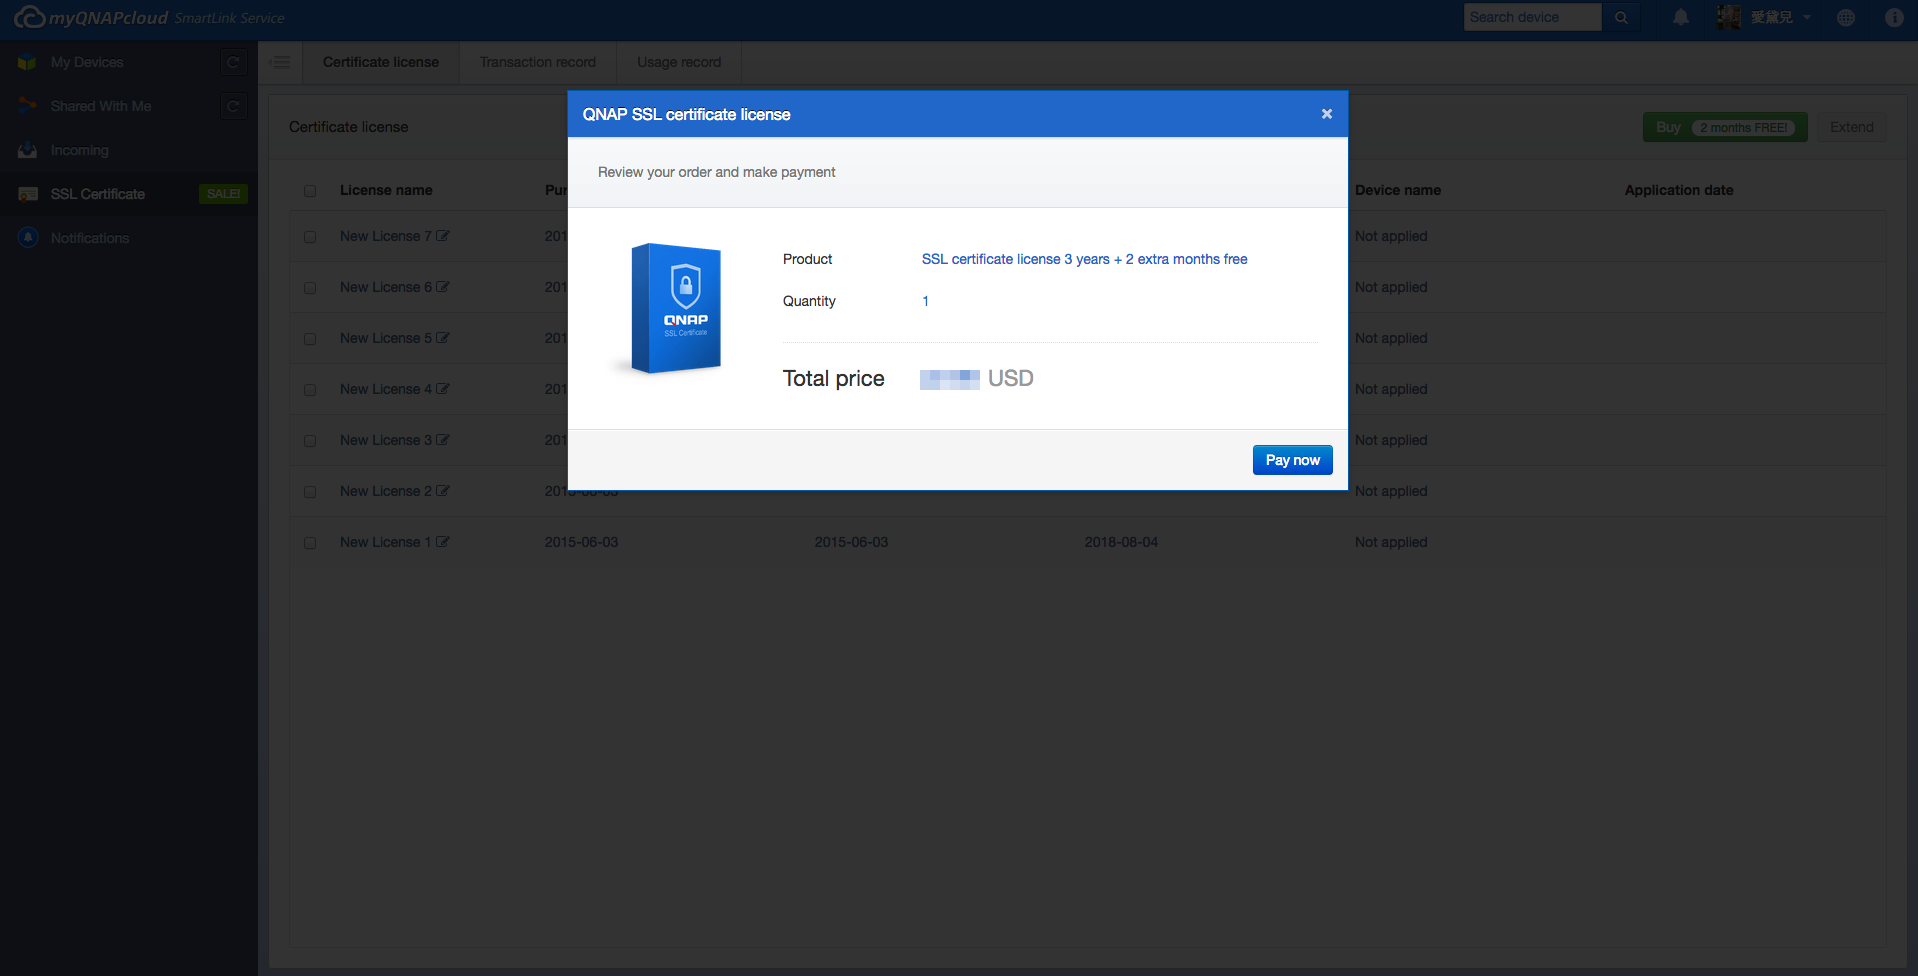
4. Select “Pay now” after reviewing your order to process the order.
5. When the payment is successful, it will display your order details.
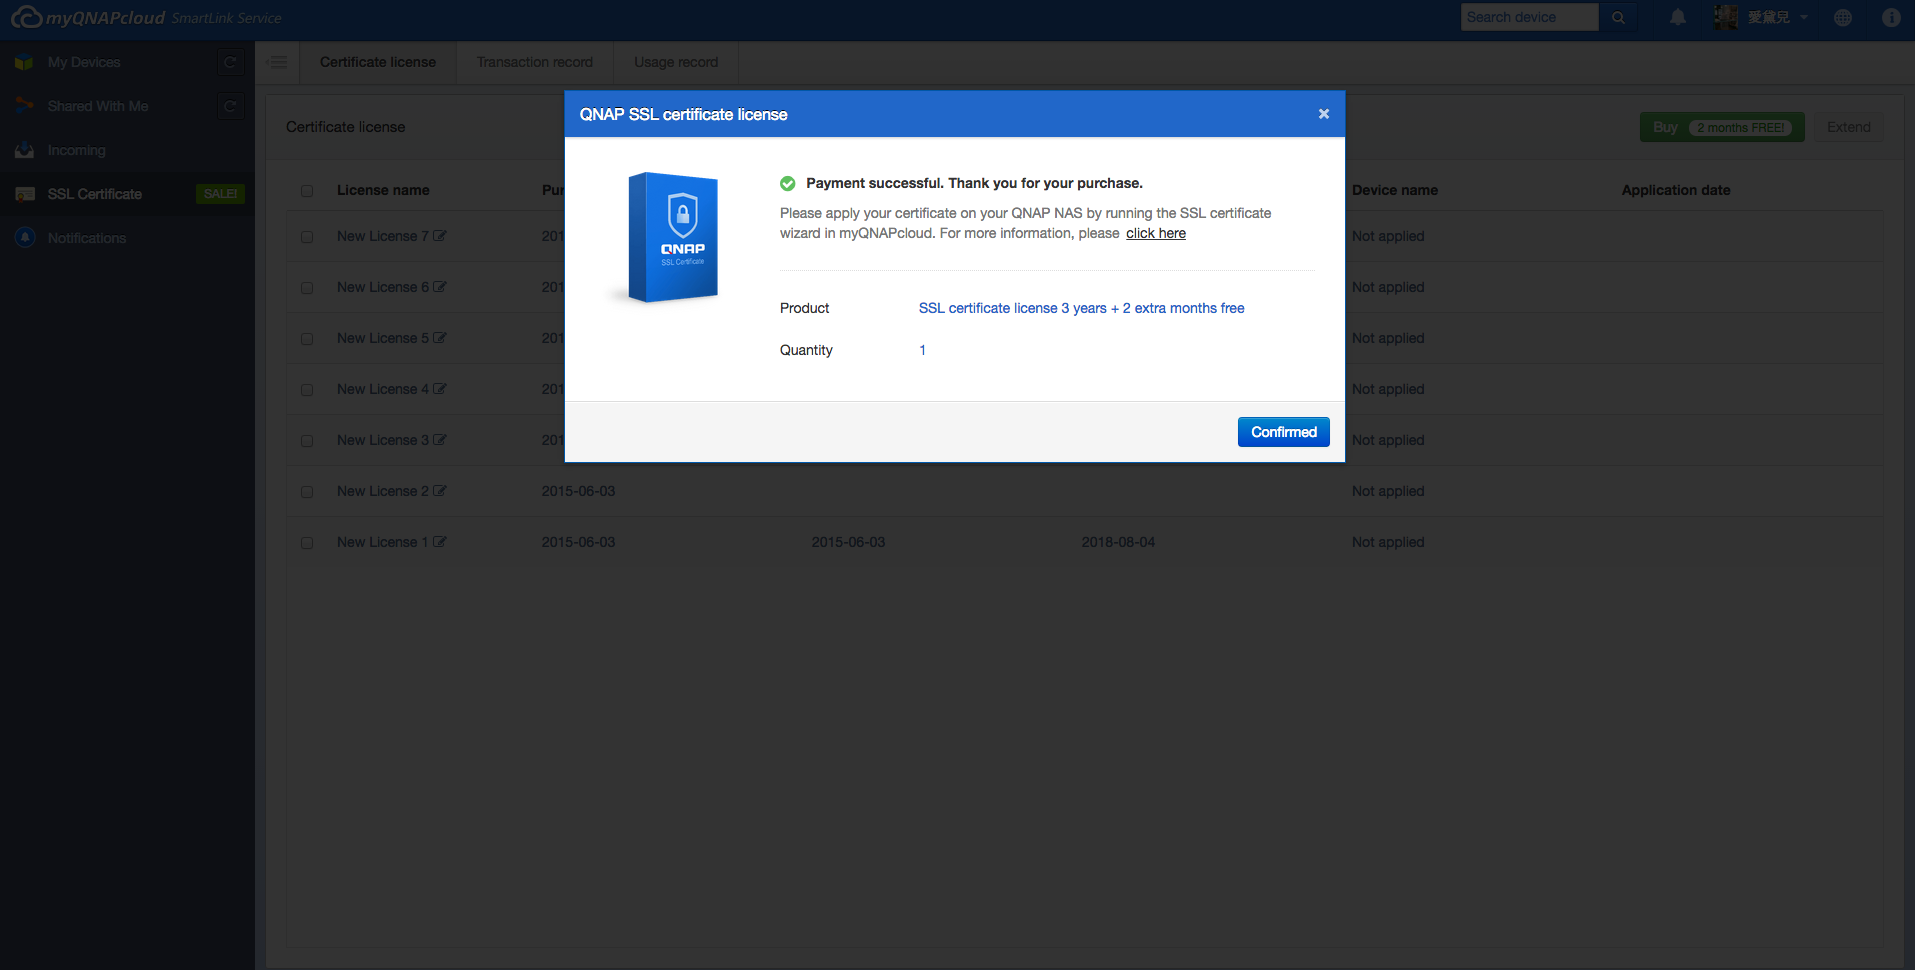
6. Click “Confirmed” to confirm your purchase and return to the “SSL Certificate” page.

7. You need to install your certificate on your QNAP NAS after purchase. Log into your QNAP NAS as an administrator and launch myQNAPcloud.
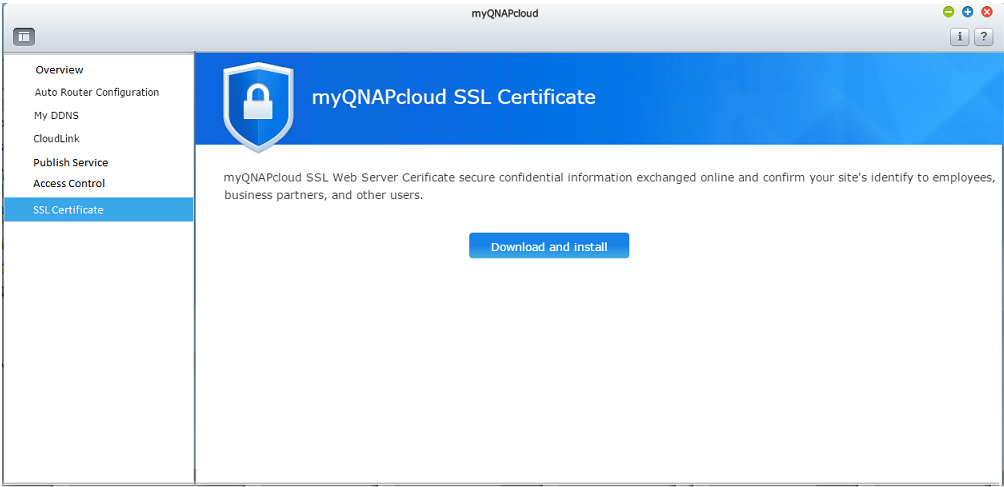
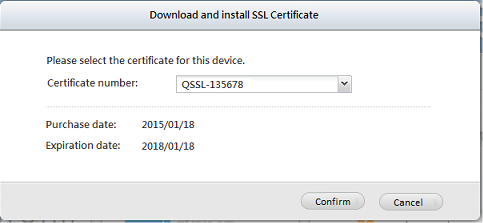
8.Select “SSL Certificate” and click “Download and install” to install the certificate. Choose one of your purchased certificates from the list.
9. The page will confirm the certificate installation. If you want to install the certificate on another device, you must click “Release” to release the certificate first.

10. The system will remind you of an expiring certificate within 30 days before expiration. You can renew your certificate before it expires.
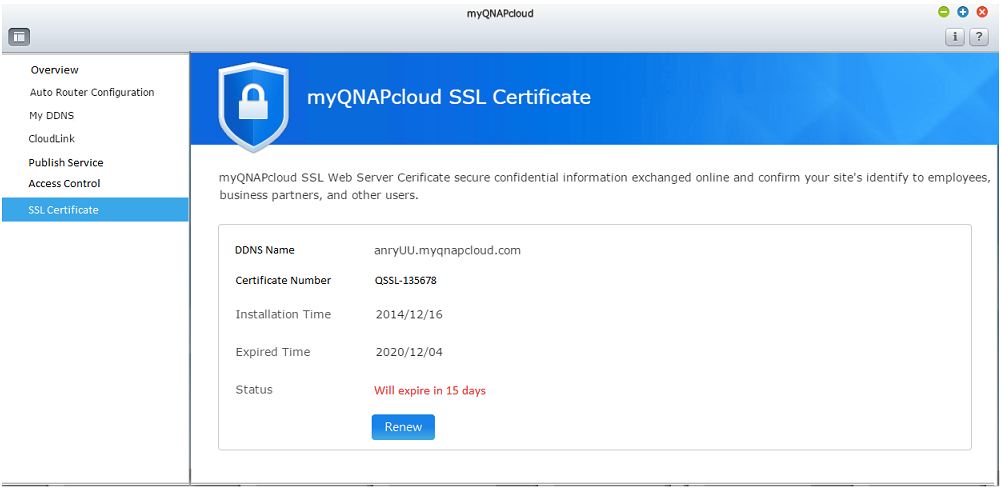
11. Please go to the myQNAPcloud website to extend your certificate.
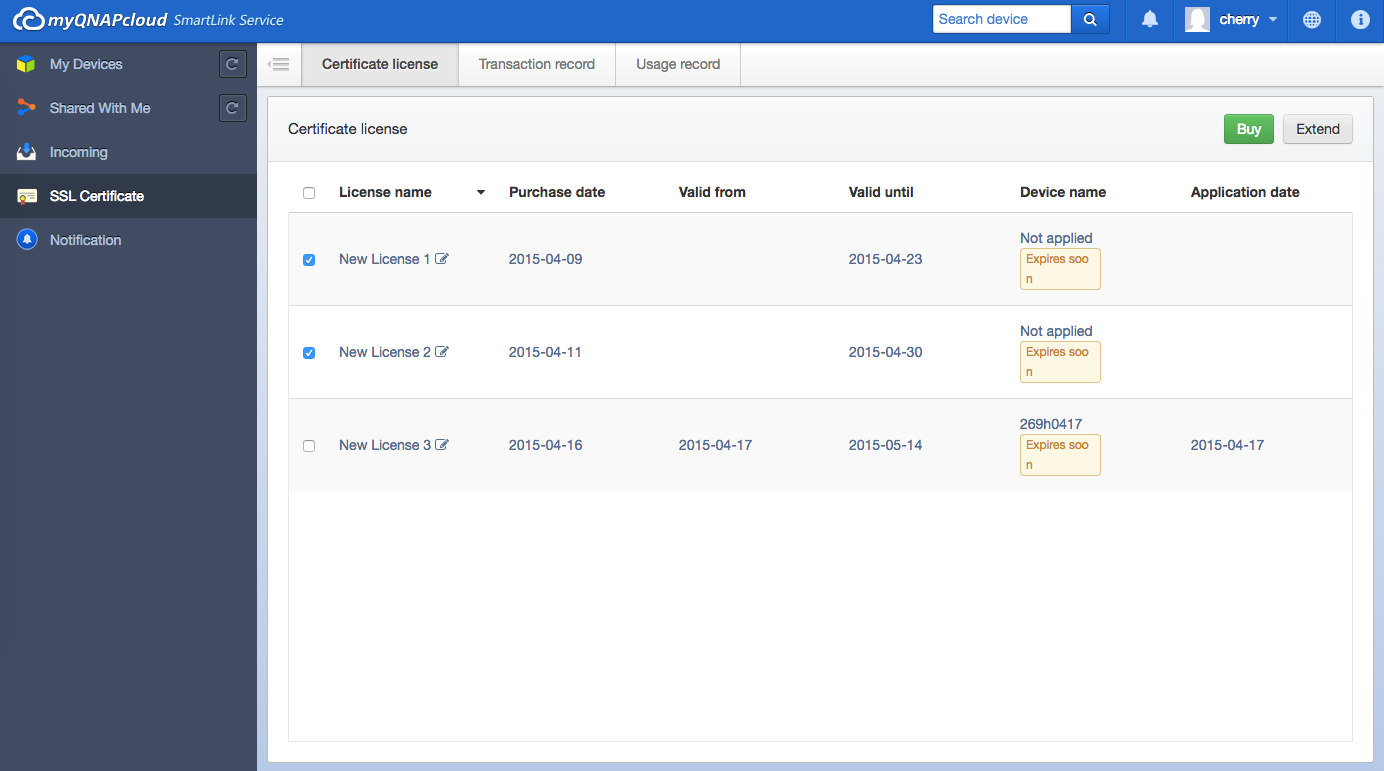
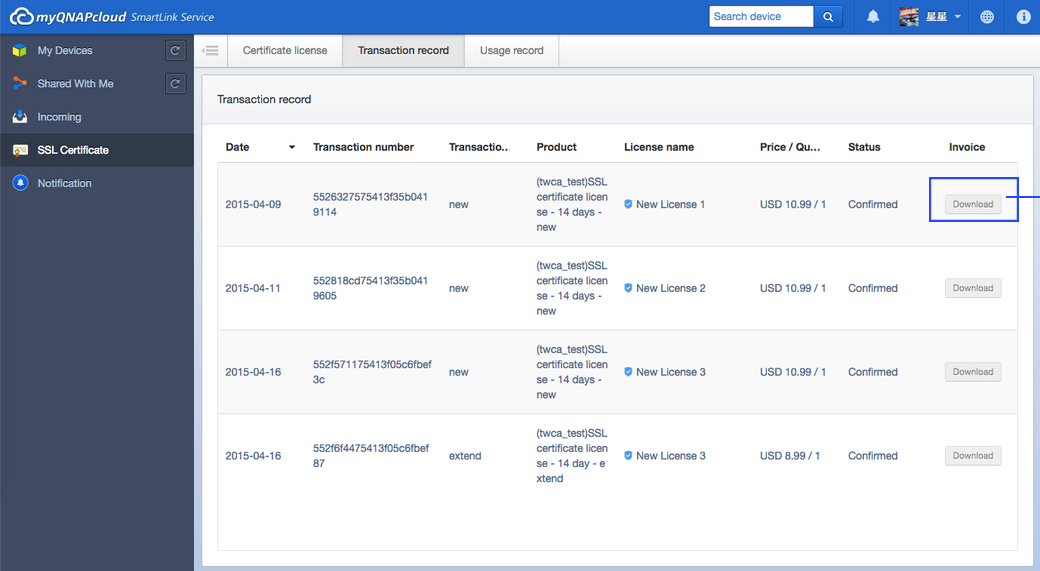
The certificate transaction history is displayed on the “Transaction Record” page. For each certificate, it should be indicated by one the following transaction types:
Apply: The certificate has been installed.
Release: The certificate has been released from the device.
Reissue: The certificated has been reissued due to a DDNS name change.
Extend: The certificate’s validity has been extended.
II – How To Use SSL Certificates To Increase The Connection Security To Your QNAP NAS
1. Challenges and Solutions
When browsing the Internet, you may be at risk of exposing personal information. Messages you send and receive may not be secure, and the website you visit may not be authentic. This risk can apply both to the communication between you and a website and between you and your QNAP NAS. By using a Certificate and Private Key (TSL/SSL) for your NAS you can receive the following benefits and make the connection between you and your QNAP NAS more secure:
- Prevent eavesdropping when connecting to your/your company’s QNAP NAS.
- Prevent tampering and ensure that you are interacting with the correct QNAP NAS.
- You and other NAS users will no longer see a warning that the connection/website is insecure.
In this application note we will address how to create a root certificate for your usage and a certificate for the QNAP NAS* by using OpenSSL and Windows Server. Detailed information on how Certificates, Private Keys and TSL/SSL work will not be addressed. For information regarding how to purchase myQNAPcloud SSL certificates, please refer to How to purchase and use myQNAPcloud SSL certificates?
*The methods provided are only for QNAP NAS and are not suitable for public websites.
2. Introduction
Transport Layer Security (TLS) and its predecessor, Secure Sockets Layer (SSL) are cryptographic protocols designed to provide communications security over a computer network.
On your web browsers, there may already be some Root Certificates that have been signed by Root Certificate Authorities. So when you visit a website that is approved and trusted by one of the Root Certificate Authorities, your browser will recognize that site as trusted and establish a secure connection for your usage.
Most websites must go through the certificate process before they can be recognized by a Root Certificate Authority for public access. But as your NAS will only be accessed by its users, it is possible to act as a Root Certificate Authority by using OpenSSL and Windows Server. This allows you to establish a secure connection between your personal/company device and the NAS as shown below:
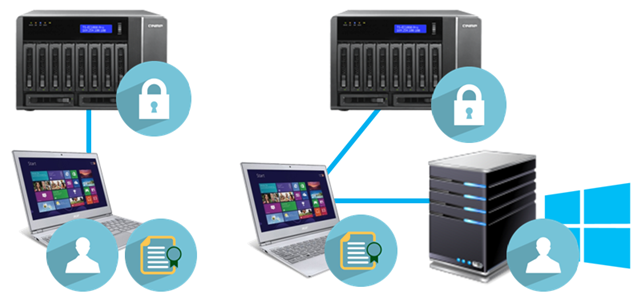
The last chapter will show how to create a root Certificate with Window Server (right).
 |
Root Certificate Authority |
 |
Root Certificate on the Device |
 |
Certificate on NAS |
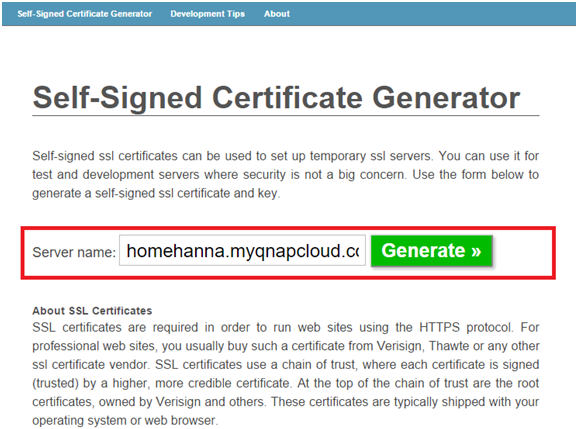
For Home usage, you can also use http://www.selfsignedcertificate.com/ to quickly create a self-signed certificate without needing OpenSSL command line (this method is only recommended for home/private use). Please refer to Chapter 3.3 for more information.
To create a Certificate and Private Key file to secure the connection with your QNAP NAS, you can use OpenSSL or purchase a Certificate from a trusted Certificate Authority. The OpenSSL package can be downloaded for Linux from: https://www.openssl.org/
For Windows and other operating systems, you can find other versions of OpenSSL developed by OpenSSL community members. In this example we use Win32OpenSSL. This can be downloaded from https://www.openssl.org/community/binaries.html
*Visual C++ 2008 must be installed before using OpenSSL in Windows. It can be downloaded from:
http://www.microsoft.com/downloads/details.aspx?familyid=9B2DA534-3E03-4391-8A4D-074B9F2BC1BF
3. Create a Certificate
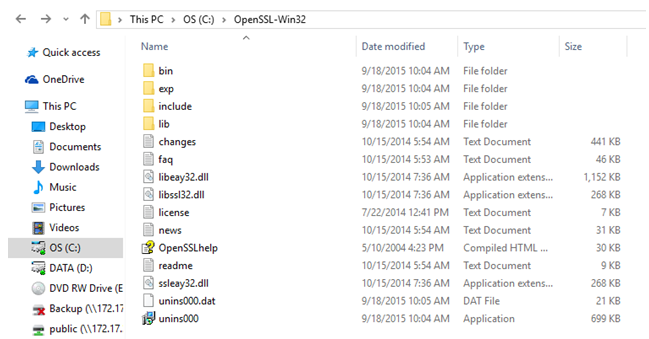
After downloading OpenSSL for Windows, decompress the package and you will see the following folders:
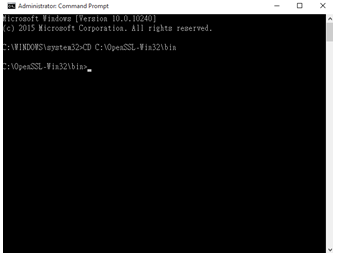
Right click on the Start button and open “Command Prompt (Admin)”. Then enter the following command:
CD C:\OpenSSL-Win32\bin
*Please adjust the file path for where you have saved the decompressed package.
Before starting, you may need to identify the OpenSSL configuration file. To manually set the configuration file path, enter the following command:
Set openssl_CONF=openssl.cnf 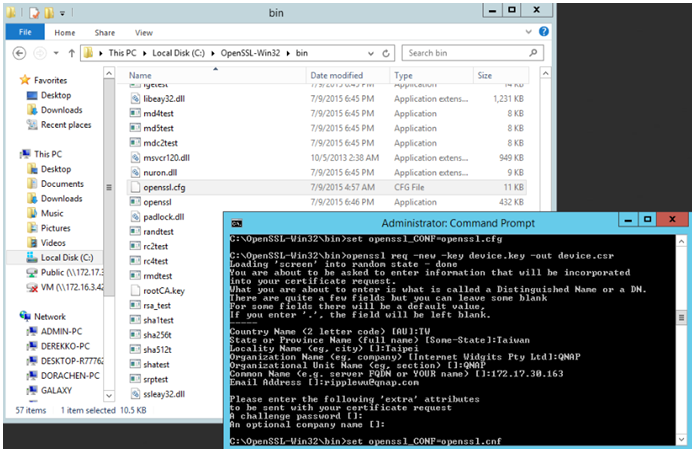
After using this command line to create the private root key, you can choose to create the key (with up to 4096 characters). In this example we set the key to 2048 characters. This private key will be the basis of all trust for your certificate, therefore the command –des3 should be used to allow us to set a password for this key. This key and password must be kept secret. For creating a key without a password, you can remove the -des3 command:
openssl genrsa -des3 -out rootCA.key 2048 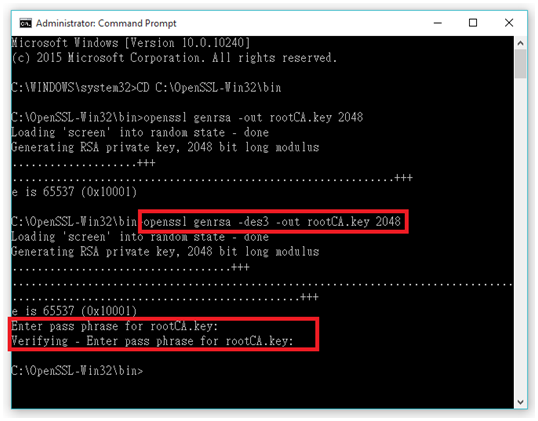
After the private key is created, use the following command to create and configure a self-signed certificate that is paired with the key. By changing the -days, you can decide the certificate’s expiry date (we use 730 days as an example). After entering this command, you must enter the key’s password and any additional information that will be stored in the certificate. In the Common Name section, please enter the name of this root certificate.
openssl req -x509 -new -nodes -key rootCA.key -days 730 -out rootCA.pem 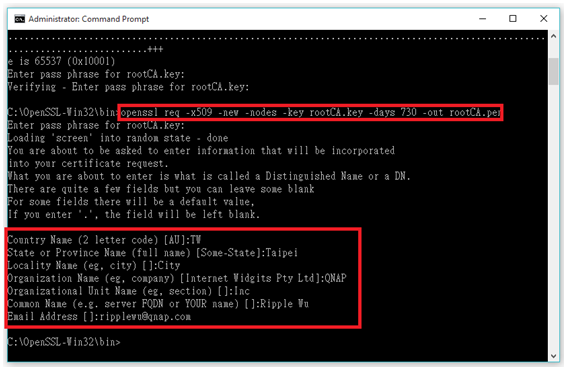
A private key called rootCA.key and an SSL certificate called rootCA.pem will now be saved in the bin folder. The certificate is self-signed, valid for 730 days, and it will act as the root certificate for a QNAP NAS when you create different certificates for each NAS.
![]()
After creating the root certificate, use the following command to create another paired private key and certificate for your QNAP NAS. This is identical as creating a root private key and certificate. You can customized the characters of the key, but no password is required. When creating a certificate for a QNAP NAS, the Common Name must be the IP address or Host name* of the QNAP NAS.
*Some browsers may automatically deem an IP address as insecure and will still display a warning message.
openssl genrsa -out device.key 2048

openssl req -new -key device.key -out device.csr 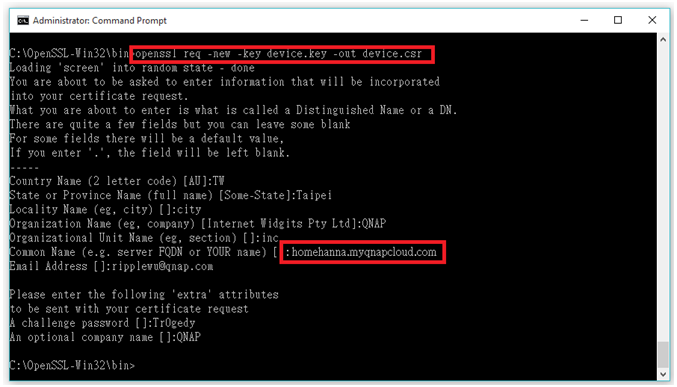
Two files will be saved to the bin folder called device.key and device.csr. You will need to enter the below command to sign the created certificate with the root certificate’s private key. You can decide the certificate’s expiry date (we use 730 days as an example):
openssl x509 -req -in device.csr -CA rootCA.pem -CAkey rootCA.key -CAcreateserial -out device.crt -days 730 
It is possible to create a self-signed certificate on the internet. *Using http://www.selfsignedcertificate.com/, enter the IP address/hostname of your QNAP NAS and click “Generate”. Please ensure that the entered address is the same you use to visit your NAS .
*Some browsers may automatically deem an IP address as insecure and will still display a warning message.

4. Establish a Secure Connection
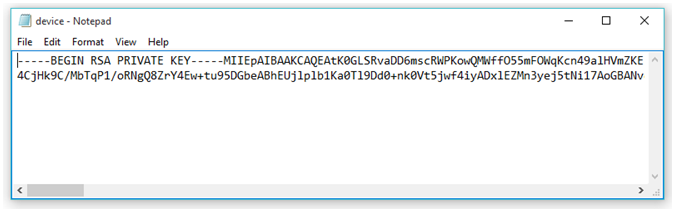
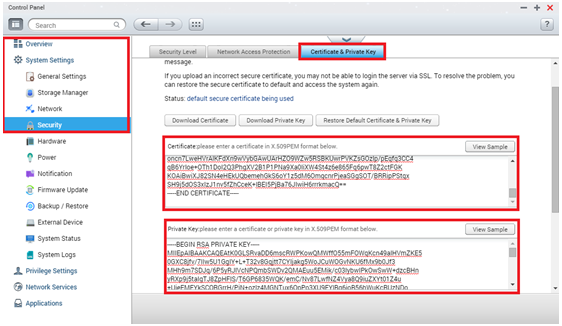
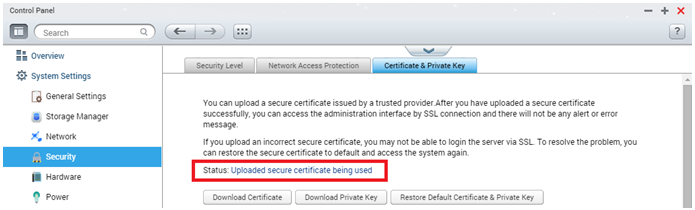
The above actions will create a new file called device.crt using the device.key, and you will be able to download address.cert and address.key from www.selfsignedcertificate.com. Now you must upload the content of the .crt (or .cert) and .key files to a QNAP NAS. Open these files with Notepad (or another text editor)*, log into your NAS, go to “Control Panel” > “Security” >“Certificate & Private Key”, copy the whole content of the key and certificate files to their respective fields, and click “Apply”.
*Do not use Microsoft Word to open the file. Do not use Word Wrap in your text editor.

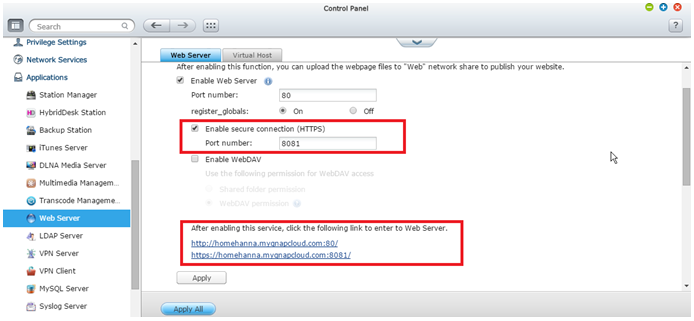
Go to “Control Panel” > “Applications” > “Web Server” and check “Enable secure connection (HTTPS)”.
5. Uses Secure Connection
For root certificates created using OpenSSL, change the name of rootCA.pem to rootCA.crt*. For certificates created by www.selfsignedcertificate.com, change the name of address.cert to address.crt. Then transfer and open the renamed file to the device that will access the NAS.
*This may not be required for some operating systems. Different operating systems may use other methods to import certificates.
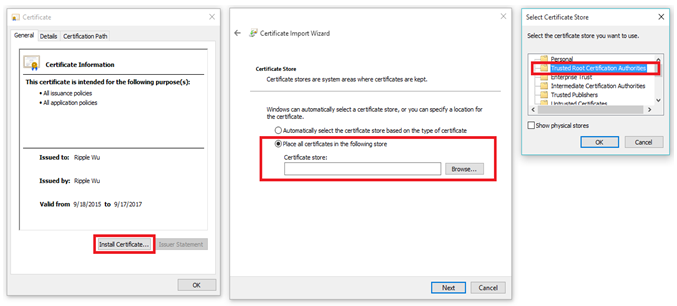
When importing the certificate in Windows, the certificate’s information will be displayed for your confirmation. Click “Install Certificate” to store it on your PC. When asked where to store this Certificate, choose Trusted Root Certificate Authorities. Before finishing, Windows may ask you to confirm its origin. As it was created by yourself, you can click “Yes”. After installation, your browsers should start using this certificate*.
*Internet Explorer and Edge will use these certificates by default. Other browsers may use different methods for storing root certificates and you will need to manually configure them.
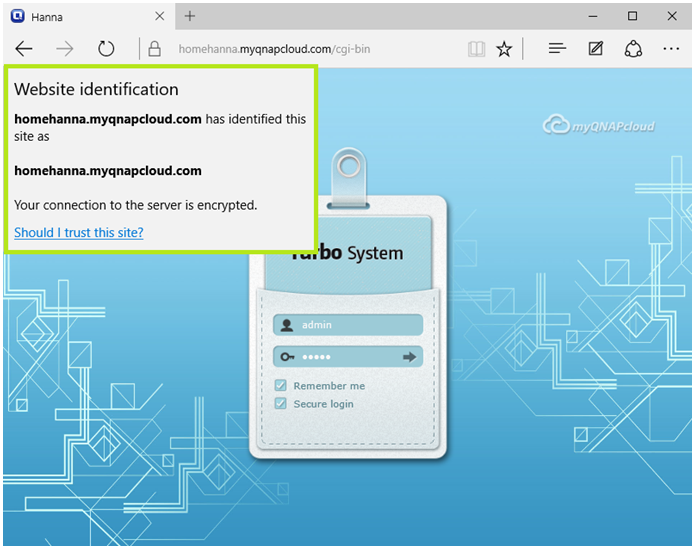
Close and reopen your browsers for the changes to take effect. In the address bar, enter https:// (Your NAS’s IP address or Host Name):(Your Secure Port) to login to the NAS. You will see the certificate message in the browser confirming that your NAS has been identified and that the connection is secure.
6. Use Windows Server Certificate Authority to issue and manage the NAS’s certificate.
If you manage multiple devices using Windows Server Active Directory, you can create a root certificate using Windows Server and sign the certificate request of your QNAP NAS. To do so, please first install the Certificate Authority Management Tools in Windows Server. In this example we use Windows Server 2012.
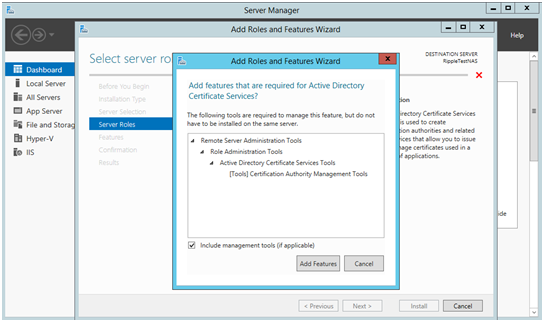
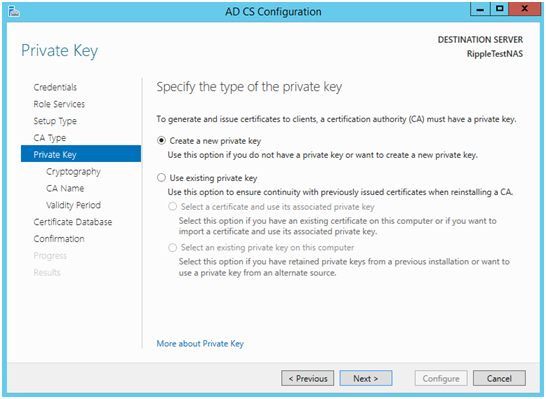
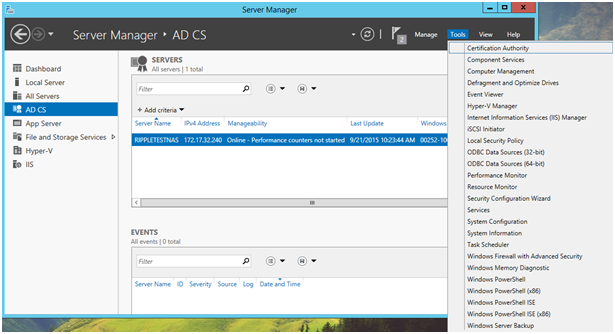
After installing Certificate Authority Management Tools, you will find a new item (“AD CS”) in the left menu of Server Manager. This means Active Directory Certificate Services. In AD CS you must configure a root certificate for your network. You can follow the wizard to create a new Root Certificate using Windows Server or select an existing root certificate.

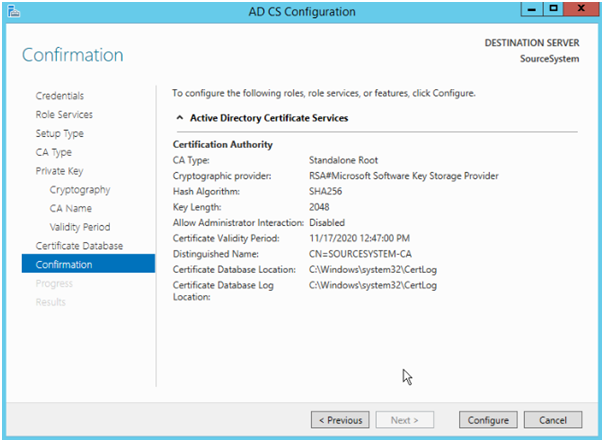
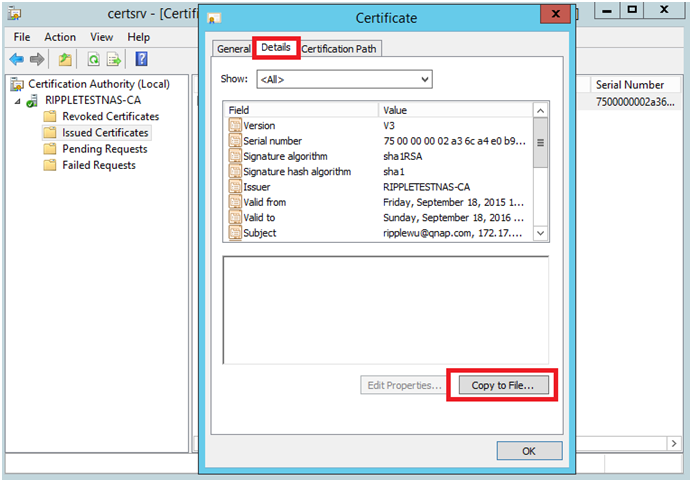
After the configuration is completed, your server will have the authority to sign a certificate. To use the server’s root certificate to sign your QNAP NAS, refer to Chapter 3.2 to create a certificate .csr file. Once the .csr file is created, find “Certificate Authority” in the Server Manager’s Tools menu.
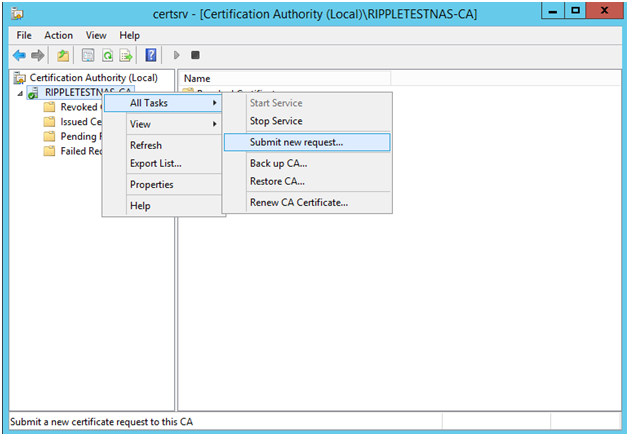
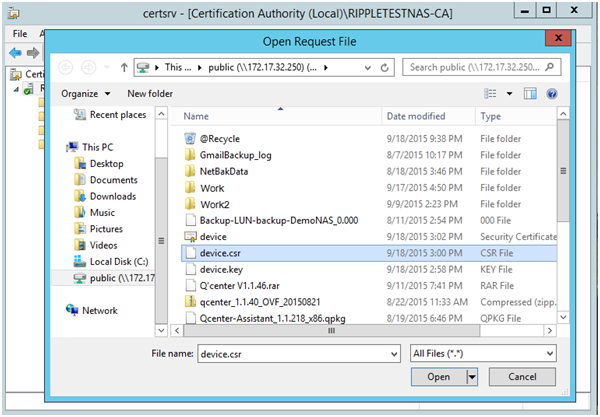
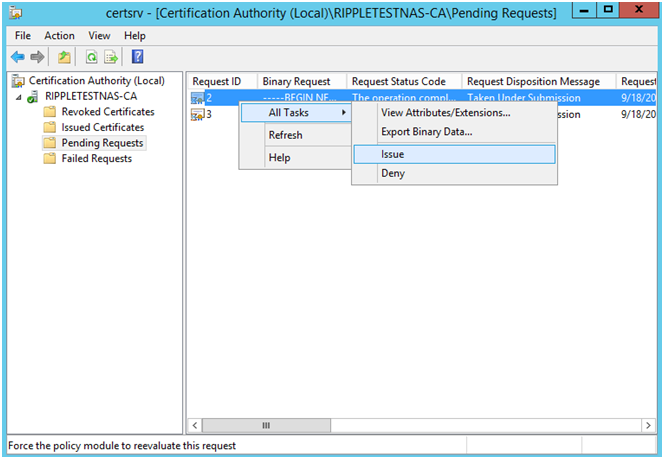
In Certificate Authority you will be able to manage the certificates that were signed and issued by your server. To sign the certificate for the NAS, right click on your server, select “All Tasks” > “Submit new request” and find the .csr file that contains the IP address/Host name of your QNAP NAS*. In “Pending Requests”, find the request you just submitted and right click it to issue the certificate.
*There are other methods to create a .csr for your QNAP NAS without using the OpenSSL command line interface, including this website: https://www.gogetssl.com/online-csr-generator/
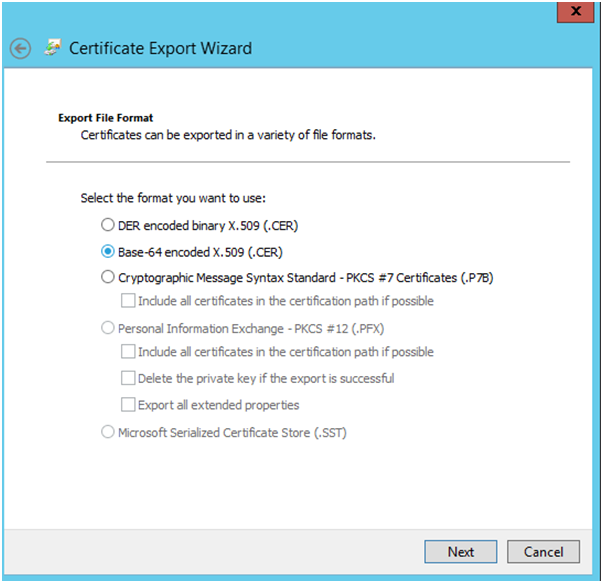
Once the certificate is issued, select it in “Issued Certificates” and export the certificate to a file to upload its content to your QNAP NAS along with the private key (refer to Chapter 4.1). Your NAS will then use the certificate that was issued by your Windows Server.

III – I Bought QNAP SSL Certificate And Even The SSL Certificate Us Considered To Be Valid, I Still Got “Your Connection İs Not Secure” Warnings?
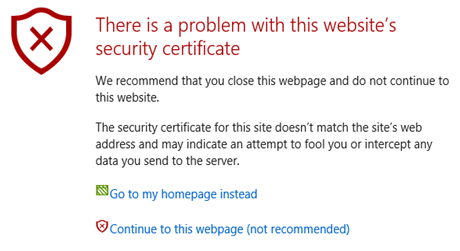
Even My Certificate Seems Fine;
I Still Got This Error;
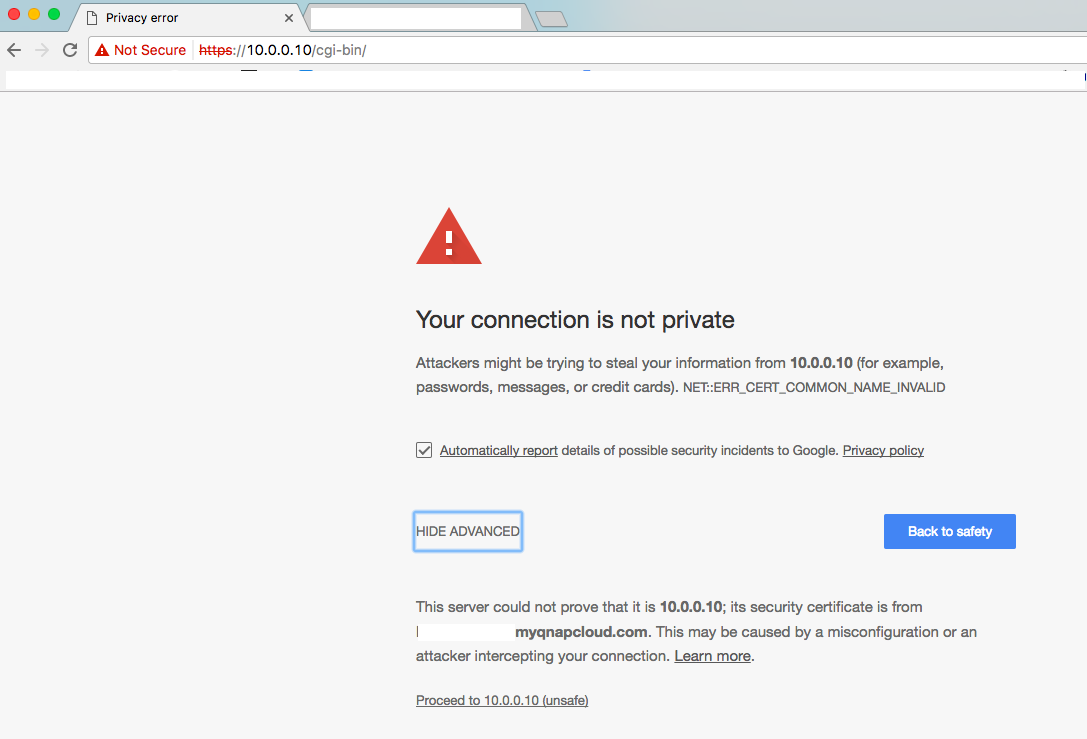
Reason: Bacuse you try to connected via IP adress. Certificate is not linked to IP adress, only cloud name, so this is normal.
Just use your Cloud Name While Accessing!
.
How To Purchase And Use myQNAPcloud SSL Certificates & How To Use SSL CertificatesmyQNAPcloud SSL Sertifikasını Nasıl Alabilirsiniz & Bu SSL Sertifikasını Nasıl Kullanabilirsiniz,