I – Linux Commands To Retrieve Smb Volume Data Manually (4.1.0 Firmware & Later)
II – IF You Still Got Error Or Couldnt Mount Volume, Please Fallow These Steps;
III – Linux Commands To Retrieve Smb Volume Data Manually (Before 4.1.0 Firmware)
IV – How To Retrieve Smb Volume Data Manually (Before 4.1.0 Firmware & If You Need Data Urgently)
V – RAID Seems Fixed, But Storage Pool Status Gets Unknown Status
.
I – Linux Commands To Retrieve Smb Volume Data Manually (4.1.0 Firmware & Later)
1 – Shut Down Qnap. Plug Out All HDD’s, but be careful, we’ll plug them all a few steps later, so be sure which HDD is at Which Port.
2 – Directly plug Qnap to your Laptop /PC via ethernet cable.
3 – A few minutes later second beep sound should come and Qnapfinder Should find Qnap
4 – Now plugin HDDs to your NAS HDD slots in Right order, and check if All HDD’s are plugged in via Qnapfinder.
Dont Start Installation!
5 – Download Putty from this link and login with admin / admin usernam / password;
http://www.chiark.greenend.org.uk/~sgta … nload.html
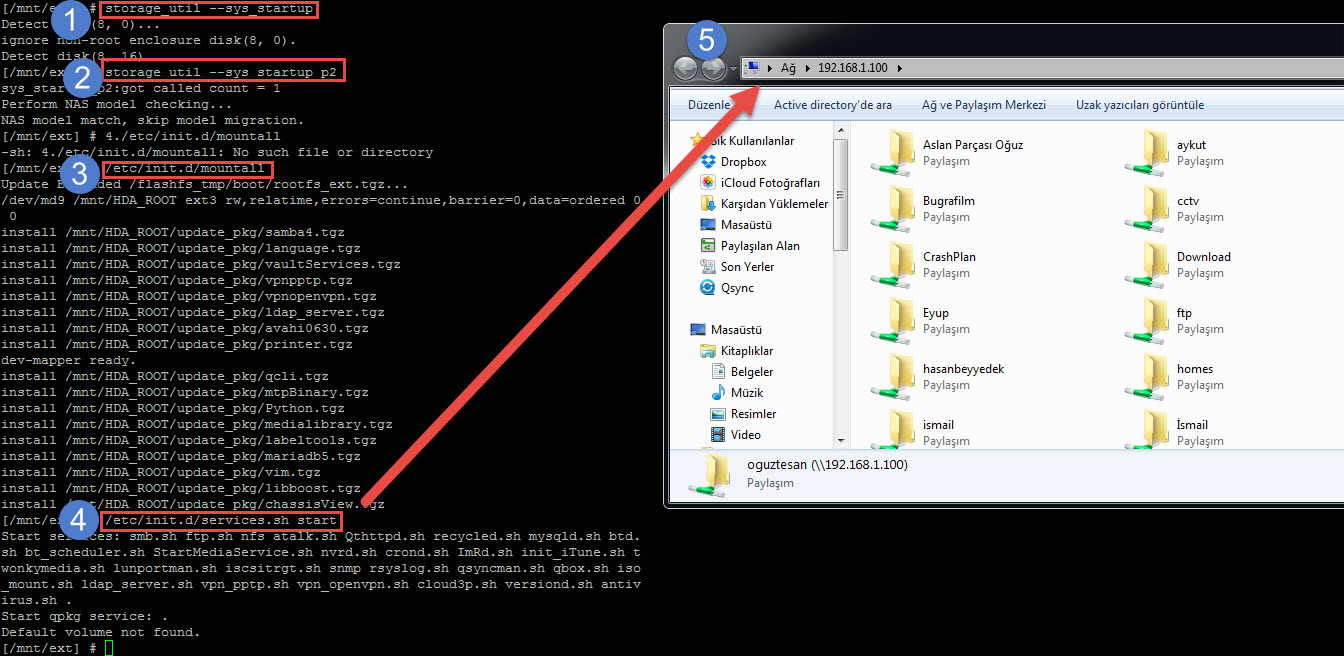
6 – Type this command lines which I marked blue;
1. /etc/enclosure_0.conf {check that all disks are being detected}
2. storage_util –sys_startup {mount md9 and md13}
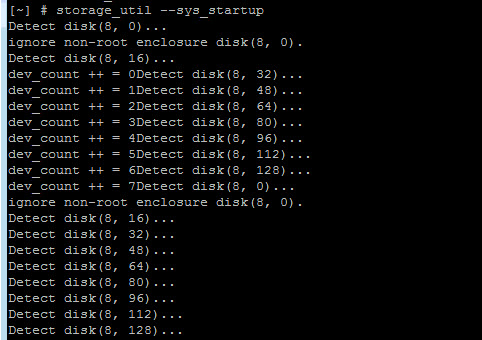
3. storage_util –sys_startup_p2{mount all volumes}

4. /etc/init.d/mountall
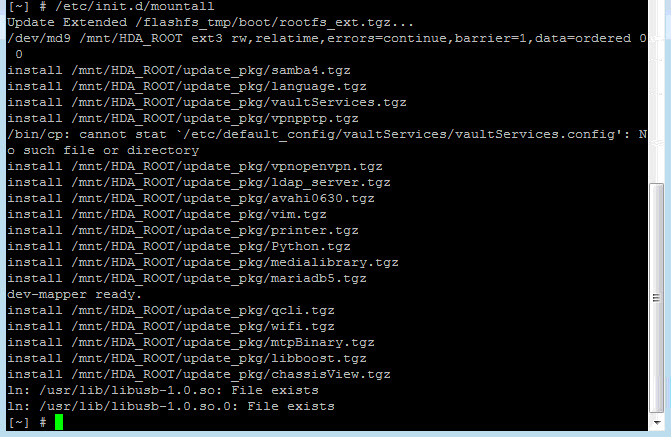
5. /etc/init.d/services.sh start

.
*If you want only SAMBA to be started, then “/etc/init.d/smb.sh start”
** If System Still Doesnt Boot After Restart Add This Command;
cp /etc/default_config/uLinux.conf /etc/config/
Here is The Commands Results;
.
II – IF You Still Got Error Or Couldnt Mount Volume, Please Fallow These Steps;
- Power down the NAS. And then plug out all HDDs.
- Power on the NAS.
- When system is ready, connect and login the NAS by using ssh with admin account.
- Plug in all HDDs one by one.
- Check the /etc/enclosure_0.conf to see if all host disks are all detected.
- Execute “storage_util –sys_startup”
- /dev/md9 and /dev/md13 should be assembled in this step.
- /dev/md9 should be mounted to /mnt/HDA_ROOT
- Execute ” storage_util –sys_startup_p2″
- All volumes should can be mounted in this step.
- If not, it’s needed to try to mount them manually.
For example:
Legacy MD volume:
mount -t ext4 /dev/md0 /share/MD0_DATA
Flexible LVM volume:
mount -t ext4 /dev/mapper/cachedev1 /share/CACHEDEV1_DATA
- If it’s still can’t be mounted successfully, maybe filesystem superblock is corrupted. Check with dumpe2fs_64 and e2fsck_64
- Execute “/etc/init.d/mountall”
- /dev/md13 should be mounted to /mnt/ext
- Execute “/etc/init.d/smb.sh start”
- Start the SAMBA service.
- User data can be retrieved by SAMBA service if /etc/config/smb.conf is correct.
.
III – Linux Commands To Retrieve Smb Volume Data Manually (Before 4.1.0 Firmware)
1 – Shut Down Qnap. Plug Out All HDD’s, but be careful, we’ll plug them all a few steps later, so be sure which HDD is at Which Port.
2 – Directly plug Qnap to your Laptop /PC via ethernet cable.
3 – A few minutes later second beep sound should come and Qnapfinder Should find Qnap
4 – Now plugin HDDs to your NAS HDD slots in Right order, and check if All HDD’s are plugged in via Qnapfinder.
Dont Start Installation!
5 – Download Putty from this link and login with admin / admin usernam / password;
http://www.chiark.greenend.org.uk/~sgta … nload.html
6 – Type this command lines which I marked blue;
# config_util 1 -> If result of this command give “Root Failed” dont go on and contact with Qnapsupport team
# storage_boot_init 1 ->
# df -> IF dev/md9 (HDA_ROOT) seems full, please contact with Qnapsupport.
(Now, you can Reboot your device with this command. ıf you want to reset your configration, please skip this.)
# reboot
But also you can Type these commands to reset your configration settings;
# cp /etc/default_config/uLinux.conf /mnt/HDA_ROOT/.config/ (Also you change another config file beside uLinux.conf. )
# rm -r /etc/config
# ln -sf /mnt/HDA_ROOT/.config /etc/config
#setcfg -f /etc/config/uLinux.conf Misc configured TRUE
# reboot
.
IV – How To Retrieve Smb Volume Data Manually (Before 4.1.0 Firmware & If You Need Data Urgently)
1 – Shut Down Qnap. Plug Out All HDD’s, but be careful, we’ll plug them all a few steps later, so be sure which HDD is at Which Port.
2 – Directly plug Qnap to your Laptop /PC via ethernet cable.
3 – A few minutes later second beep sound should come and Qnapfinder Should find Qnap
4 – Now plugin HDDs to your NAS HDD slots in Right order, and check if All HDD’s are plugged in via Qnapfinder.
Dont Start Installation!
5 – Download Putty from this link and login with admin / admin usernam / password;
http://www.chiark.greenend.org.uk/~sgta … nload.html
6 – Type this command lines which I marked blue;
# config_util 1 -> If result of this command give “Root Failed” dont go on and contact with Qnapsupport team
# storage_boot_init 2 -> (this time type storage_boot_init 2, not storage_boot_init 1)
you should get this kind of information after this command:

.
V – RAID Seems Fixed, But Storage Pool Status Gets Unknown Status
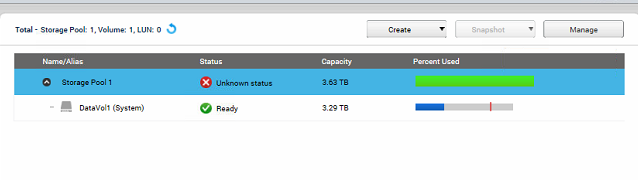
How To Solve?
Login Qnap and type this command;
/etc/init.d/init_lvm.sh
.
Daniel From Qnap Support Team Note;
if you got the storage manager config seems incorrect, you can try init_lvm.sh first
it will do :
move old storage config files away
storage_util –sys_startup
storage_util –sys_startup_p2 (at this time recreates the config again)
.
How To Fix / Mount RAID After 4.1.0 Firmware4.1.0 Firmware ve Sonrası İçin RAID Yapısını Kurtarma / Mount Etme Komutlar,
Half these commands and files don’t exist (TS-212) so back to square one.
Nice pre-release testing, QNAP! :/
Hi;
Commands are based on firmware version so you must check this first. Also be sure that you only type right commands (You can copy these commands and right click on on putty to paste)
One last thing, this is not Qnap global offical website and you can always request help from your local Qnap tech departman or offical global Qnap support team (www.qnap.com) . We can fix this kind of cases less than 10 minutes
about your PDF: “QNAP_NAS_Data_Recovery – Qnap Advanced Support”
you might want to add on slide 27:
use “dmsg” to find the /dev/XXX where your usb disk got mounted – in my case /dev/sdt1. See output of dmesg command below.
cheers
Chris.
390.050000] usb 1-1.3: new high speed USB device using orion-ehci and address 4
[ 390.240000] scsi7 : usb-storage 1-1.3:1.0
[ 395.250000] scsi 7:0:0:0: Direct-Access WD Elements 25A2 1004 PQ: 0 ANSI: 6
[ 395.250000] sd 7:0:0:0: Attached scsi generic sg19 type 0
[ 395.270000] sd 7:0:0:0: [sdt] Spinning up disk….ready
[ 396.280000] sd 7:0:0:0: [sdt] 1953458176 512-byte logical blocks: (1.00 TB/931 GiB)
[ 396.280000] sd 7:0:0:0: [sdt] Write Protect is off
[ 396.280000] sd 7:0:0:0: [sdt] Mode Sense: 47 00 10 08
[ 396.280000] sd 7:0:0:0: [sdt] Assuming drive cache: write through
[ 396.280000] sd 7:0:0:0: [sdt] Assuming drive cache: write through
[ 396.280000] sdt:
[ 396.390000] Alternate GPT is invalid, using primary GPT.
[ 396.390000] sdt1
[ 396.410000] sd 7:0:0:0: [sdt] Assuming drive cache: write through
[ 396.410000] sd 7:0:0:0: [sdt] Attached SCSI disk
[ 400.520000] active port 0 :139
[ 400.520000] active port 1 :445
[ 400.520000] active port 2 :20
[ 866.940000] ufsd: driver U82 (Mar 31 2011 01:37:17) LBD=OFF with ioctl loaded at bf1a6000
[ 866.940000] NTFS read/write support included
[ 866.940000] Hfs+/HfsX read/write support included