I – “Qnapfinder Coultn find even after directly connect Qnap to my Laptop, Closing firewall & Antivirus.”- How to Determinate Problem
II – “Qnap LED panel, Device stuck at “Loading Driver, Please Wait” : How to solve Problem
III – ”Qnap LED panel, still stuck at “Booting” / Qnap Name seems as “ULinux” on Qnapfinder” and doestn get IP adress
I – “Qnapfinder Coultn find even after directly connect Qnap to my Laptop, Closing firewall & Antivirus.” -How to Determinate Problem
Please Refer To This Guide if You Got One of These Errors;
-Shut Down Qnap. Plug Out All HDD’s, but be careful, we’ll plug them all a few steps later, so be sure which HDD is at Which Port.
- Directly plug Qnap to your Laptop /PC.
- Start Qnap without HDD’s, and dont plug them yet.
1 – Qnap power On? ->No?; Qnap powersupply may be damaged. Contact with Qnapsupport.
2 – You should heard first beep sound first -> No? Mainboard may be damaged. Press and hold Reset button at back of Qnap and check if this fic problem. If problem still continue, send device back to your Vendor.
3 – A few minutes later second beep sound should come and Qnapfinder Should find Qnap -> No? Qnap firmware may damage, so please check my “How to recover / reflash Qnap firmware” Documents
4 – Double click Qnap to be sure if you can Reach Installation screen -> No? If you cant reach, close Antivirus & firewal, and be sure your PC is at the same subnet with Qnap IP. If you still cannot Reach Qnap.
If you can reach Qnap interface, just plug in HDDs in right order. DONT START INSTALLATION / INITILIZATION.
5 – After HDD plugged In, Qnap Restart /Shut down Itself Error;
a – One of your HDD may be dead. I saw this error a few times, and sometime dead HDDs cause Qnap Shutdown. Just Identify which HDD cause this problem, and DONT USE IT. Just skip all steps at here, and restart Qnap witout that HDD.
b – Second possable proble is powersupply / adaptor problem. One of our costumer try to use another device adaptor with his ts-212, and after plug in 2.th HDD, Qnap just shut down ıtself or couldn recognize 2.th HDD. After changing device adaptor, device works perfect. Just be sure your using original Qnap adaptor.
6 – On Qnapfinder, one left click to you Qnap, and press “Detail” button at the buttom of Qnapfinder. Be sure All HDDs appears there. ->No? If any of HDDs doesnt appear there, ıt maybe Qnap sata plug board error, so send device back to vendor for repear. If 1-2 HDDs doesn appear, plug out those HDDs and go on. Dont use these HDDs!
If everything is okey till this step, Your NAS is fine, but there is an error on HDD / RAID. To fix this problem, please follow this documnet;
.
II – “Qnap LED panel, Device stuck at “Loading Driver, Please Wait” : How to solve Problem
Summurize:
1 – Shut Down Qnap. Plug Out All HDD’s, but be careful, we’ll plug them all a few steps later, so be sure which HDD is at Which Port.
2 – Directly plug Qnap to your Laptop /PC via ethernet cable.
3 – A few minutes later second beep sound should come and Qnapfinder Should find Qnap
4 – Now plugin HDDs to your NAS HDD slots in Right order, and check if All HDD’s are plugged in via Qnapfinder.
Dont Start Installation!
5 – Download Putty from this link and login with admin / admin usernam / password;
http://www.chiark.greenend.org.uk/~sgta … nload.html
6 – Type this command lines which I marked blue;
# config_util 1 -> If result of this command give “Root Failed” dont go on and contact with Qnapsupport team
# storage_boot_init 1 ->
# df -> IF dev/md9 (HDA_ROOT) seems full, please contact with Qnapsupport.
(Now, you can Reboot your device with this command. ıf you want to reset your configration, please skip this.)
# reboot
But also you can Type these commands to reset your configration settings;
# cp /etc/default_config/uLinux.conf /mnt/HDA_ROOT/.config/ (Also you change another config file beside uLinux.conf. )
# rm -r /etc/config
# ln -sf /mnt/HDA_ROOT/.config /etc/config
#setcfg -f /etc/config/uLinux.conf Misc configured TRUE
# reboot
Other Configration files;
uLinux.conf – Sistem ayarlarının çoğu burada saklanır
- · smb.conf – Microsoft Network (Samba) configration
- · raidtab – RAID configration
- · proftpd.conf – FTP server configration
- · apache.conf – Web server configration files
- · passwd / shadow – user Password informations
.
III – ”Qnap LED panel, still stuck at “Booting” / Qnap Name seems as “ULinux” on Qnapfinder” and doestn get IP adress
1 – Shut Down Qnap. Plug Out All HDD’s, but be careful, we’ll plug them all a few steps later, so be sure which HDD is at Which Port.
2 – Directly plug Qnap to your Laptop /PC via ethernet cable.
3 – A few minutes later second beep sound should come and Qnapfinder Should find Qnap
4 – Now plugin HDDs to your NAS HDD slots in Right order, and check if All HDD’s are plugged in via Qnapfinder.
Dont Start Installation!
5 – Download Putty from this link and login with admin / admin usernam / password;
http://www.chiark.greenend.org.uk/~sgta … nload.html
6 – Type this command lines which I marked blue;
# config_util 1 -> If result of this command give “Root Failed” dont go on and contact with Qnapsupport team
# storage_boot_init 2 -> (this time type storage_boot_init 2, not storage_boot_init 1)
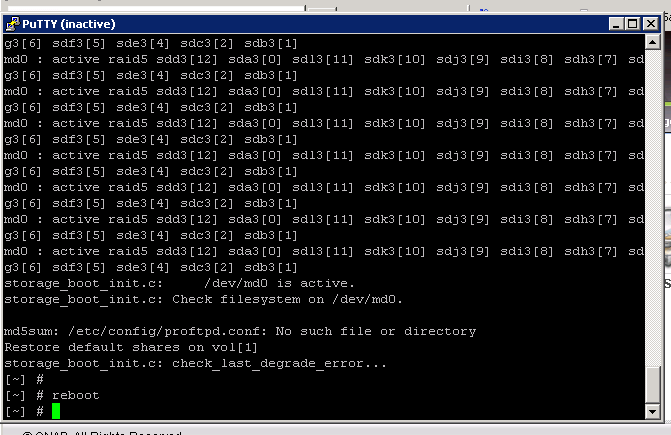
you should get this kind of information after this command:
Sometimes a broken HDD cause this kind of booting problems, so Now, we will detect which HDD may cause this Error and not part of the HDD. Type Commands down below:
# mdadm -E /dev/sda3 -> this will check your first HDD is in RAID or not.
# mdadm -E /dev/sdb3 -> this will check your 2.th HDD is in RAID or not.
# mdadm -E /dev/sdc3 -> this will check your 3.th HDD is in RAID or not.
# mdadm -E /dev/sdd3 -> this will check your 4.th HDD is in RAID or not.
# mdadm -E /dev/sde3 -> this will check your 5.th HDD is in RAID or not.
# mdadm -E /dev/sdf3 -> this will check your 6.th HDD is in RAID or not.
# mdadm -E /dev/sdg3 -> this will check your 7.th HDD is in RAID or not.
# mdadm -E /dev/sdh3 -> this will check your 8.th HDD is in RAID or not.
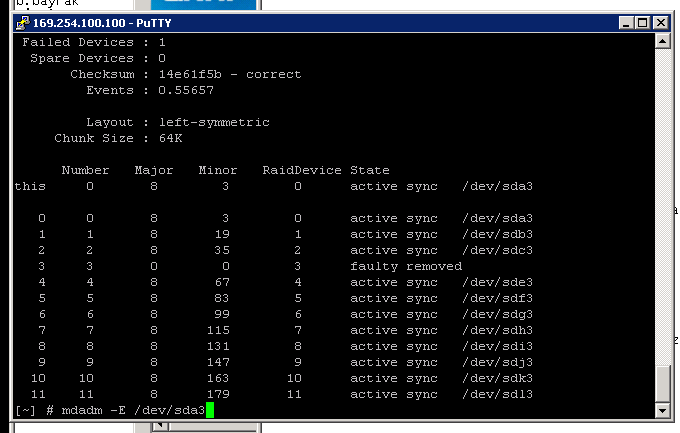
Example, in this case our /dev/sdd3 seems “faulty removed”.
IF your device still stuck at booting even after this process, shut down Qnap, remove this HDD and restart device again without this HDD!
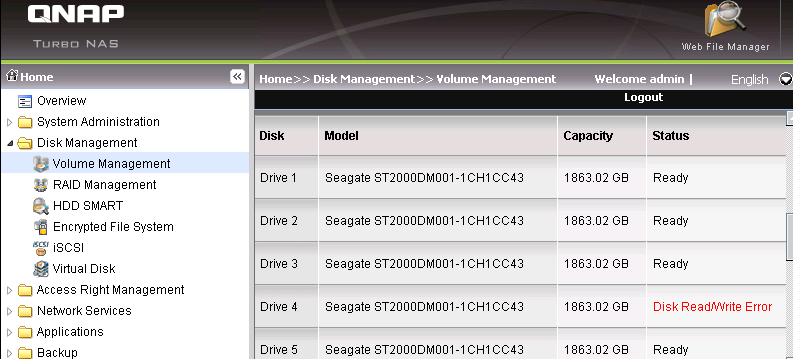
After Qnap becomes accessable, as you can see that 4.th HDD gives errror at RAID menu:
If you didnt loose more HDD than your RAID tolarated (ex at RAID 5 only 1 HDD gives this error) you can change HDD to Recover your RAID.
IF Qnap starts with “Read Only Mode” backup your datas quickly and setup your RAID from begining.
And well, I fix nearly %80 of the cases with this document, but If Problem still exist, please Contact Qnapsupport.
Booting / Loading Driver 'da Takılı Kalan QnapStuck At Booting / Loading Driver,


