QNAP NAS models applied
The System Recovery Mode is currently supported on QNAP TS-109, TS-209, TS-409 & TS-409U (including Standard, PRO and PRO-II models).
How Does Recovery Mode Work?
The Recovery Mode enables the NAS to establish a TFTP session with a remote PC to retrieve the QNAP default flash image file and will programme this flash image file automatically to restore to the factory default state without the need to use a RS-232 console cable.
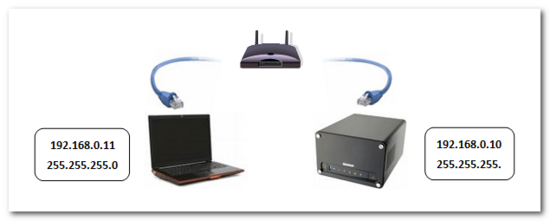
Under the Recovery Mode, the NAS boot loader (U-boot) will be pre-configured with an IP address of 192.168.0.10. Therefore in order to establish a TFTP session between the NAS and the PC, substitute 192.168.0.11 as a static IP and a subnet mask of 255.255.255.0 for the PC. The PC and the NAS can be connected directly by plugging a RJ-45 LAN cable to each other or through a network switch as long as both units are under the same network segment.
Enable the Recovery Mode
QNAP NAS manufactured prior to 2009 do not carry this function natively. The Recovery Mode needs to be manually enabled by installing the special QPKG file. Note that prior to enabling the Recovery Mode, please make sure that your current system firmware version is at least v2.1.2 build 081114. If not, you may go the offical firmware download site here and choose the correct firmware that matches your NAS model and update your system before continuing to the next step.
System Recovery Mode is enabled by installing the QPKG (.qpkg) files via the web administration page under ‘System Tools’ -> ‘QPKG’. Once the installation ends you will have to reboot the NAS manually by either going to ‘System Tools’ -> ‘Restart / Shutdown’ and select ‘Restart’ or issue ‘reboot’ from the console prompt and then when system starts up it will update the kernel and u-boot automatically and then reboot itself again to complete. Please note that before the update procedure finishes DO NOT INTERVENE OR POWER OFF THE NAS.
Once the update procedure ends your system now has the System Recovery Mode enabled. Please note that unless your flash memory is damaged and the NAS is unable to enter the normal operating state you do not need to continue on next chapter.
Now download the QPKG file from below that matches your QNAP NAS model:
Operating Guideline of System Recovery Mode
Once you have updated your system with the QPKG file from the previous system, you can use the recovery mode in case you want to load a recovery image. We provide recovery images that contain the QNAP fimrware. Note the size of these images is 8MB which is the same size as your onboard flash memory. Now you can download the file that matches you QNAP NAS model from the URL below:
- TS-109 / TS-109-II
- TS-109-Pro / TS-109-Pro-II
- TS-209 / TS-209-II
- TS-209-Pro / TS-209-Pro-II
- TS-409 / TS-409-Pro / TS-409U
Remark:
According to information from Martin Michlmayr the 6 mtdblocks are arranged in following order in the image:
mtdblock1 (Kernel, 2MiB)
mtdblock2 (RootFS1, initrd, 4MiB)
mtdblock3 (RootFS2, 1MiB)
mtdblock5 (NAS Config, 384kiB)
mtdblock4 (U-Boot Config, 128kiB)
mtdblock0 (U-Boot, 512kiB)
During the recovery only mtdblock1, mtdblock2, mtdblock3 (together 7MiB) are written to the flash. This way you also can backup your existing firmware/configuration into an image by executing:
“cat /dev/mtdblock1 /dev/mtdblock2 /dev/mtdblock3 > qnapimg.bin”
and using this image (7MiB in size) for recovery.
Setup TFTP Server on Windows XP / Vista
If you have no TFTP server installed on your Windows machines you may find one free of charge from the Internet or simply follow the one recommended below in this guide.
Installation
- Download: http://sourceforge.net/projects/tftputil/
- Latest Version: 1.3.0
- Filename: TFTPUtil_GUI_Version_1.3.0_Installer.exe
- Requirement: .NET framework 2.0 (downloadable from Microsoft)
Configuration
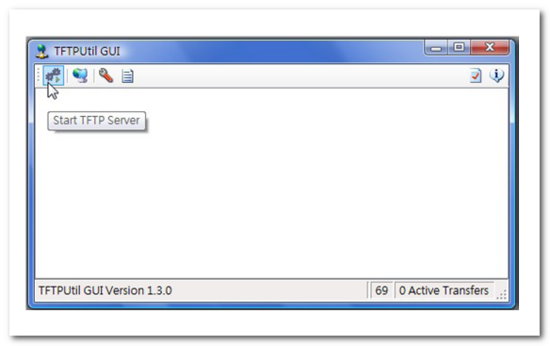
- Start TFTPUtil GUI & TFTP Server
- Set your root directory path of your TFTP server
- Either temporarily disable the Windows firewall or add TFTPUtil GUI program to the exception list.
- Unzip the firmware image you have just downloaded to the TFTP root directory you specify in the last step (C:\Users\ken\Desktop\img in this case) and do not forget to rename it to qnapimg.bin. (The recovery process will not start if the file name does not match the one above)
Enter the recovery mode
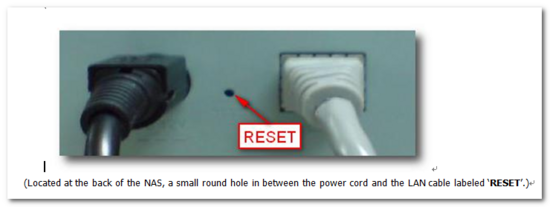
Use any pointy object (eg, pen or small-size screw driver) to press and hold on the Reset Button (see below) for at least 5~8 seconds until you hear two short beeps and then you are in the system firmware recovery mode. The status LED should be lit from flashing red and green to constant red.
Alternatively press and hold the reset button whilst the unit is powered down and then power on the unit the two short beeps should be pretty much instant, this may prove the easier route if you’re doing this to reinstate the firmware on a “live” unit.

During the recovery process
During the recovery operation (writing the firmware to the flash) the LED on the LAN port will flash rapidly for the first few seconds (receiving firmware image from the Windows machine over the network). Once the flash memory programming begins the status LED should lit constant red. LEAVE THE NAS ALONE AT THIS POINT! DO NOT TURN IT OFF OR UNPLUG THE POWER CORD. As soon as the flash programming ends you will hear a single long beep as well as the status LED flashing green. The NAS will now reboot itself with the new firmware loaded. No intervention required during this stage.
Timeouts
During the initial stage of the recovery operation the NAS will try to load the image file (qnapimg.bin) from the Windows machine however one may experience timeouts due to poor connection quality or incorrect network address settings. If this should occur simply reset the NAS by pressing and holding down the power button for a few seconds and the system should reboot itself then you may try the procedure once again
Eski Nesil (Ts-X09) Qnap Firmware DüzeltmeOld Generation (Ts-x09) Qnaps Firmware Recovery,


