Introduction & Feature
One of the core values of QNAP NAS is always to help small and medium businesses to preserve their data with utmost reliability. Therefore we have created a new feature, Backup Versioning, in our Backup Station’s RTRR function. This feature contains our latest backup technology that enables users to freely generate and restore multiple versions of the same files & folders not only one time, but at selected times, while minimizing the required storage needed. Backup Versioning therefore frees your business from the risk of accidental changes, corruption, or deletion of important files in a selected period.
Audience
This application note is intended for those who are responsible for administering a QNAP NAS for business use (as a data backup center with RTRR) therefore details regarding the existing RTRR backup process will not be addressed.
1. How to Start
1.1. What is Backup Version
A normal backup job will only process one file/folder at a time during replication, and if a backup job is repeatedly carried out and the backup file is to be saved is in the same target folders, the previously backed up file will be replaced. In a shared data center this raises the risk of overwriting important data every time it is backed up.
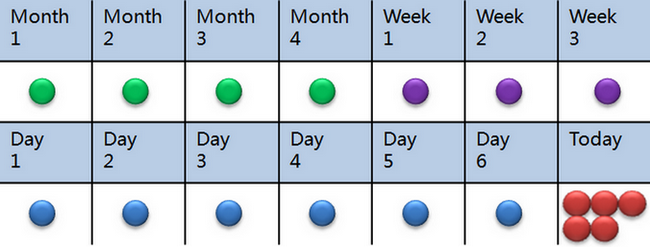
Using backup versioning in RTRR creates a new target folder to store the new backup data, therefore creating different versions of backed up files depending on when the backup is carried out and if the file has been modified since the last backup. An example of how this is beneficial is that a software company can still retain original working code while they continue to work on it, and if newer code fails to work they can easily restore the original working code:
1.2. System Required
To use Backup Versioning in Backup Station, you must install the Backup Versioning App from the App Center. Just click the App Center in the QTS desktop, search and install Backup Versioning and add it to QTS on both the local and remote NAS.
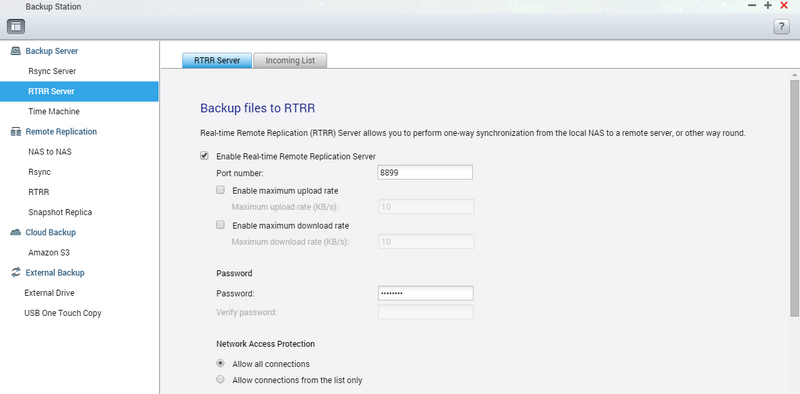
When installed, go to Backup Station and create a backup task. Before starting, please enable the RTRR server on the remote NAS (select RTRR server at the right hand corner and check if the Real-time Remote Replication Server is enabled). Before clicking Apply, you also need to provide the port number which links to your remote device or other NAS if the system does not automatically show the default value. You must also enter that device’s admin login password (not necessary for local to local backup).
2. Create Replication
2.1. Backup with Version Control
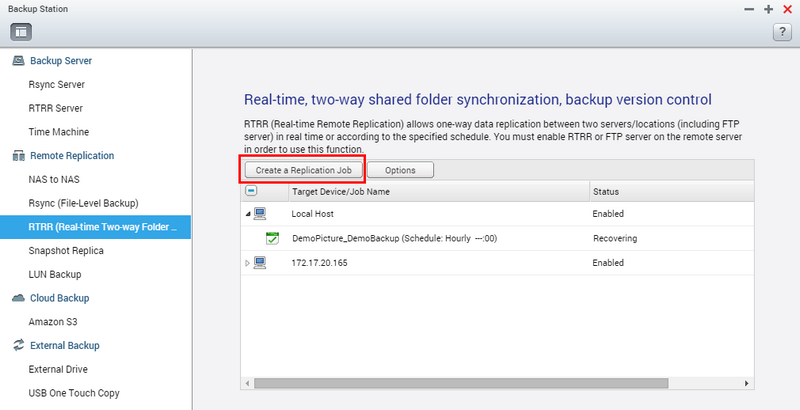
To use Backup Versioning, go to Backup Station and select RTRR from Remote Replication. Click Create a Replication Job to enter the Synchronization Job Wizard and backup your file with Backup Versioning feature.
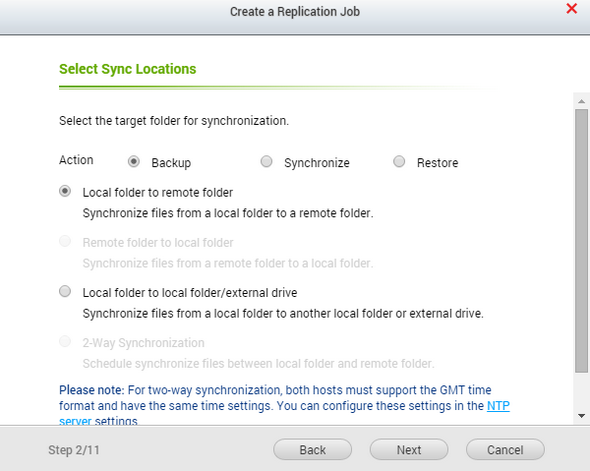
When asked for the job’s action, select Backup to create a Backup Job that enables Backup Versioning. Below you can choose if the data be backed up to a remote folder, local folder or external drive. In this example, we will select “Local folder to remote folder” (this process is similar to “Local folder to local folder”).
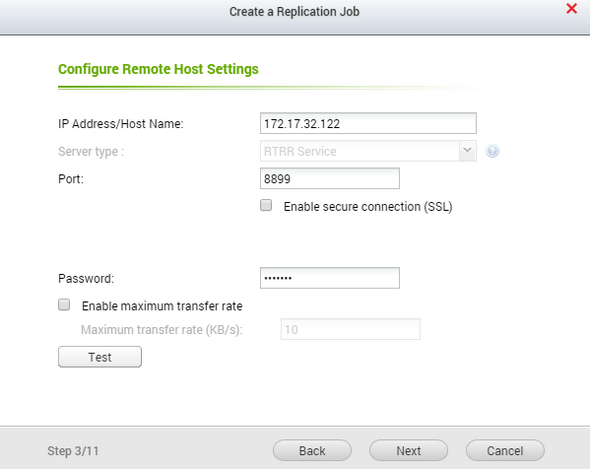
The next step will be configuring your remote host settings. If you have provided the port address in the RTRR server, it should be here and you can input the IP address of the remote host that you want to back up to. For example we have another NAS, so we enter its IP address and the admin password. We can confirm these details are correct by pressing the Test button.
*You can set the maximum transfer rate now or after the job is created to optimize your network resource usage.
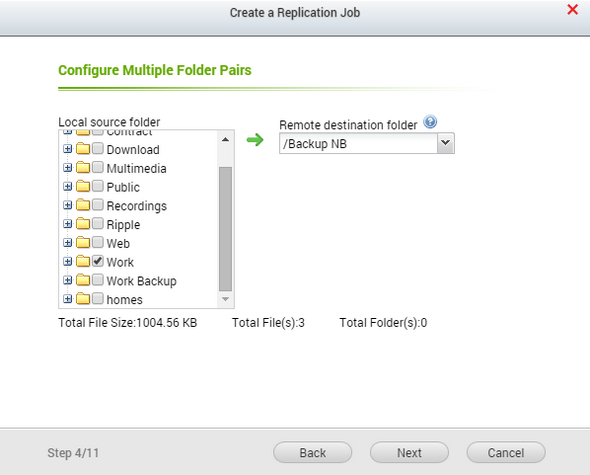
The following wizard steps are the same for selecting both remote and local folders as the backup folder. In the window you can select the folders you want to backup and where they will be backed up to.
As we selected the backup action, in Replication Options we only need to select the Schedule and set it as an Hourly, Daily, Weekly or Monthly backup job. It is essential to check the “Configure policies, filters and Version Control” as this will enable Backup Versioning for this job.
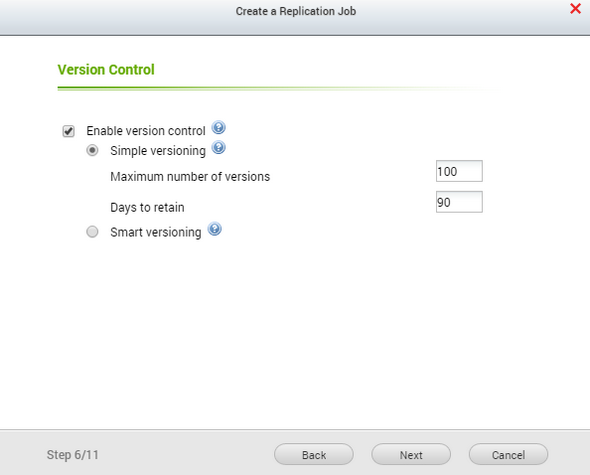
In the next step, to enable and configure how backup versioning work, check “Enable Version Control” and two options will show after selection. The first is Simple Versioning, which allows you to set the maximum number of versions for a file and number of days to retain them. When the maximum number of versions is reached, the oldest backup will be replaced by the latest job. While Day to Retain defines how long a version file will exist after it was created.
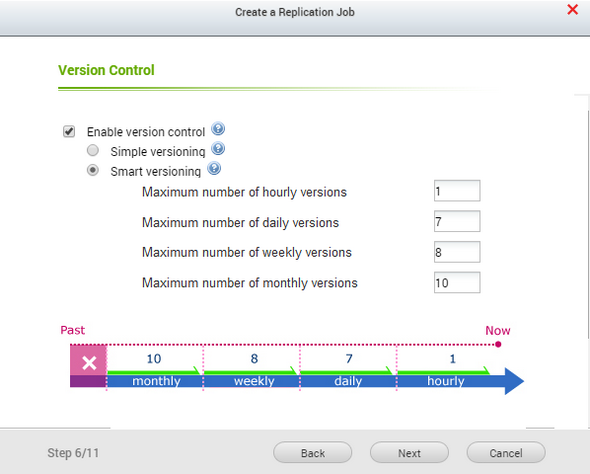
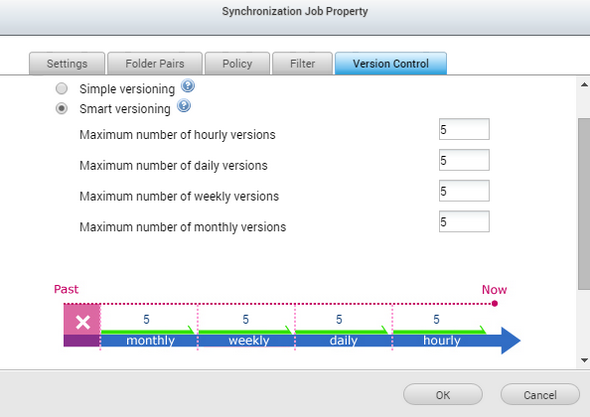
The second is Smart Versioning, which allows you to set maximum hourly versions and the maximum number of daily, weekly and monthly versions.
The backup job creates the latest version, and converts previous versions to hourly/daily/weekly/monthly versions based on the settings (daily versions become weekly versions, weekly versions become monthly versions, etc).
Here are some examples to understand the benefits according to the settings:
- If a backup job is set every hour and with maximum Hourly 5 , Daily 6, Weekly 3, Monthly 4
- In this case, there will be 6 hourly versions for the current day, 6 versions kept over 6 days, then 3 versions over 3 weeks, then 4 versions over 4 months.
- Total is 18 versions
- Backup retention is 6 days + 3 weeks + 4 months for a total of 5 months
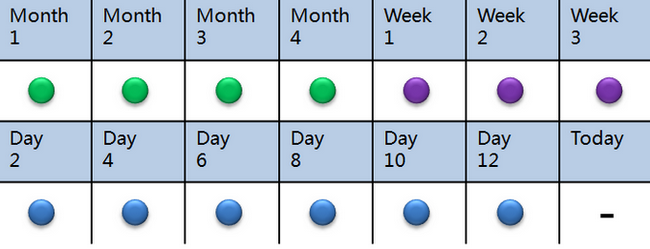
- If the same backup job is started manually every 2 days with maximum Hourly 5 , Daily 6, Weekly 3, Monthly 4
- There will be no hourly version because the backup only runs every 2 days, and there will be 6 daily versions, taken every 2 days (so around 12 days of backups), then 3 weekly versions (older than the daily version, so 3 more weeks of backups), then 4 monthly versions
- So the backup retention is 12 days + 3 weeks + 4 months for a total of about 5 months and 1 week
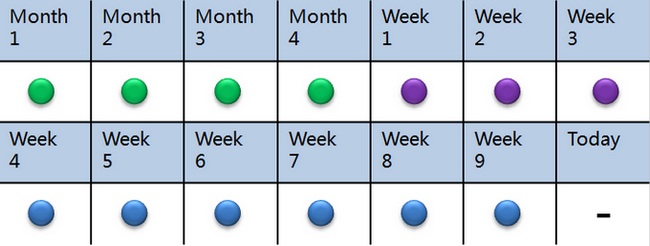
- If the same backup job starts every week with a maximum Hourly 5 , Daily 6, Weekly 3, Monthly 4
- There will be no hourly versions because the backup runs only every week, and there will be 6 daily versions, each taken every week (so around 6 weeks of backups), then 4 weekly versions (older than the daily version, so 4 more weeks of backups), then 4 monthly versions
- So the backup retention is 10 weeks + 4 months for a total of about 6 months
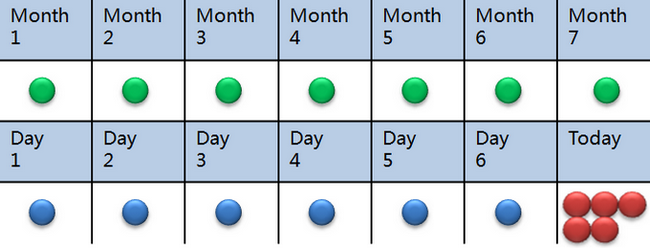
- If the weekly version is set to 0, then daily versions directly become monthly:
- If the backup job starts every hour with maximum Hourly 5 , Daily 6, Weekly 0, Monthly 7
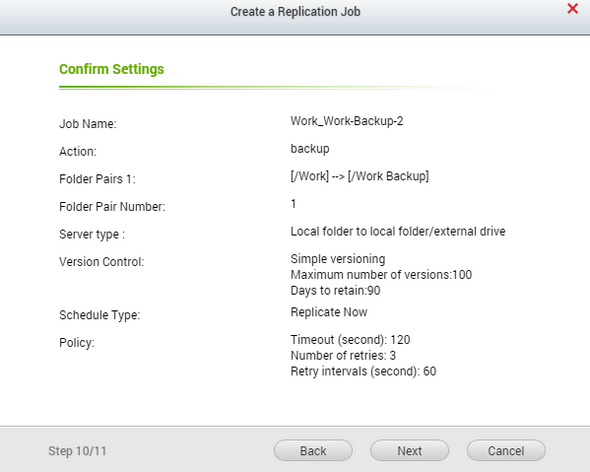
Therefore, it allows for flexible backup retention versus data usage. It is possible to retain fewer versions while backups get older. After selecting the version control model, the remaining configuration is the same as the original RTRR backup wizard. You will need to adjust the timeout/retry and advanced settings for the backup process and file types to backup. At the end of wizard, please check that the version control information has been given, and the job has been created in the RTRR backup list.
2.2. Edit a Backup Job with Backup Versioning
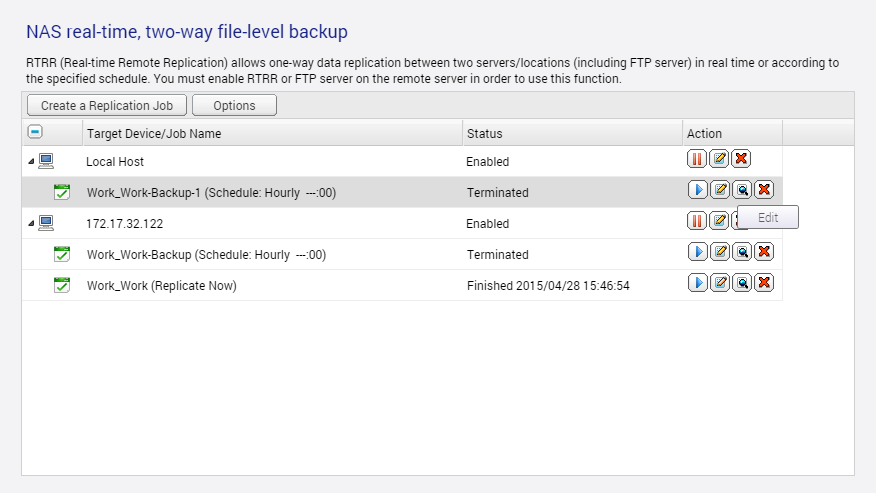
After a backup job is created, you can change the Version Control policy in the RTRR section of Backup Station. To do this, enter Backup Station and select RTRR in from the drop-down menu. You can check each backup job in the content window, select the Edit icon next to each backup job, and enter the Version Control tab. Here you can change a backup job to use or not use Backup Versioning using “Enable version control”. You can also set the values of Simple or Smart Versioning for the backup job.
3. Restore Backup File
3.1. Backup Behavior
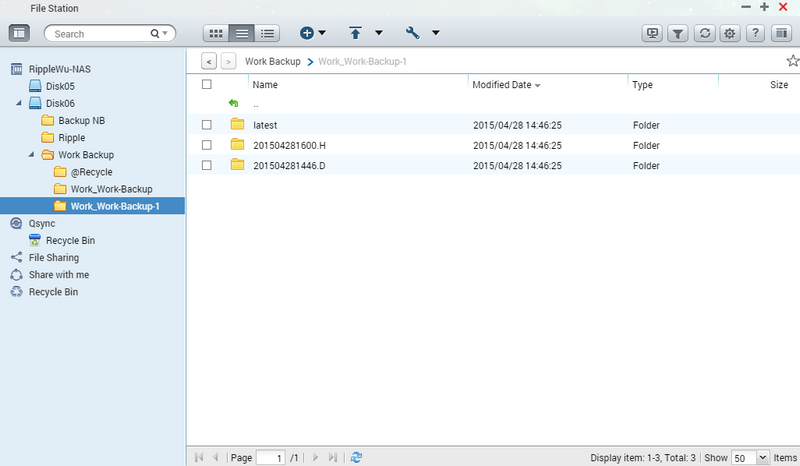
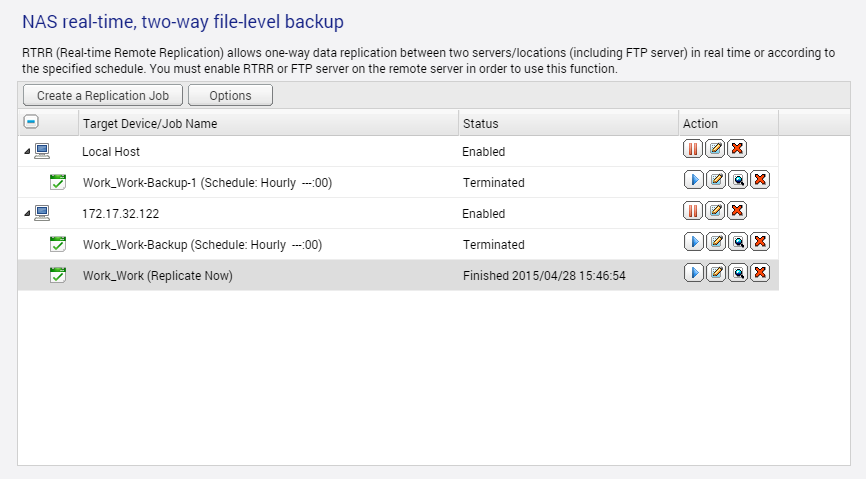
When backup versioning jobs are created and running, you can check the status of each backup job in the RTRR section of Backup station. When checking the backup folder from either Windows or File Station on the NAS, you can see that different backup folders are created with the name of their backup time.
Multiple files appear in different backup versions, but will only use additional space if they are different. If no changes are made between versions, there is no additional backup space required. And even early version of files are deleted, the later version’s file will still be accessible.
There are several behaviors of the backup versioning process that need attention.
- The newest backup version will always be named latest, and this version will not be calculated regarding the maximum settings.
- Excluding the latest version, the backup folders will have their folder name in the following format: yyyy/mm/dd/hh/mm to identify different versions. The files within each folder will retain their original filenames.
- In smart version control, there will also be a letter in the end of each folder to suggest whether it is an hourly, daily, weekly or monthly backup version.
- The smart versioning control will transfer the oldest version in a version type to the next type when reach the transfer period. For example, at 07/15/2015 there has hourly versions at 21, 22 and 23pm, when reach 07/16, the hourly version at 21pm will be transferred to daily version of 07/15. (The transferring will only happen during the backup)
3.2. Restore backup file in File Station
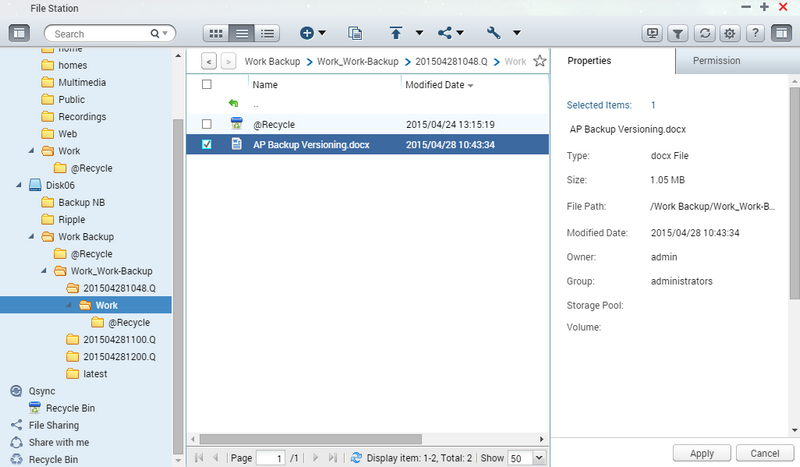
To restore a file/folder from a backup folder with backup versioning, simply open the File Station of the NAS where you put the backup data, select the desired backup folders, and copy the file to the location you wish to place it. You can right click on the file to check if the modification date matches your desired time.
3.3. Restore backup file in Backup Station
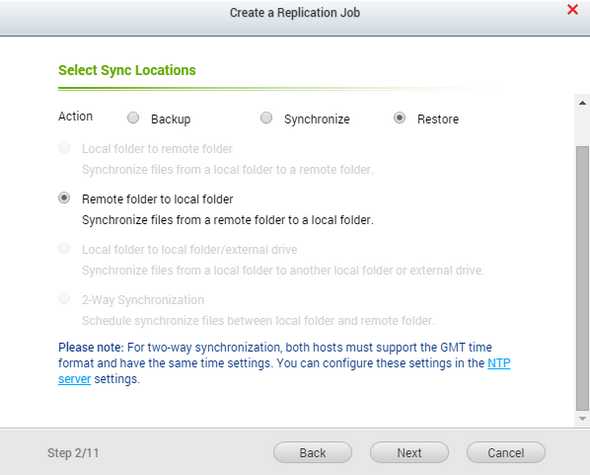
Just as using the normal RTRR restore process, select the RTRR from Backup Station’s drop-down menu and click Create a Replication Job to enter the Synchronization Job Wizard. Select Restore, and enter your remote device’s IP address, password.
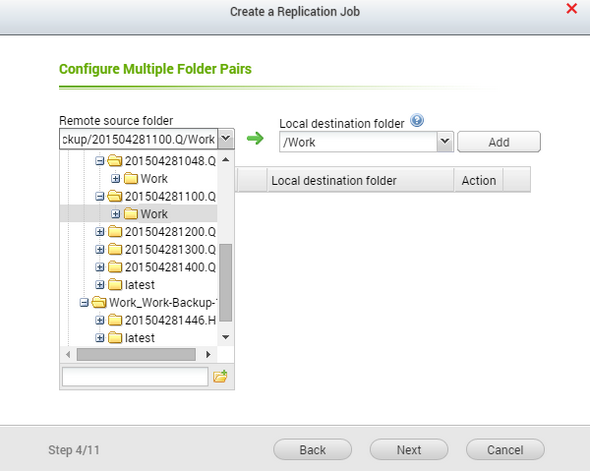
When in the folder selection step, select the desired versions of backup folders according to the time and date on the folder name. After selecting them you can set the timeout and retry options and complete the wizard. After completion, check the processing of the work from the RTRR window.





Hello,
Thanks, nice overview. But does the backup function uses hardlinks to reduce required space for different versions of unchanged files?
Best regards