I – Qnap Web Server: Host Your Own Websites in A Place
II – Host Multiple Websites On Qnap Nas By the Virtual Host Feature
III – How To Use PHP & MySQL To Create A Forum İn Your Turbo Station
.
I – Qnap Web Server: Host Your Own Websites in A Place
Web Server
- Built-in web server
- Built-in MySQL server
Host your own websites in a place
Want to build up an online shop to start your own business? Wish to create a self-managed forum or blog for easier communication and sharing with others? You might be worried about the complicated process to initiate a website. However, building a website could be easier than you have imagined, the answer is the Turbo NAS.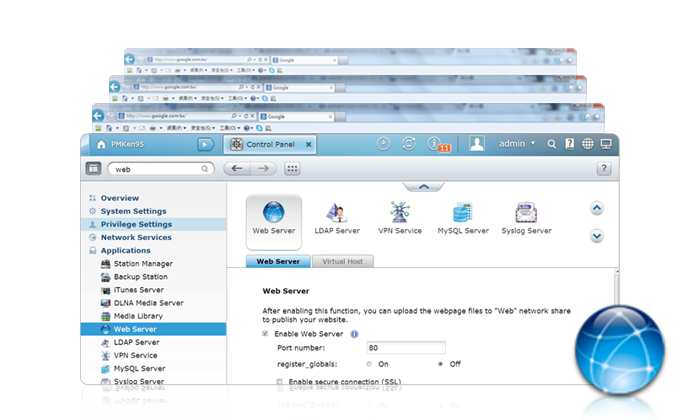
PHP/MySQL server
The built-in web server, together with PHP/MySQL support, allows running famous web applications on the Turbo NAS and hosting websites such as Joomla online shops, phpBB forums very easily. A variety of 3rd-party open source apps are available to be installed based on your needs.
- Application Notes
.
II – Host Multiple Websites On Qnap Nas By the Virtual Host Feature
Today, having a web presence to allow your users, customers or audience from anywhere in the world to interact with you or your company via the World Wide Web is essential. Hosting a website is not as difficult as before and with plenty of free resources on the Internet, setting up multiple website are not limited to the professionals and can be only a few clicks away.Virtual Host is a web server technique that provides the capability to host more than one domain (website) on one physical host offers a cost-effective solution for personal and small business with such need.QNAP NAS supports virtual hosting and this article will show you how to set up multiple websites on QNAP NAS by using virtual host. Read on.In this tutorial we will use the information provided in the table below as the reference guide.
| Host name | WAN/LAN IP & port | Document root | Demo web application |
| site1.mysite.com | WAN IP: 111.222.333.444 LAN IP: 10.8.12.45 (NAS) Port: 80 (NAS) |
/Web/site1_mysite | Joomla! |
| site2.mysite.com | /Web/site2_mysite | WordPress | |
| www.mysite2.com | /Web/www_mysite2 | phpBB3 |
Before you start
Before you start, please make sure you have checked the following items:
DNS records
The host name must point to the WAN IP of your NAS and you can normally configure this from your DNS service providers.
Port forwarding
If the web server listens on port 80 you need to configure port forwarding on your router to allow inbound traffic from port 80 to the LAN IP (10.8.12.45) of your NAS.
SSL certificate import
If you are going to enable SSL connection for the website and intend to use your own trusted SSL certificates you may import the certificate from within the administration backend under ‘System Administration’ > ‘Security’ > ‘Import SSL Secure Certificate’.
Activate the Web Server and Configure the Virtual Host Function
Login the administration page and then go to ‘Network Services’ > ‘Web Server’. Check the box ‘Enable Web server’ and click ‘Apply’.
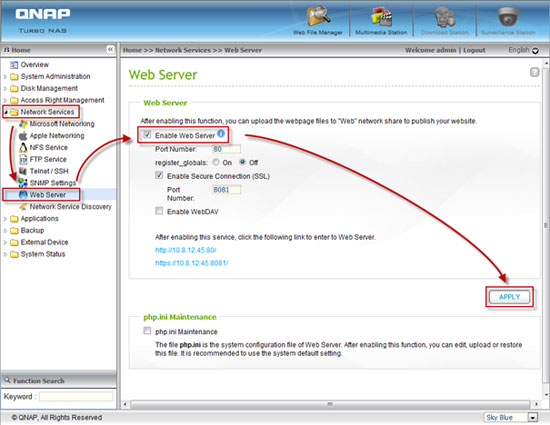
Next go to the ‘Virtual Host’ tab and check the box ‘Enable Virtual Host’ and click ‘Apply’.

Click ‘Create New Virtual Host’ to start the wizard and enter the required information (Host name, Folder name, Protocol and Port) then click ‘Apply’.
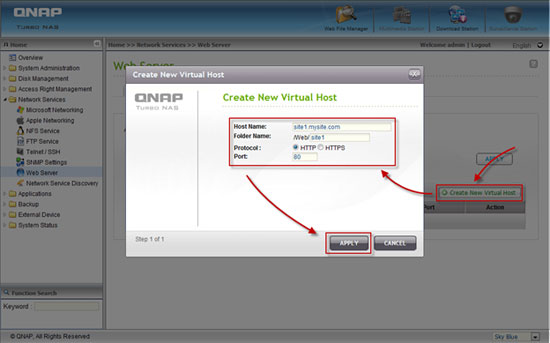
Continue to enter the information for the rest of the sites you wish to host on the NAS.

Upload the Website Data to the NAS
So far we have NAS configured to host multiple websites and next we are going to upload the files for each website by mapping the Web (or Qweb) share folder to your desktop.
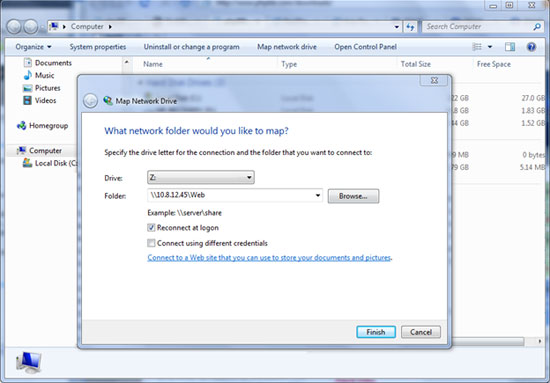
Once the ‘Web’ share folder is mapped create a folder for each website (site1_mysite, site2_mysite and www_mysite2) and start transferring the website files to the corresponding folders we created.
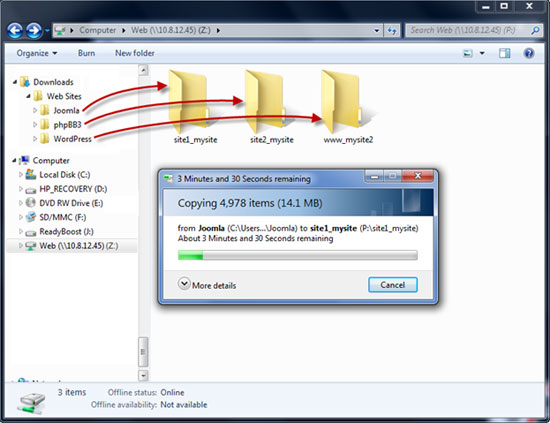
Once the files transfers complete point your web browser to the websites by entering the following URL:
http://site1.mysite.com
http://site2.mysite.com
http://www.mysite2.com
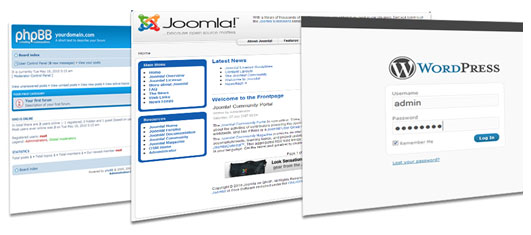
You should see the Joomla!, phpBB3 and WordPress web pages respectively. Additional setup options including enabling SSL connections or choose another port number other than port 80.
.
III – How To Use PHP & MySQL To Create A Forum İn Your Turbo Station
Save your bucks on hosting company
Think it’s difficult and costly to setup your own community forum? Not any more, and this guide will demonstrate within a few steps you can have your community forum setup and going online right away. Note that we will be using the popular open source forum software phpbb as an example here.
Activate the web server and the MySQL database server
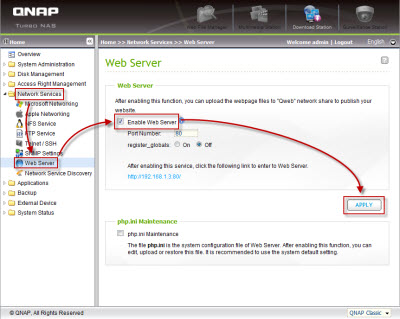
Login to the administration page and then go to ‘Network Services‘ > ‘Web Server‘. Tick the checkbox ‘Enable Web server‘ and click on ‘Apply‘.
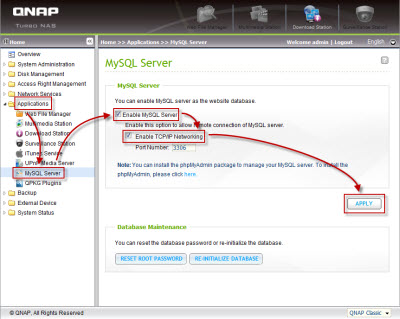
Next go to ‘Applications‘ > ‘MySQL Server‘ and tick both ‘Enable MySQL Server‘ and ‘Enable TCP/IP Networking‘ checkboxes then click on the ‘Apply‘ botton.
Create a database for phpBB3 in phpMyAdmin
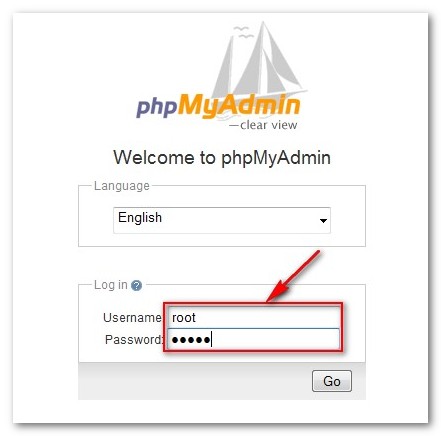
Prior to installing phpBB3, we need to create a new database for it and we will use phpMyAdmin to create the database so install phpMyAdmin QPKG if you do not have it running on your NAS yet. (phpMyAdmin QPKG can be downloaded from here) Once installed point your broswer to http://NAS-IP-Adress/phpMyAdmin/ and enter the user name and password to login (default username and password is root/admin). You can also select your preferred language.
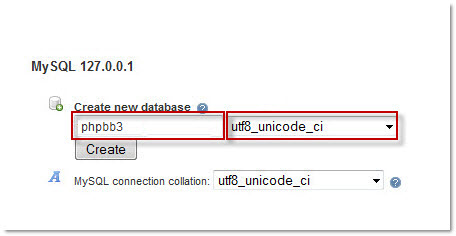
Once in, enter the database name ‘phpbb3′ in the field says ‘Create new database’ and choose a default encoding language you prefer (UTF-8 for best compatibility) then click on ‘Create’ button. That’s it you may now proceed to step 3.
Start the phpBB3 web-based installation
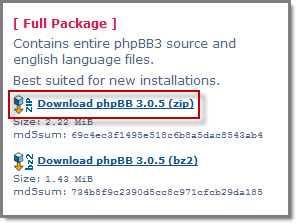
Download the phpbb3 source archive from this URL (http://www.phpbb.com/downloads/olympus.php) and download the [Full Package] one and unzip it to your Web share.
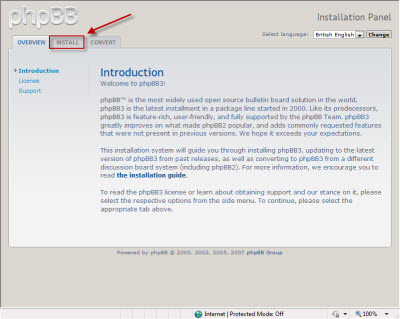
Point your browser to “http://Your-NAS-IP/phpBB3” and you should see the phpBB3 web-based installation page like below. Now click on ‘INSTALL‘ tab to start.
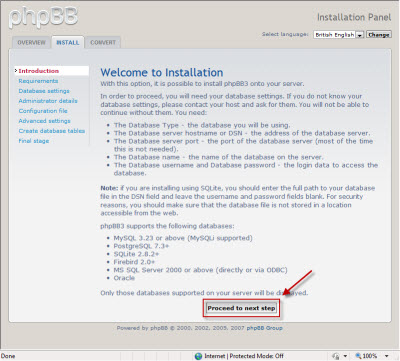
Simply click on ‘Proceed to next step‘ button to go to the next step.
In most of the cases your current web server should be compatible with the requirements so click on the ‘Start install‘ button to go the next step.
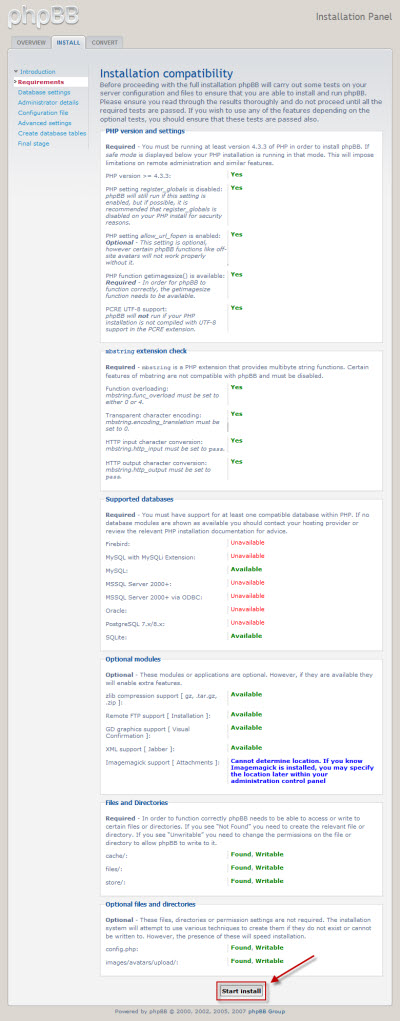
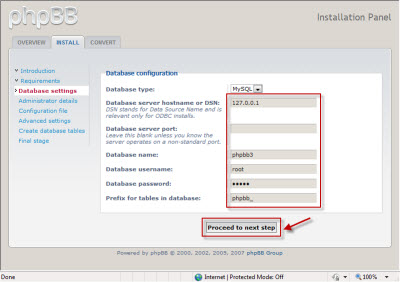
Fill up the fields with your MySQL information including the hostname, database name, database username and database password then click on ‘Proceed to next step‘ to continue.
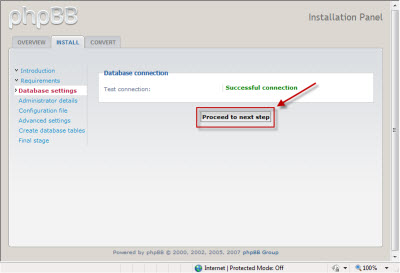
You should see ‘Successful connection‘ if your MySQL server is running and the database ‘phpbb3′ we created earlier is present. Now click on ‘Proceed to next step‘ to continue.
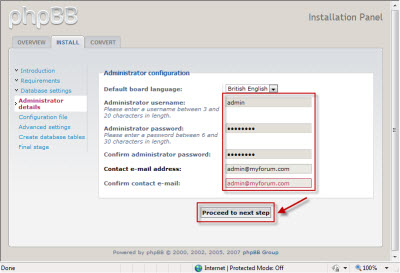
Specify the phpBB3 administrator username and password as well as a valid email address. Once done, click on ‘Proceed to next step‘ to continue.
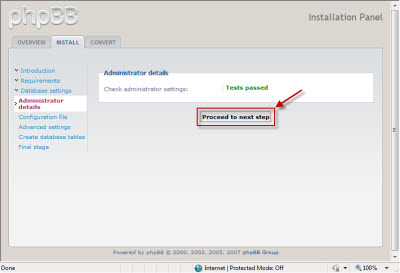
You should see ‘Tests passed‘ and click on ‘Proceed to next step‘ to continue.
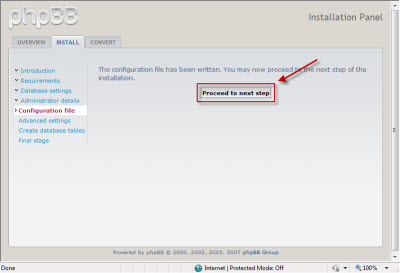
phpBB3 writes all the settings information to a configuration file (config.php) at this stage. Click on ‘Proceed to next step‘ to continue.
Here you can specify advanced settings if you wish then click on ‘Proceed to next step‘ to continue.
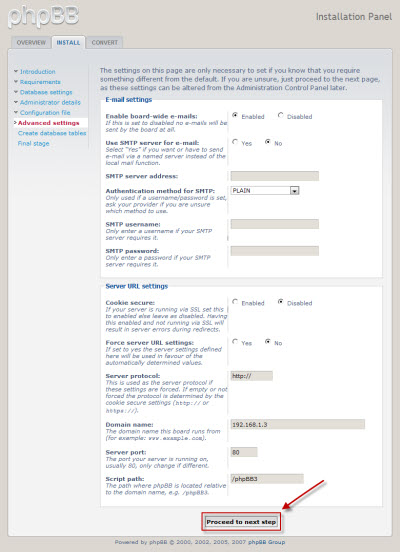
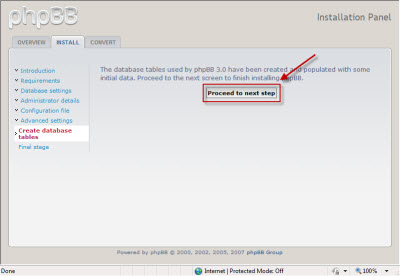
phpBB3 creates all the database tables and populates some initial data at this stage. Click on ‘Proceed to next step‘ to continue.
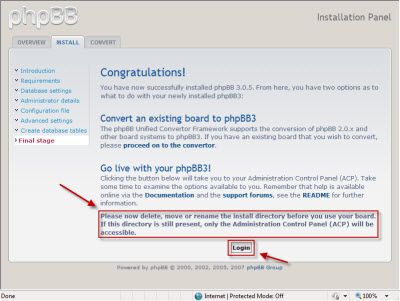
Congratulations! That’s it. Now there’s one more thing you need to do is that you have to delete the installation folder located under the phpBB3 folder. Once deleted you can click on ‘Login’ button to enter the administration page of phpBB3.
This is the phpBB3 Administration Control Panel where you can perform all administrative tasks.
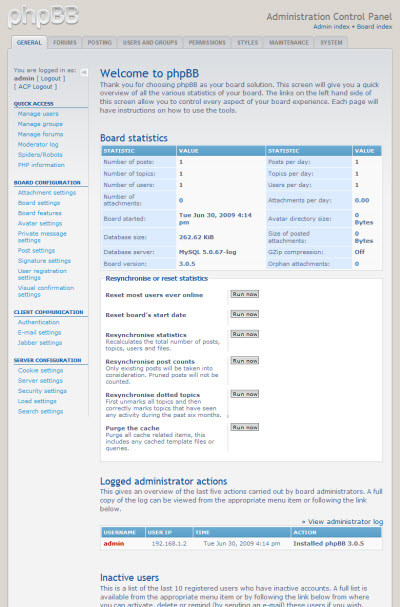
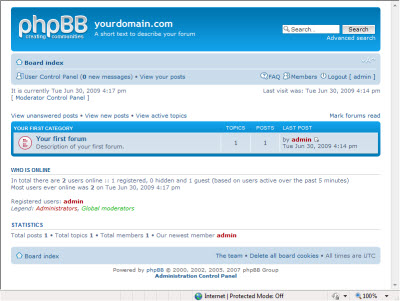
This is the front page of your freshly installed phpBB3 forum. Start sending out forum invitations to establish your online community!
Qnap Web Server: Host Your Own Websites in A PlaceQnap Web Server: Kendi Web Sitenizi Qnap Üzerinden Yayınlayın!,

Sounds simple, but it didn’t work. Do you have any details on dealing with Port Forwarding? I suspect there are details regarding Ports, Router Port Settings and DNS that everyone is glossing over. I believe this is my problem.
thanks,