I – How To Downgrade Qnap Firmware To Older Version?
II – Why I Cant Downgrade Ts-531P Series Firmware? How To Downgrade Qnap Firmware To Older Version?
III – How to Downgrade From 4.0.4 / 4.0.5 Firmware
IV- How To Downgrade Firmware If No HDD’s Installed
.
I – How To Downgrade Qnap Firmware To Older Version?
To Downgrade the firmware of your NAS manually, follow these steps:
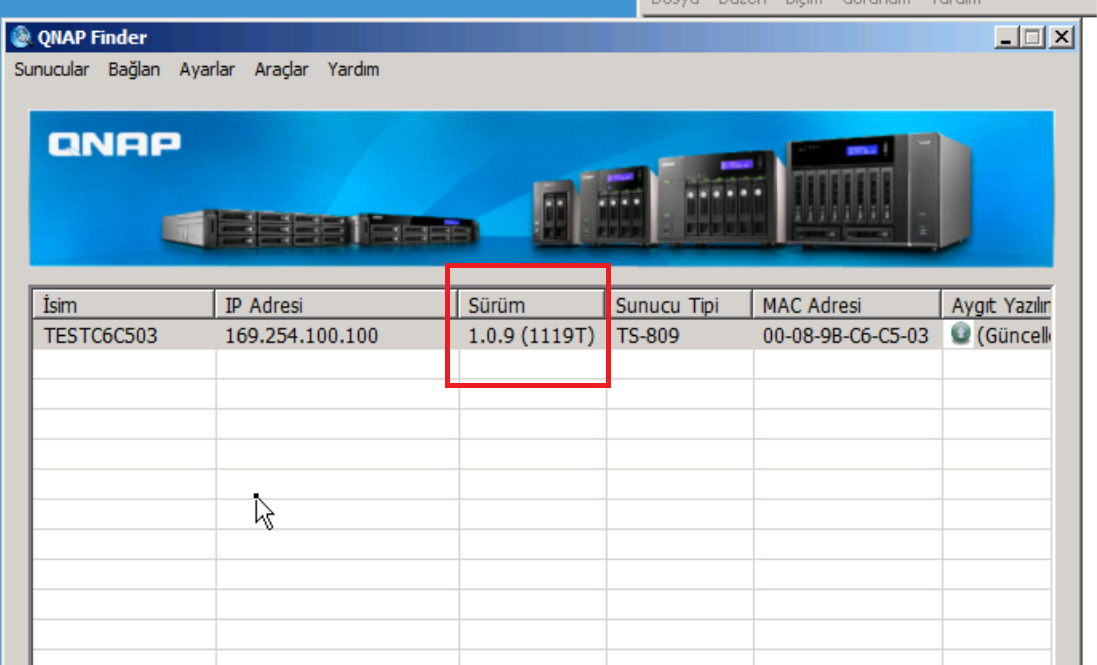
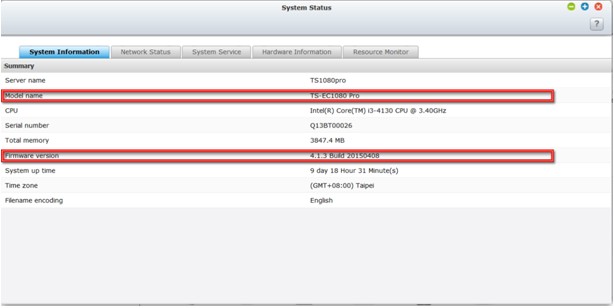
1 – Verify the model name and firmware version of your NAS
Log into your NAS as an administrator (use the admin account, or a user account belonging to the administrator group) and go to “Control Panel” > “System Status”, and click the “System Information” tab. This page displays the model name and firmware version in addition to other information about the system.
.
2 – Download the older firmware
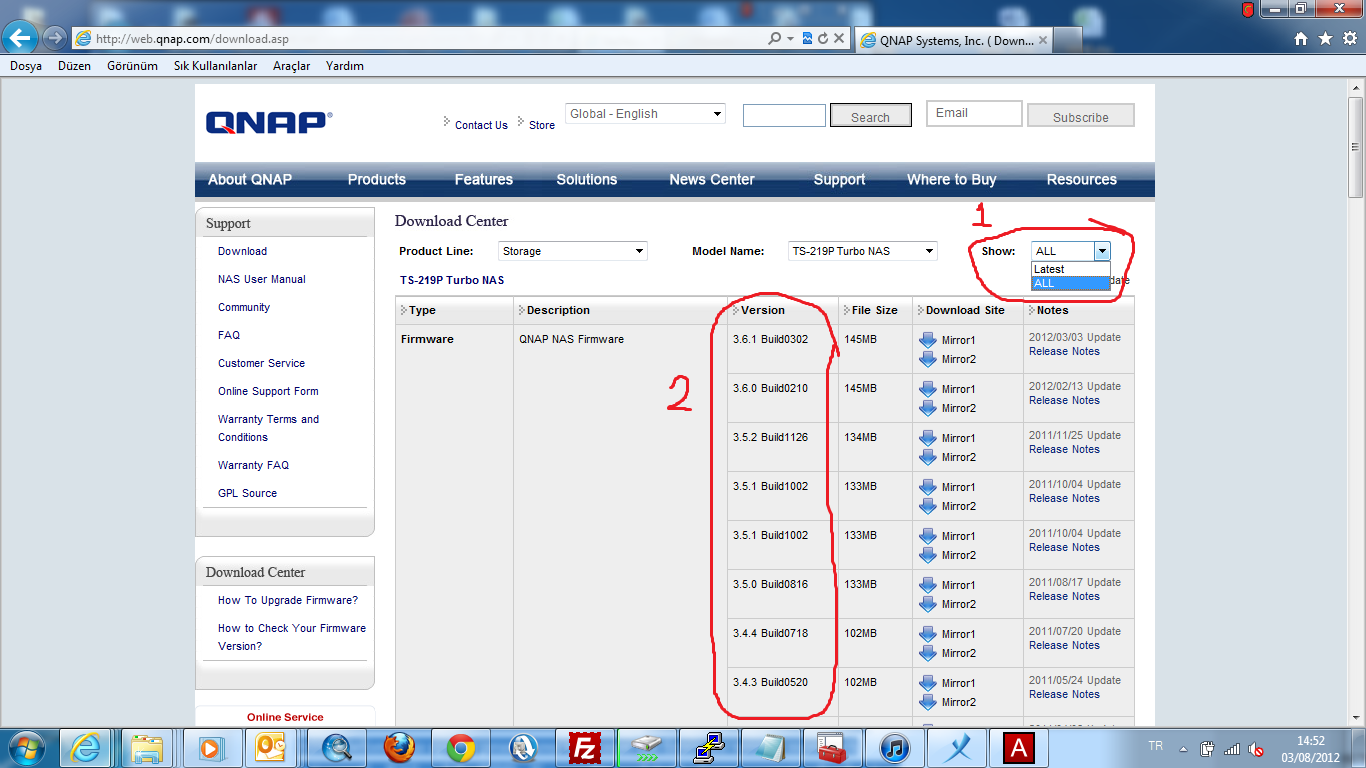
- Go to the QNAP website (http://www.qnap.com/download) and select your NAS model.
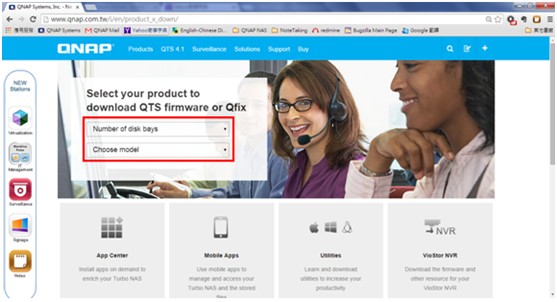
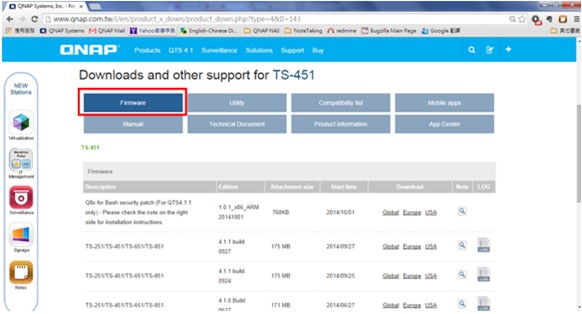
- Select “Firmware”, and find the desired firmware version. Click on the “Note” icon
 to read the release notes for the selected firmware version. The release notes will contain specific instructions that may apply.
.
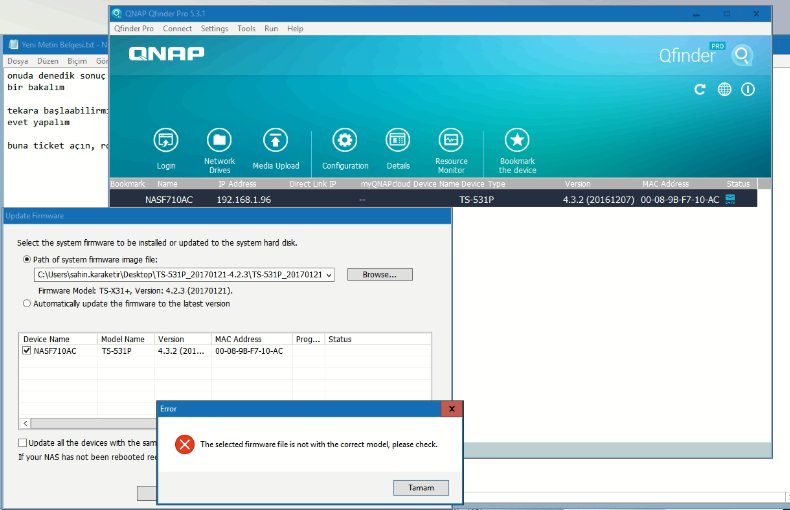
3 – Downgrade your NAS firmware Via Qfinder;
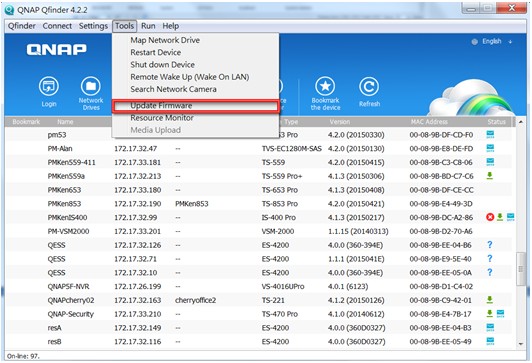
- Launch Qfinder Pro.
- Click “Tools” > ”Update Firmware”.
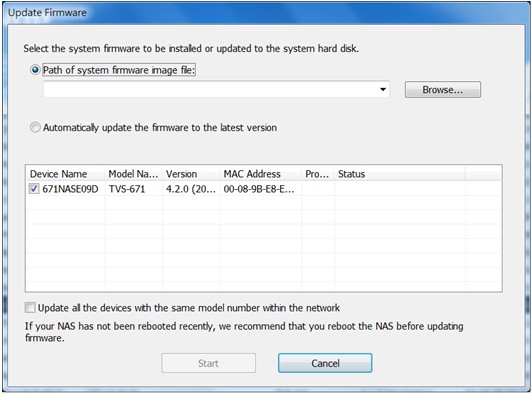
- Select “Path of the system firmware image file” and show older firmware image file (you must unzip firmware after download, and show .iso file here
.
II – Why I Cant Downgrade Ts-531P Series Firmware? How To Downgrade Qnap Firmware To Older Version?
Problem;
To Downgrade Qnap Firmware;
We use TS-531P firmware;
https://www.qnap.com/en/product_x_down/product_down.php?II=210 [^]
And TS-531X/TS-831X firmware;
https://www.qnap.com/en/product_x_down/product_down.php?II=260 [^]
Both fails via Qfinder & Qnap Interface.
.
Reason;
It’s because model name definition is changed in 4.3.2.
.
How To Solve?
You can downgrade firmware with command lines;
https://wiki.qnap.com/wiki/Manually_Updating_Firmware
.
III – How to Downgrade From 4.0.4 / 4.0.5 Firmware
Please try below steps to downgrade.
Warning: If any new storage pool or data volume was created on 4.0.4/4.0.5 Firmware, it will be lost after downgrade.
1. Download the 3.8.4 Firmware file from http://www.qnap.com/download
2. Unzip file and put file under Public Folder on Qnap
3. Connect to the NAS on SSH (download putty and login your Qnap)
4. Type the command:
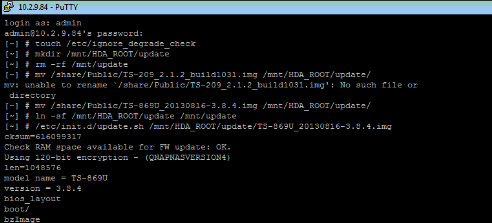
touch /etc/ignore_degrade_check
5. Follow the wiki guide to manually install the 3.8.4 firmware:
[Two important checks]
(1) Please make sure there is /mnt/HDA_ROOT/update folder.
If it does not exist, create it using
# mkdir /mnt/HDA_ROOT/update
(2) Confirm no /mnt/update file or folder.
If it exists, you need to delete it using:
# rm -rf /mnt/update
if you get a message saying:
“rm: unable to remove ‘/mnt/update’: Device or resource busy”, unmount the folder and try the rm line above again. To unmount use:
# umount /mnt/update
After the above two checks, execute the commands below to perform the update.
- Copy the image file to the normal update location:
# mv /share/Public/TS-209_2.1.2_build1031.img /mnt/HDA_ROOT/update/
- Create a link to the /mnt/update location:
# ln -sf /mnt/HDA_ROOT/update /mnt/update
- Run the update script:
# /etc/init.d/update.sh /mnt/HDA_ROOT/update/TS-209_2.1.2_build1031.img
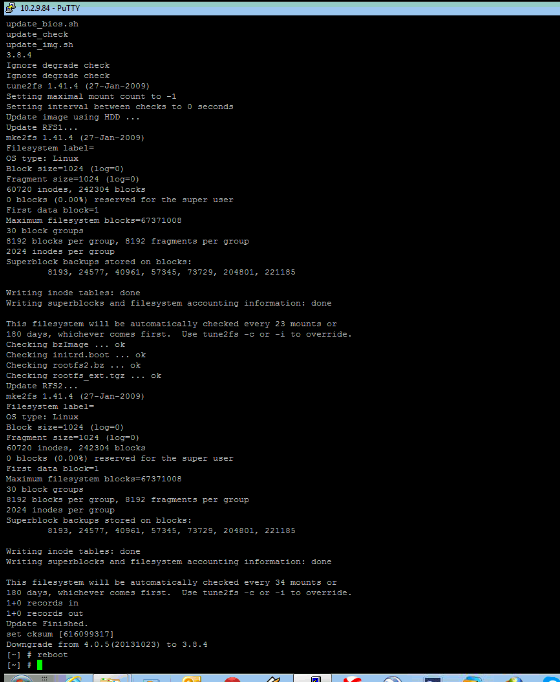
Note while the update script runs, you will get some output feedback in the terminal, similar to the following.
6. Results Should be like this. You must reboot Qnap device after this firmware upgrade / downgrade
Resource: http://wiki.qnap.com/wiki/Manually_Updating_Firmware
.
IV – How To Downgrade Firmware If No HDD’s Installed
How to Fix;
1 – NAS Firmware Update When No HDD(s) Installed
From QNAPedia
NOTE:
- This procedures are used to update the flash / DOM (disk on module) firmware on the NAS.
- Make sure no HDD installed before update.
- Flash image are required for NAS with 16MB flash or 128MB DOM.
- For NAS with 512MB DOM, just use the firmware on QNAP download site (http://www.qnap.com/download.asp).
- This updated procedures are generally used when the NAS can be found by QNAP Finder but cannot be initialized with HDD(s).
- QNAP NAS also store firmware on the HDDs. If you have initialized the NAS with HDDs before, this update procedures will cause the firmware version mismatch between the NAS and the HDDs. You need to update the firmware again after boot up with HDDs installed.
Download link of the flash image:
TS-110
http://us1.qnap.com/Storage/tsd/flashimage/TS-110_20120302-3.6.1.Flash.img
TS-112
http://us1.qnap.com/Storage/tsd/flashimage/TS-112_20120302-3.6.1.Flash.img
TS-119, TS-119P+, TS-119PII
http://us1.qnap.com/Storage/tsd/flashimage/TS-119_20120302-3.6.1.Flash.img
TS-210
http://us1.qnap.com/Storage/tsd/flashimage/TS-210_20120302-3.6.1.Flash.img
TS-212
http://us1.qnap.com/Storage/tsd/flashimage/TS-212_20120302-3.6.1.Flash.img
TS-219, TS-219P, TS-219P+, TS-219PII
http://us1.qnap.com/Storage/tsd/flashimage/TS-219_20120302-3.6.1.Flash.img
TS-410
http://us1.qnap.com/Storage/tsd/flashimage/TS-410_20120302-3.6.1.Flash.img
TS-410U
http://us1.qnap.com/Storage/tsd/flashimage/TS-410U_20120302-3.6.1.Flash.img
TS-412
http://us1.qnap.com/Storage/tsd/flashimage/TS-412_20120302-3.6.1.Flash.img
TS-412U
http://us1.qnap.com/Storage/tsd/flashimage/TS-412U_20120302-3.6.1.Flash.img
TS-419P, TS-419P+, TS-419PII
http://us1.qnap.com/Storage/tsd/flashimage/TS-419P_20120302-3.6.1.Flash.img
TS-419U, TS-419U+, TS-419UII
http://us1.qnap.com/Storage/tsd/flashimage/TS-419U_20120302-3.6.1.Flash.img
TS-239
http://us1.qnap.com/Storage/tsd/flashimage/TS-239_20120302-3.6.1.Flash.img
TS-439
http://us1.qnap.com/Storage/tsd/flashimage/TS-439_20120302-3.6.1.Flash.img
TS-439U
http://us1.qnap.com/Storage/tsd/flashimage/TS-439U_20120302-3.6.1.Flash.img
TS-639
http://us1.qnap.com/Storage/tsd/flashimage/TS-639_20120302-3.6.1.Flash.img
TS-509
http://us1.qnap.com/Storage/tsd/flashimage/TS-509_20120302-3.6.1.Flash.img
TS-809
http://us1.qnap.com/Storage/tsd/flashimage/TS-809_20120302-3.6.1.Flash.img
TS-809U
http://us1.qnap.com/Storage/tsd/flashimage/TS-809U_20120302-3.6.1.Flash.img
SS-439
http://us1.qnap.com/Storage/tsd/flashimage/SS-439_20120302-3.6.1.Flash.img
SS-839
http://us1.qnap.com/Storage/tsd/flashimage/SS-839_20120302-3.6.1.Flash.img
2 – Update Procedures:
- Power off the NAS
- Remove all the HDDs
- Power on the NAS
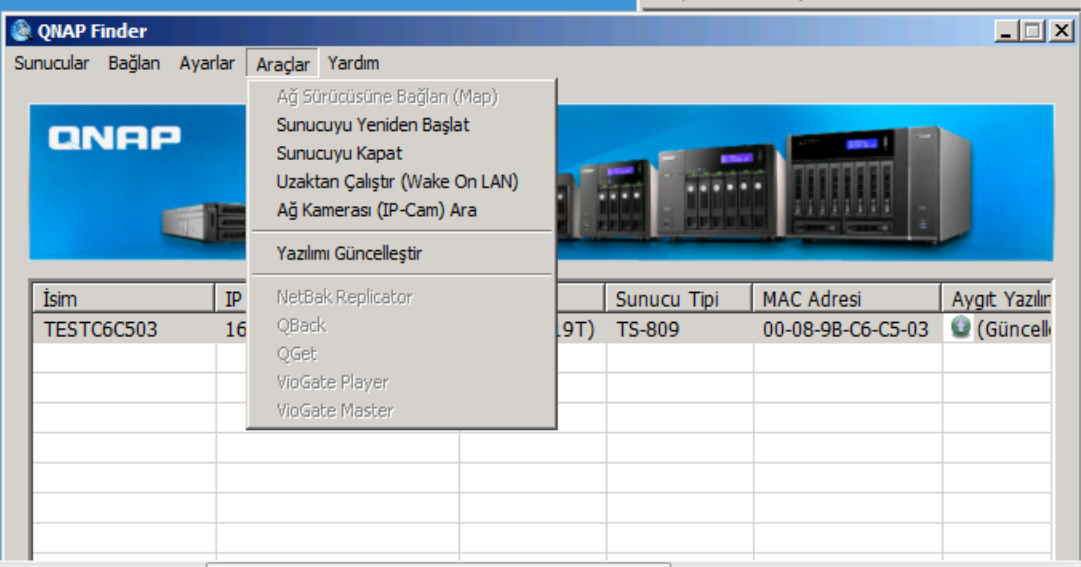
- After a short beep and a long beep(about two minutes after first short beep), run the QNAP Finder(Make sure the Finder is the latest version).
- QNAP Finder should find the NAS and its IP
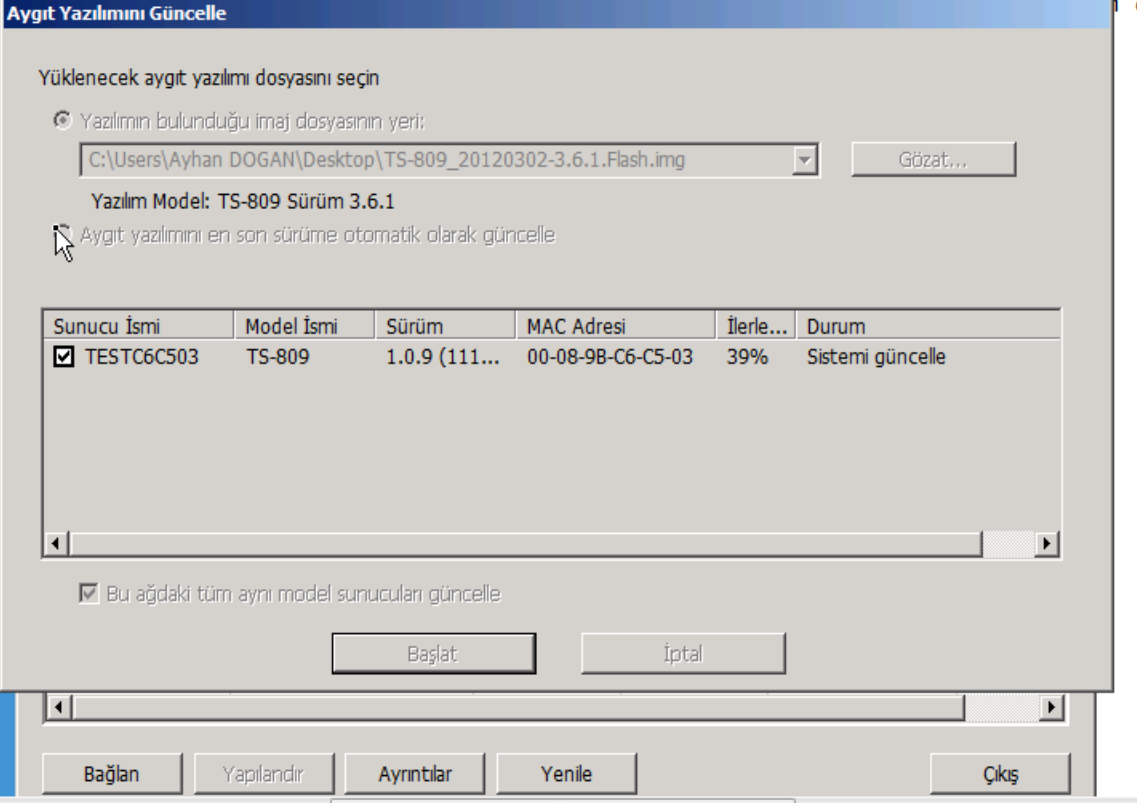
- Select the NAS and click “Tools” -> “Update Firmware”
- Input default username and password (admin/admin)
- Select the image files on your PC for the NAS.
- After firmware update, the NAS will be reboot.
- Make sure the firmware have been updated
- Power off the NAS
- Plug all the HDD back
- After power on, follow the messages on the Finder to initialize the NAS.
From : http://wiki.qnap.com/w/index.php?title=NAS_Firmware_Update_When_No_HDD(s)_Installed
Qnap Firmware DowngradeEski Qnap Firmware'ini Nasıl Geri Yükleyebilirsiniz,

Hi,
I’m using these instructions to try to manually update the firmware on my QNAP TS210. I believe it’s currently corrupted due to a bad update (I cannot access the NAS when the drives are connected, only when not). I’ve downloaded the latest firmware to my OS x. But the step “2: Unzip file and put file under Public Folder on Qnap” I’m having difficulty with because of the connection to the NAS. I can see it mounted as SMB in finder but I cannot access it because it tells me that too many users are connected. Therefore I cannot put the firmware on the NAS. Did you have to do anything special to get the file across?
Thanks
Kevin