I – When to use the firmware recovery guide
II – Easy Way to Firwmare Reflash with VirtualBox : (Warning : this is not Offical Qnap Firwmare Reflash)
III – Instructions for NAS Recovery – Method 2 (Live CD)
VI – Instructions for NAS Recovery – Method 3 (VMware Player)
I – When to use the firmware recovery guide
Applied QNAP NAS models
For firmware update of QNAP TS-110, TS-112, TS-119, TS-210, TS-212, TS-219, TS-219P, TS-410, TS-410U, TS-412, TS-412U, TS-419P, TS-419U, TS-419U+, TS-119P+, TS-219P+, TS-419P+ Turbo NAS servers via recovery mode.
When to use the firmware recovery guide
This firmware recovery guide is intended for users who encounter system startup failure due to incomplete or unsuccessful firmware update caused by power outage or network disconnection during the process. To verify if this guide applies to your NAS, follow the steps below:
1. Power off the NAS.
2. Remove all the hard disks.
3. Power on the NAS.
4. Wait for ten seconds and check if you hear a short beep.
5. After the short beep, wait for two minutes to check if you hear a long beep.
6. If you only hear a short beep or do not hear any beep, follow the instructions of this guide to recover your NAS.
II – Easy Way to Firwmare Reflash with VirtualBox : (Warning : this is not Offical Qnap Firwmare Reflash)
1 – Download the live CD ISO image from the following links
Note: Please use the ISO file (a) for 1-bay and 2-bay NAS models (TS-110/210/119/219/219P). If you failed to recover the NAS with the file (a), please try to use the ISO file (b).
a. TS-110, TS-119, TS-210, TS-219, TS-219P ftp://csdread:csdread@ftp.qnap.com/NAS/live_cd/Flash_Reburn_live-cd-2009-09-24(TS-110&119&210&219&219P).iso
b. TS-410, TS-410U, TS-419, TS-419U ftp://csdread:csdread@ftp.qnap.com/NAS/live_cd/Flash_Reburn_live-cd-2009-12-09(TS-410&410U&419P&419U).iso
c. TS-x119P+, TS-219P+, or TS-419P+ http://us1.qnap.com/Storage/tsd/live-cd-2010-10-08.(TS-x19P+_Recovery).iso
d. TS-112/212/412/412U/419U/419U+ http://us1.qnap.com/Storage/tsd/live-cd-2011-03-02(TS-x12_412U_419U_419U+).iso
e. TS-119P II/219P II/419P II http://us1.qnap.com/Storage/tsd/live_cd/live-cd-20120424-TS-x19PII_USB30.iso
2 – Download and install Virtual Box;
https://www.virtualbox.org/wiki/Downloads
3 – Setup Vrtualbox:
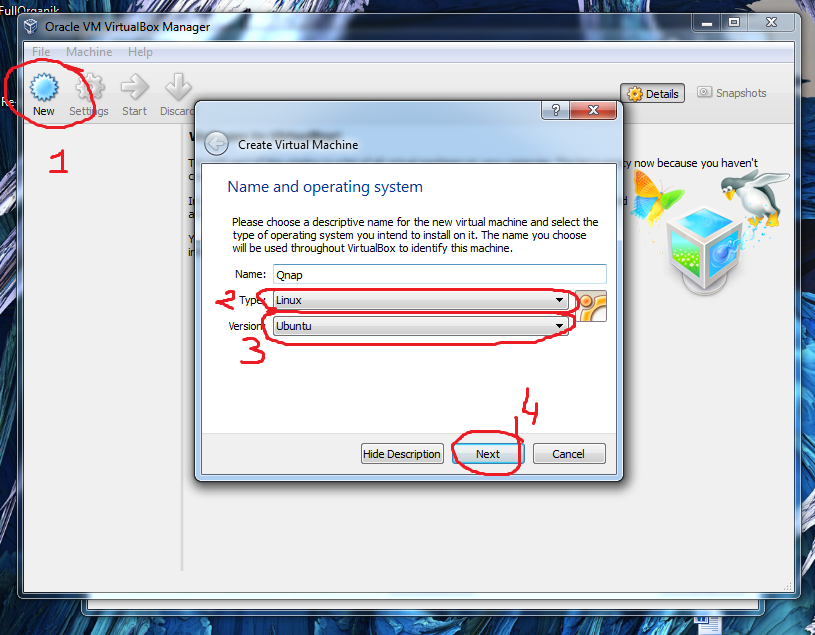
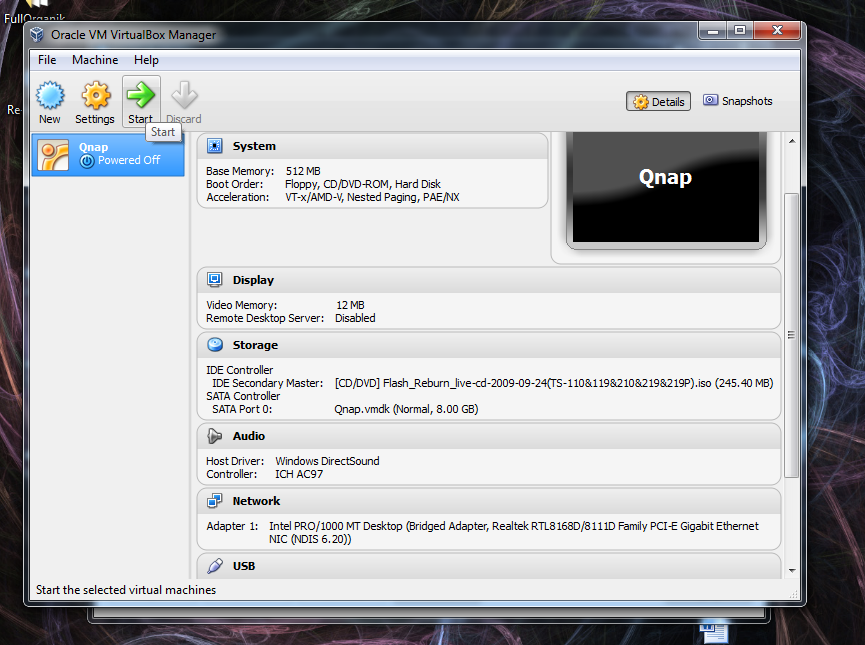
Step 1 :Start software and Choose “New”;
Type : Linux,
Version: Ubuntu
Step 2 : Memory size : 512 mb
Step 3 : choose “Create a Virtual Drive Now”
Step 4 : Choose VDI -> Dynamical allocated
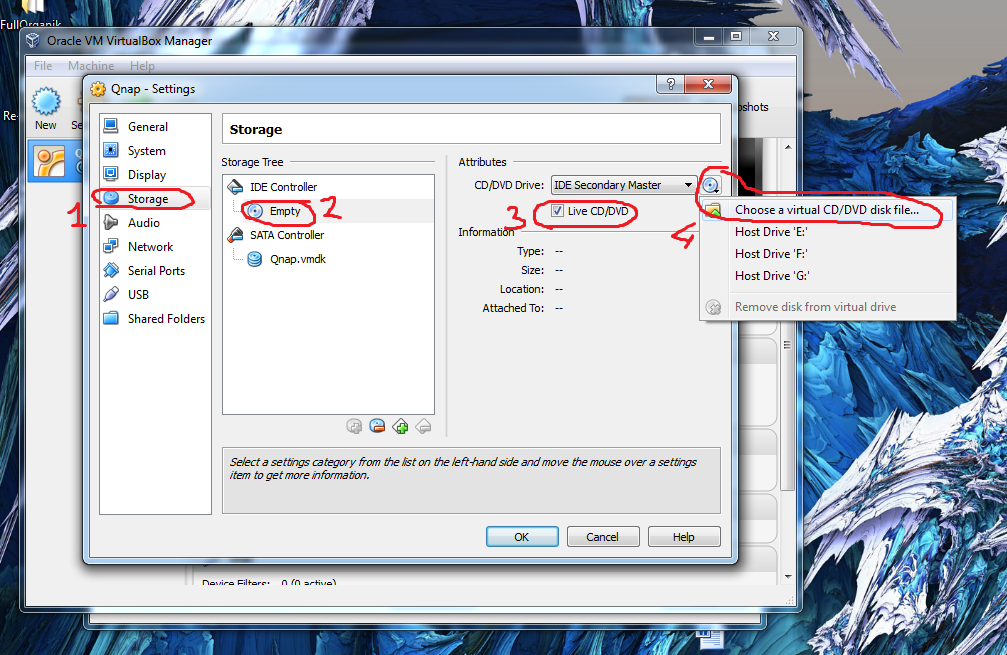
4 – right click to your virtual server -> Settings ->storage.
controller : IDE -> CD/DVD Drive -> Choose a virtual DC /DVD and choose your device firwmare
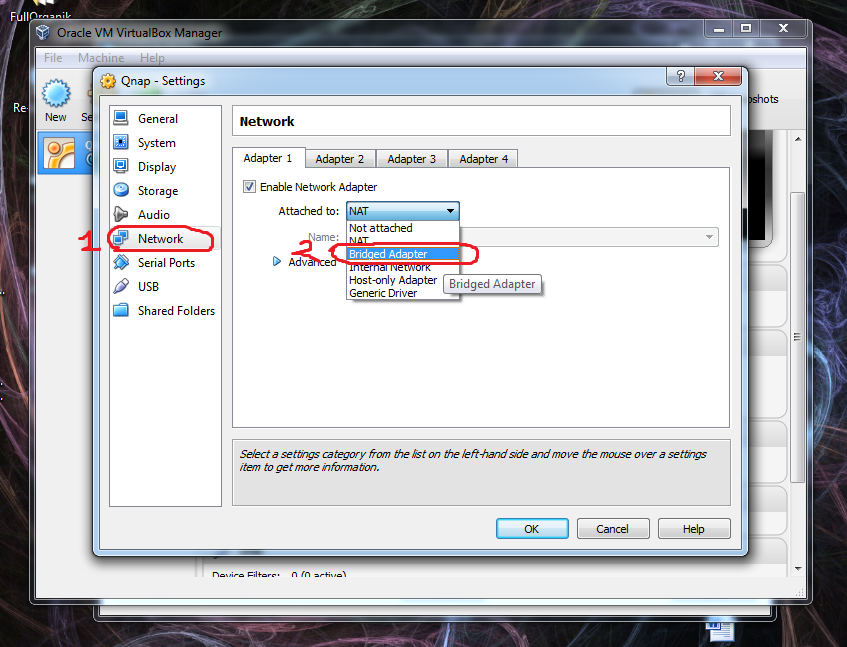
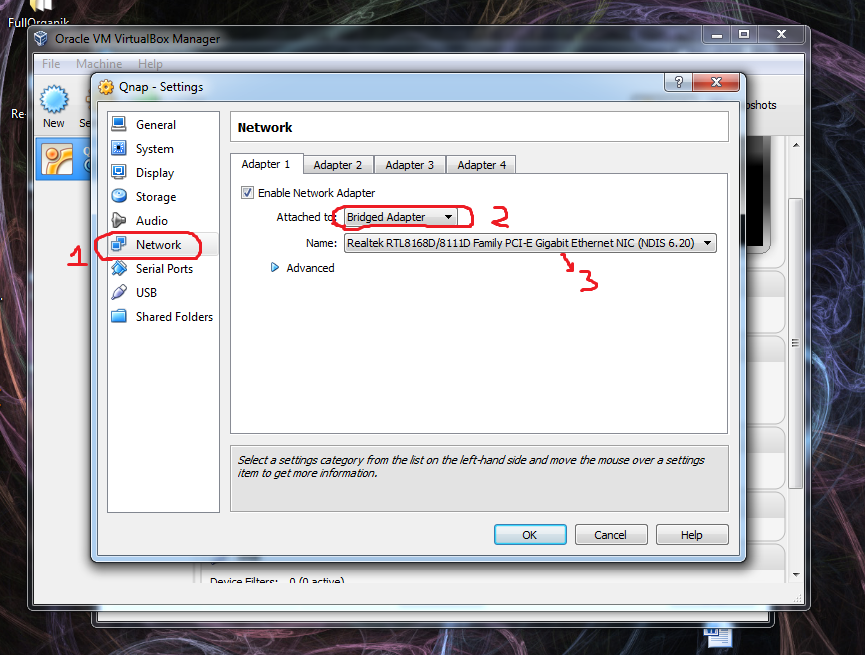
5 – go to Network -> Adapter 1 –and choose Bridge Adaptor.
6 – Also be sure that you choose right Ethernet port. (you may have different Lan port if VMWare is install on your computer.)
7 – Start your virtual server
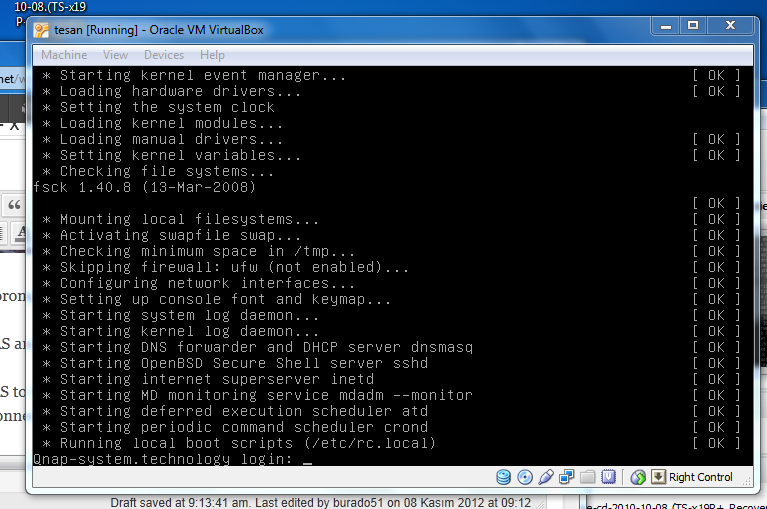
8 – Choose first option:
When the login prompt is shown, go to next step. No login is required:
9 – Power off the NAS and remove all hard disks.
10 – Connect the NAS to the PC directly by an Ethernet cable. If your NAS includes two LAN ports, please connect LAN 2 of the NAS to the PC. If it doesn’t work try it again with LAN 1
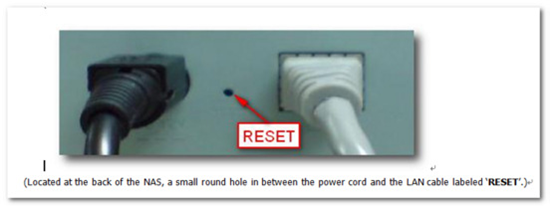
11. Find the RESET button of the NAS (see below).
12. Use a pen or any pointed object to press and hold the RESET button. Then press the Power button on the front panel to power on the NAS at the meanwhile.
13. Please keep holding the RESET button around 25 seconds.
14. The LED on the LAN port of the NAS should be flashing for the first few seconds and then glows green or orange.
15. LEAVE THE NAS ALONE AT THIS POINT! DO NOT TURN IT OFF OR UNPLUG THE POWER CORD. Wait for about 5 minutes.
Note: To make sure if the data has been delvering to NAS or not, you can login to the console by the username and password, root/root. Then, use the command “ifconfig” to see if the number of TX on eth0 is increasing or not.
16. Wait until you hear a long beep or two short beeps and see the Status LED flashing green. The NAS will then reboot. No intervention required during this stage.
17. The reboot should take about 3 minutes. After that you should hear a long beep.
18. Connect the NAS to your switch or router and use QNAP Finder to find the NAS.
19. Power off the NAS, plug the HDD(s) back by original order, then power it on.
20. Download the latest firmware from QNAP website(http://www.qnap.com/download.asp), unzip the file, and perform firmware upgrade through QNAP Finder.
21. On QNAP Finder, select the NAS, click Tools -> Update Firmware to update the NAS firmware.
III – Instructions for NAS Recovery – Method 2 (Live CD)
Follow the steps below to recover the NAS.
1. Download the live CD ISO image from the following links and “BURN” it into an empty CD-R.
Note: Please use the ISO file (a) for 1-bay and 2-bay NAS models (TS-110/210/119/219/219P). If you failed to recover the NAS with the file (a), please try to use the ISO file (b).
a. TS-110, TS-119, TS-210, TS-219, TS-219P ftp://csdread:csdread@ftp.qnap.com/NAS/live_cd/Flash_Reburn_live-cd-2009-09-24(TS-110&119&210&219&219P).iso
b. TS-410, TS-410U, TS-419, TS-419U ftp://csdread:csdread@ftp.qnap.com/NAS/live_cd/Flash_Reburn_live-cd-2009-12-09(TS-410&410U&419P&419U).iso
c. TS-x119P+, TS-219P+, or TS-419P+ http://us1.qnap.com/Storage/tsd/live-cd-2010-10-08.(TS-x19P+_Recovery).iso
d. TS-112/212/412/412U/419U/419U+ http://us1.qnap.com/Storage/tsd/live-cd-2011-03-02(TS-x12_412U_419U_419U+).iso
e. TS-119P II/219P II/419P II http://us1.qnap.com/Storage/tsd/live_cd/live-cd-20120424-TS-x19PII_USB30.iso
2. Burn the ISO file to a CD.
3. Insert the CD to a PC and boot up from the CD.
4. When the login prompt is shown, go to next step. No login is required. 5. Power off the NAS and remove all hard disks.
6. Connect the NAS to the PC directly by an Ethernet cable. If your NAS includes two LAN ports, please connect LAN 2 of the NAS to the PC. If it doesn’t work try it again with LAN 1
7. Find the RESET button of the NAS (see below).
8. Use a pen or any pointed object to press and hold the RESET button. Then press the Power button on the front panel to power on the NAS at the meanwhile.
9. Please keep holding the RESET button and Power button until you hear two short beeps in about 5-8 seconds. The Status LED of the NAS should be flashing red and green and then glows red.
10. The LED on the LAN port of the NAS should be flashing for the first few seconds and then glows green or orange.
11. LEAVE THE NAS ALONE AT THIS POINT! DO NOT TURN IT OFF OR UNPLUG THE POWER CORD. Wait for about 5 minutes.
Note: To make sure if the data has been delvering to NAS or not, you can login to the console by the username and password, root/root. Then, use the command “ifconfig” to see if the number of TX on eth0 is increasing or not.
12. Wait until you hear a long beep or two short beeps and see the Status LED flashing green. The NAS will then reboot. No intervention required during this stage.
13. The reboot should take about 3 minutes. After that you should hear a long beep.
14. Connect the NAS to your switch or router and use QNAP Finder to find the NAS.
15. Power off the NAS, plug the HDD(s) back by original order, then power it on.
16. Download the latest firmware from QNAP website(http://www.qnap.com/download.asp), unzip the file, and perform firmware upgrade through QNAP Finder.
17. On QNAP Finder, select the NAS, click Tools -> Update Firmware to update the NAS firmware.
How to do if the startup problem persists
If the startup problem persists, please return the NAS to your local dealer or distributor for system repair immediately.
NOTE: If the recover progress does not work at the first time, please try another PC or reburn the ISO image.
VI – Instructions for NAS Recovery – Method 3 (VMware Player)
Follow the steps below to recover the NAS.
Note: Please use the ISO file (a) for 1-bay and 2-bay NAS models (TS-110/210/119/219/219P). If you failed to recover the NAS with the file (a), please try to use the ISO file (b).
a. TS-110, TS-119, TS-210, TS-219, TS-219P ftp://csdread:csdread@ftp.qnap.com/NAS/live_cd/Flash_Reburn_live-cd-2009-09-24(TS-110&119&210&219&219P).iso
b. TS-410, TS-410U, TS-419, TS-419U ftp://csdread:csdread@ftp.qnap.com/NAS/live_cd/Flash_Reburn_live-cd-2009-12-09(TS-410&410U&419P&419U).iso
c. TS-x119P+, TS-219P+, or TS-419P+ http://us1.qnap.com/Storage/tsd/live-cd-2010-10-08.(TS-x19P+_Recovery).iso
d. TS-112/212/412/412U/419U/419U+ http://us1.qnap.com/Storage/tsd/live-cd-2011-03-02(TS-x12_412U_419U_419U+).iso
e. TS-119P II/219P II/419P II http://us1.qnap.com/Storage/tsd/live_cd/live-cd-20120424-TS-x19PII_USB30.iso
2. Download and install VMware Player:
http://www.vmware.com/go/downloadplayer/
3. Disconnect any wireless network connections on your PC
4. Run VMware Player, and click on “Create a New Virtual Machine”
5. Select “Installer disc image file (iso)”, and choose the ISO file downloaded in Step 1. Click “Next”
6. Select “Linux” and “Ubuntu”, click “Next”
7. For virtual machine name and disk settings, click “Next”.
8. Click “Customize Hardware”
9. Under “Network Adapter”, select Network Connection as “Bridged”, then click “Close”
10. Click “Finish”. The virtual machine will start booting in a window. (If you get a message about software updates, click “Remind Me Later”)
11. When the login prompt is shown, go to next step. No login is required.
12. Power off the NAS and remove all hard disks.
13. Connect the NAS to the PC directly by an Ethernet cable. If your NAS includes two LAN ports, please connect LAN 2 of the NAS to the PC. If it doesn’t work try it again with LAN 1
14. Find the RESET button of the NAS (see below).
15. Use a pen or any pointed object to press and hold the RESET button. Then press the Power button on the front panel to power on the NAS at the meanwhile.
16. Please keep holding the RESET button and Power button until you hear two short beeps in about 5-8 seconds. The Status LED of the NAS should be flashing red and green and then glows red.
17. The LED on the LAN port of the NAS should be flashing for the first few seconds and then glows green or orange.
18. LEAVE THE NAS ALONE AT THIS POINT! DO NOT TURN IT OFF OR UNPLUG THE POWER CORD. Wait for about 5 minutes.
Note: To make sure if the data has been delvering to NAS or not, you can login to the console by the username and password, root/root. Then, use the command “ifconfig” to see if the number of TX on eth0 is increasing or not.
19. Wait until you hear a long beep or two short beeps and see the Status LED flashing green. The NAS will then reboot. No intervention required during this stage.
20. The reboot should take about 3 minutes. After that you should hear a long beep.
21. Connect the NAS to your switch or router and use QNAP Finder to find the NAS.
22. Power off the NAS, plug the HDD(s) back by original order, then power it on.
23. Download the latest firmware from QNAP website(http://www.qnap.com/download.asp), unzip the file, and perform firmware upgrade through QNAP Finder.
24. On QNAP Finder, select the NAS, click Tools -> Update Firmware to update the NAS firmware.
What to do if the startup problem persists
If the startup problem persists, please return the NAS to your local dealer or distributor for system repair immediately.
NOTE: If the recover progress does not work at the first time, please try another PC and make sure all other network connections are disabled.
ARM Based (Ts- x10/x12/x19 Serisi) İçin Firmware ReflashFirmware Reflash for ARM Based (Ts- x10/x12/x19 Series),



Remove Battery!
In my case, non of the recovery methods worked. i had a broken firmware because of an failed update.
i was able to boot up the qnap 212 without harddisks and need to push reset button while pushing power button for some seconds until it beeps twice. then qnap boots up with dhcp and resettet password and so an. then connect with qfinder and try firmware update with and without harddisks. it always stopped with some error that its unalbe to write firmware because of some network error. makes no sense…
in my case this worked: when you unscrew the green circuit board, theres a battery on the backside. take it out, pull the powercable and wait a few minutes. after that, put the battery back in, boot up the qnap holding reset button pushed until it beeps twice, take qfinder, connect an harddisk (sorry, data lost) an run the config assistant including firmware update.
Hi;
I’ll try this and if it works, I’ll add this information to this guide;
Also you cannot loose your data with “reset” function and can get your datas back by this way; (Fallow “My shared folders disappear” document)
http://qnapsupport.net/?page_id=722
If your datas are important and accidently format HDD’s, you can easly recover data with Data recovery sorfwares for Single / RAID 1 buildings;
http://qnapsupport.net/?page_id=318
Okey, I try unplugging battery combinations and sorry, now way to fix Qnap firmware that way.
@Jan, your problem is not about firmware, you have a problem with your first HDD -which cause Qnap to boot properly-
At this kind of cases, you can try to start device without first HDD, or fallow my “Qnap doesnt boot” documentery to solve;
http://qnapsupport.net/?page_id=516
Or, please contact with your local Qnap support team, we can easly identify & solve this kind of problems around 15 minutes without data lost.
Is there an .iso for TS212? I’ve tried downloading from http://wiki.qnap.com/wiki/Firmware_Recovery, but Ubuntu fails to boot both as LiveCD and in VMware Player.
This was helpful to reset my QNAP TS-210 after some strange behavior – it showd up in Qnap-Finder only for a few seconds. I used Vrtlbox and image b) (as it did not work using a) to reset.
Nevertheless I had to reinitialize the harddisks in the end as well, as it could not be seen in step 20 with the previously used HDD. After reformatting (i.e. data lost – but did backup before) everything worked well.
So back your data up, before starting the process….