Virtualization Station System Requirements;
https://www.qnap.com/event/station/en/virtualization.php?content=supported
The First NAS Server with Centralized virtualization management:
QNAP Virtualization Station enables virtualized desktop operations on the Turbo NAS for managing multiple virtual machines. With the easy-to-use interface, you can centrally manage all of the virtual machines created on the Turbo NAS with the least effort. Being capable of hosting multiple operating systems, the Turbo NAS is not only storage for data archiving and backup but also a comprehensive, powerful NAS server.
There are many benefits for using virtualized desktop operations: (1) virtual machines can be created with different operating systems (2) data can be accessed and files opened directly by applications installed on virtual machines (3) all operations are executed on the NAS to minimize the risk of data leaking and reducing network bandwidth usage as well.
- Installation of Virtualization Station
- Install VM (virtual machine)
- Introduction of user interface and function operating for Virtualization Station
- Import VM
- Export VM
- Snapshot
- Network Setting
- Account Management
- Device Management
- Backup & Restore VM
- Preference
- VM Marketplace
- Log
- Virtual Machine Information Page
- Virtualization Station Limitation
Installing the Virtualization Station
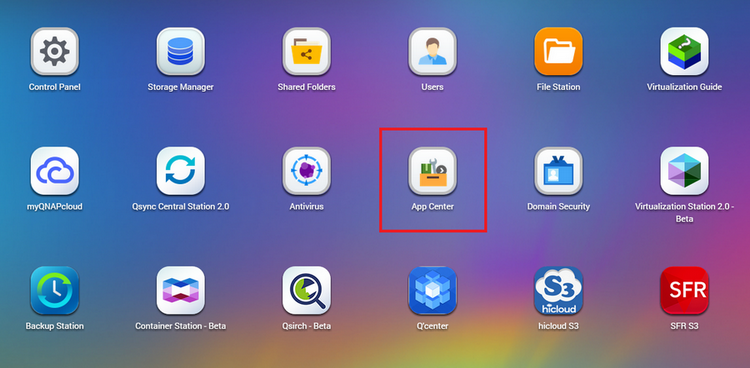
To install the Virtualization Station app on the QNAP Turbo NAS, please log into the NAS Desktop as an administrator. Go to “App Center” >“Virtualization Station” and click “Add To QTS”. After the installation is complete, please launch Virtualization Station.

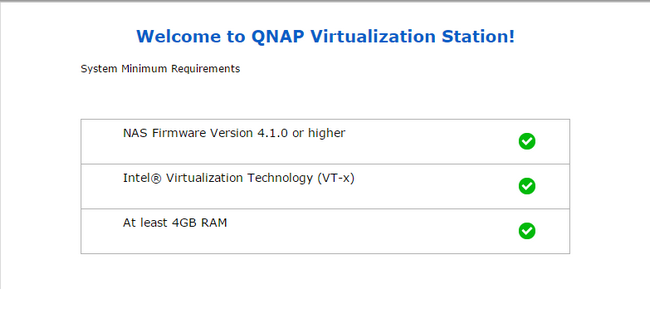
When you launch the Virtualization Station, it will first check to see if the firmware version of the QNAP Turbo NAS is 4.0.5 or above, if the BIOS for the VT (Virtualization Technology) has been opened or not, and whether the Turbo NAS has at least 4GB of memory.
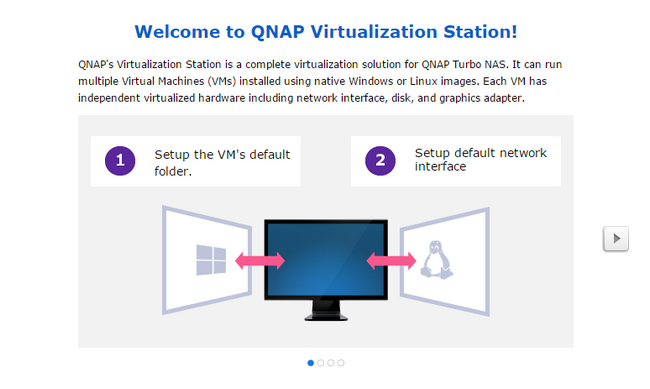
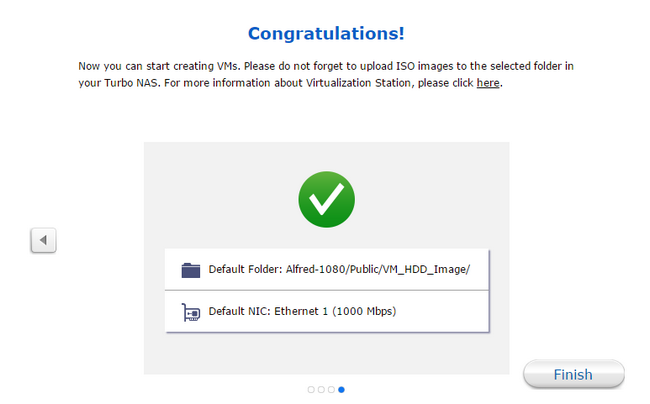
Next, please choose the default folder on the QNAP Turbo NAS for locating the VMs (virtual machines) that you will create in the future.
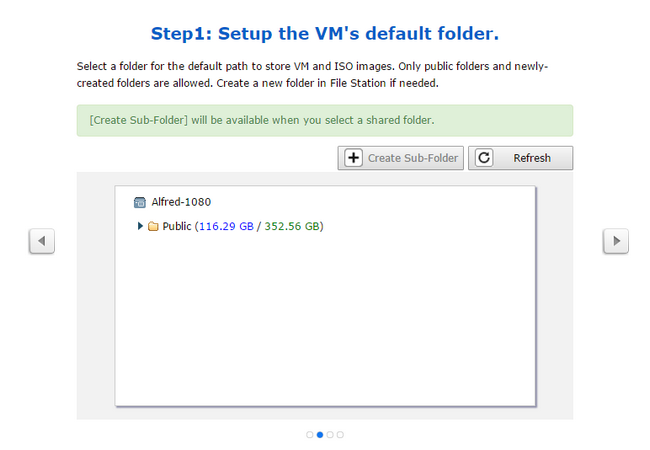
After setting default folder up, the Virtual Disks that are created on the VMs (virtual machines) will be located in the default folder.
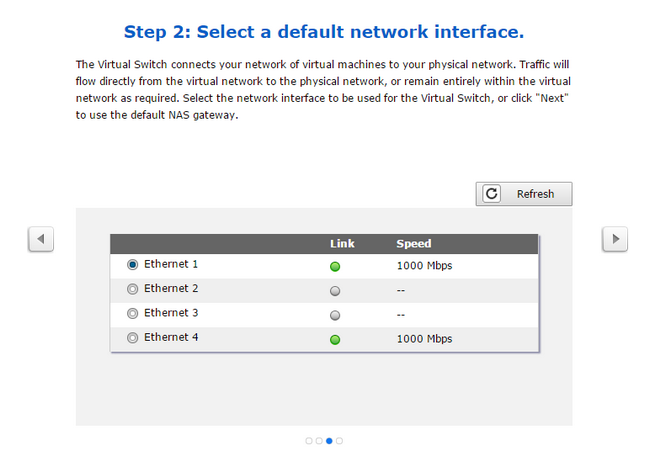
Next, please choose the Ethernet for the VMs (virtual machines) that you will create in the future.
When you have finished setting the default folder and network interface, please click “finish” to start using the Virtualization Station on the QNAP Turbo NAS.
Install VM (virtual machine)
Install a VM (virtual machine) via CD/DVD
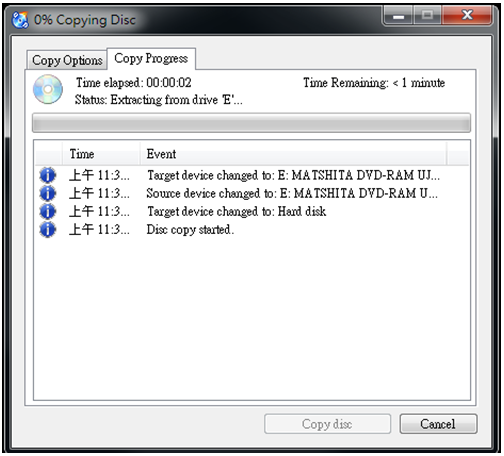
If you would like to install a VM (virtual machine) by using a CD/DVD of an operating system, you will first have to create an ISO image of the disc and store it in the QNAP NAS. If you do not have software to create ISO files, you can use the below link to download a suitable application. https://cdburnerxp.se/en/download
After downloading and launching CDBurnerXP, choose “Copy or grab disc” and then click “OK”.

Select “Hard disk” as a target, then assign a destination folder, a name for the file and select “File type: ISO (Single track)”. Click “Copy disc” to begin the process.
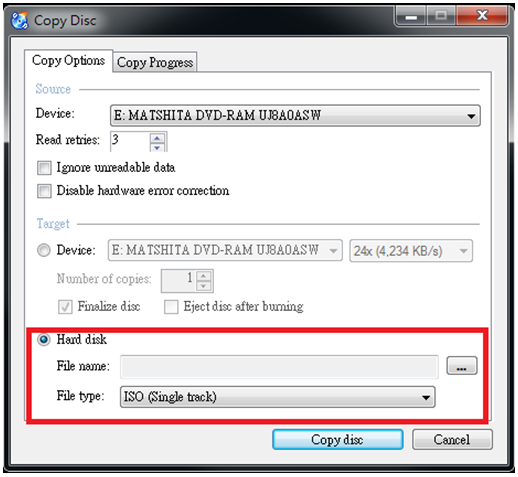
An ISO image file of the CD/DVD will then be generated in the destination folder you selected.
Install a VM (virtual machine) via ISO file
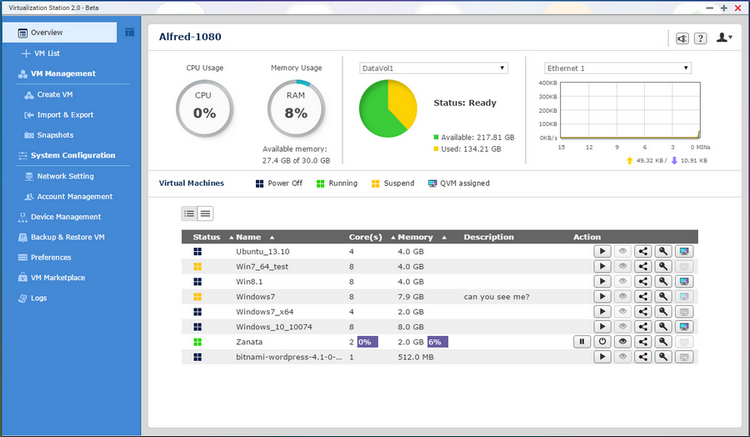
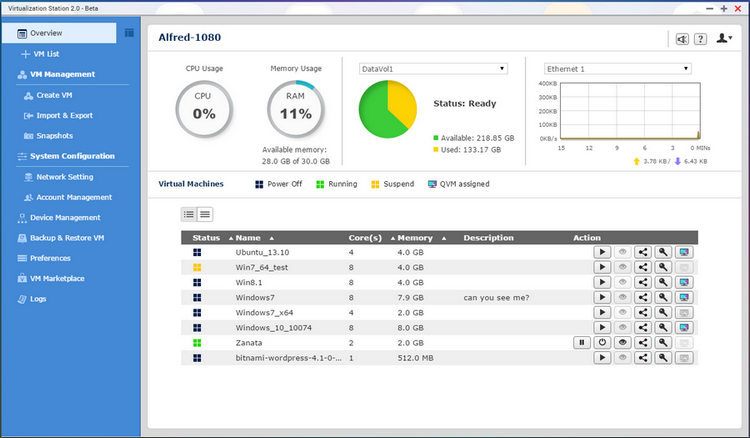
The Overview will show details of the QNAP Turbo NAS, including its name, CPU specification & usage, and total memory capacity & usage. Below these details, all of the VMs (virtual machines) that you created will be listed.
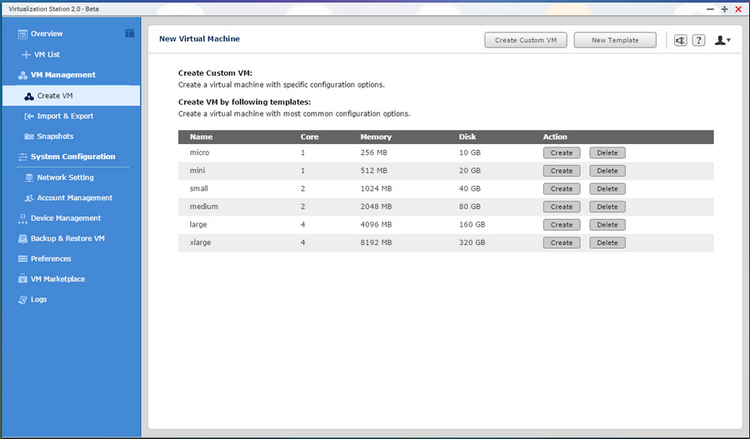
Create VM:
When you want to create a VM (virtual machine), please choose “Create VM” , and then you can choose the different default template: “micro, mini, small, medium, large and xlarge” to build a personal VM (virtual machine).
Next, you can configure settings the type & version of the operating system, the location of the CD image, the folder the VM will be located and the network interface.
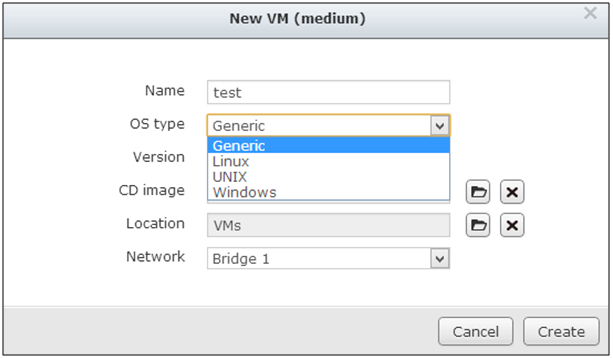

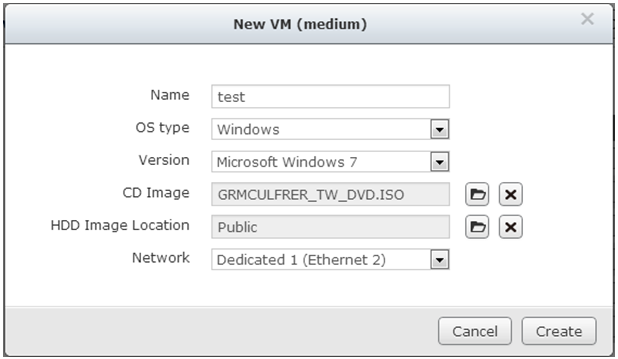
To finish the configuration, please click “Create”, and you will have created your VM (virtual machine).
Next, click “Start” to switch on this VM (virtual machine).
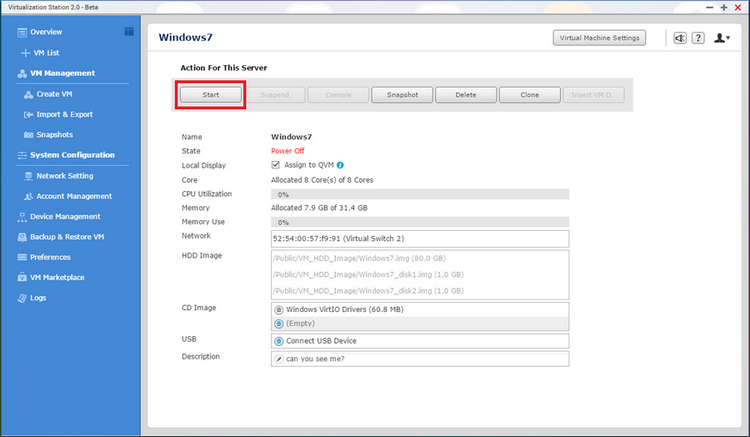
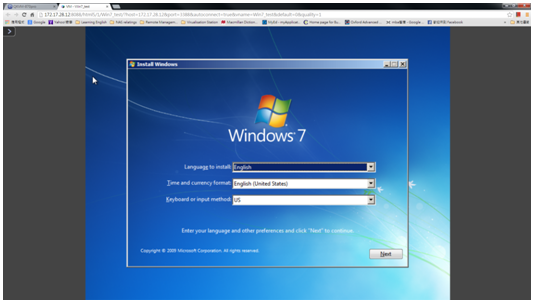
Please click “Console” to install the operating system on this VM (virtual machine).
Introduction of user interface and function operating for Virtualization Station
Overview:
The Overview will show details of the QNAP NAS, including its name, CPU & memory usage, all volume capacity and the real-time network I/O traffic. Below these details, all of the VMs (virtual machines) that you created will be listed.
There are five quick buttons in the action column to operate the VM including “Power Control”, “Console”, “Share”, “Account Management” and “QVM Assign”.
- Import VM:When you want to import a VM (virtual machine), please choose
“Import & Export”and then you can import the main VM file from the QNAP Turbo NAS or your PC.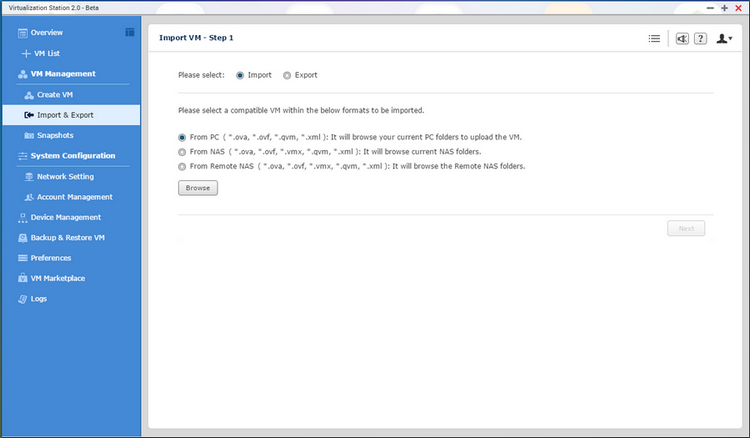
Note: the file formats *.ova, *.ovf are compatible with the virtual machine exported from VirtualBox v4 and VMWare 5.0 only; format *.vmx is compatible with the virtual machine created from VMWare Workstation 8/9 only; format *.qvm is only for Virtualization Station.Next, you can configure the VM importing settings.
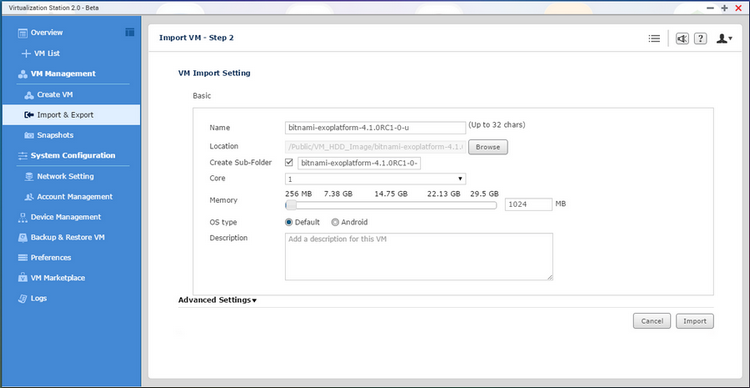
When you finish the configuration, click “import” and wait for the Import Process to finish. You will then see the VM that you imported on the Virtualization Station.

- Export VM:When you want to export a VM (virtual machine), please shutdown this VM (virtual machine) in advance of exporting.
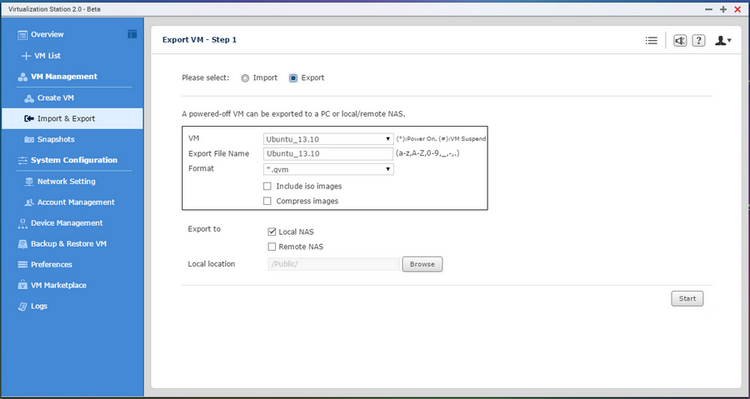 Next, please choose “Import & Export”>“Export” ,and configure the settings that include the location & format for exporting files, images included in exporting (and if they should be compressed or not), and a file name for exporting files. After setting these configurations, please click “Start” to start exporting the VM.
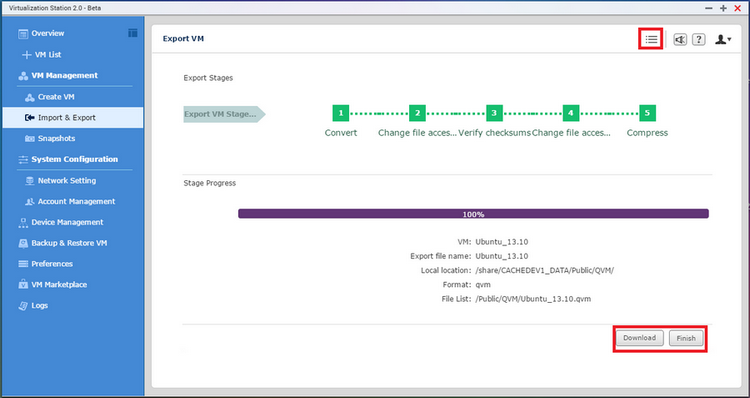 After the Export Process reaches 100%, click “Finish.” If you want to download the exported VM, click “Download”.
You can click
 to check all VM export tasks.
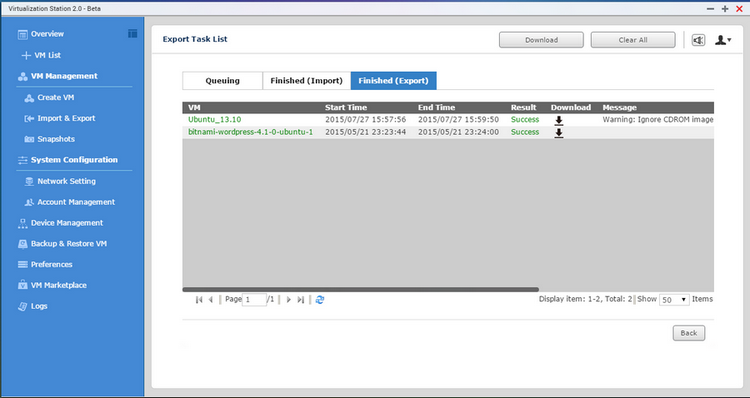
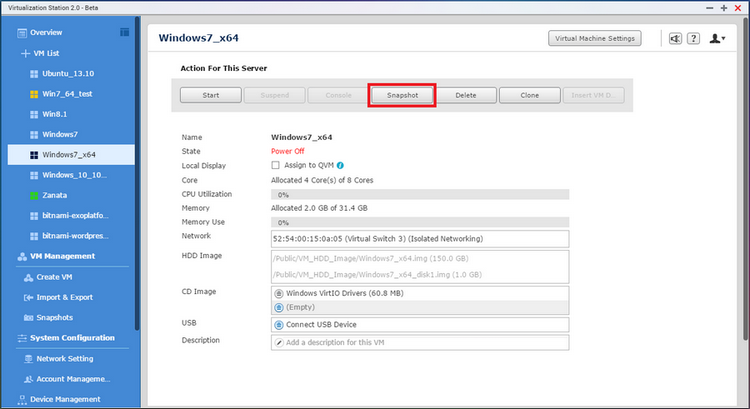
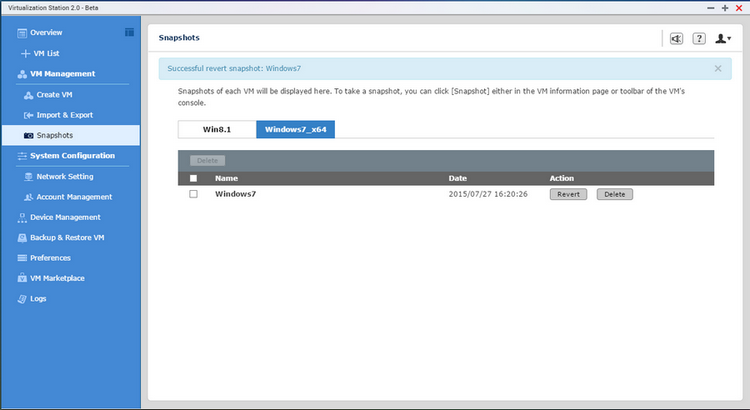
- Snapshot:Virtualization Station provides a snapshot feature to record the virtual machine system status at a point of time. In the event of a virtual machine failure, users can quickly roll back to the snapshot time to ensure continual system operation.Go to the VM information page and click “Snapshot”.
 Next, please name the snapshot, and then click “Create” to start the process of taking a snapshot.
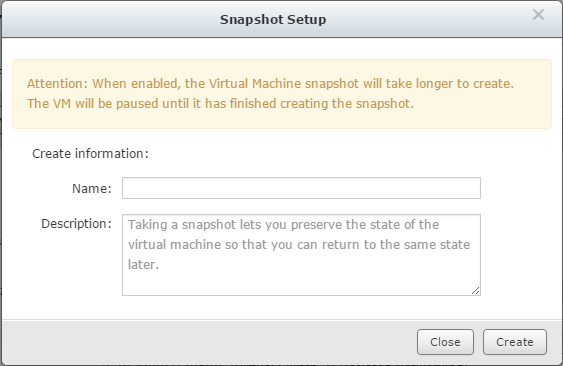
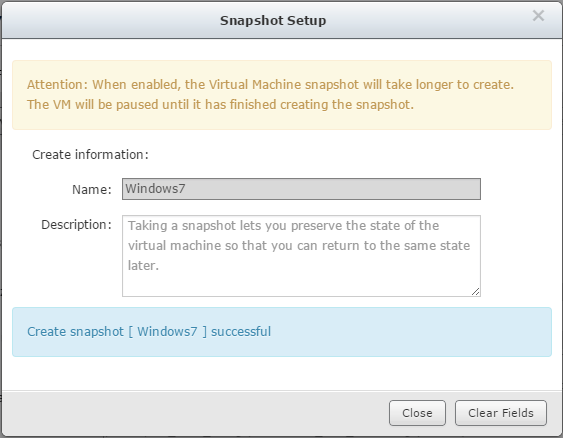
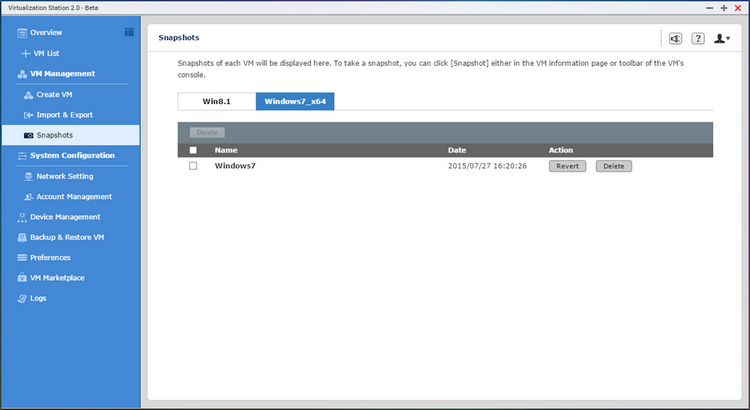
When you see the “Create snapshot [snapshot name] successful” message, then you can click “Hide” to go back the main page of “Snapshots”. Next please click “Snapshots” to check all snapshot tasks, and if you want to recover the system status to the point of time that you took the snapshot, please click “Revert”.
- Network Setting:When you click “Network Setting”, the topology of network will be displayed. Clicking the VM adapter allows you to choose a virtual switch to connect. Clicking the Virtual Switch can set up the networking mode and be attached to an Ethernet interface.
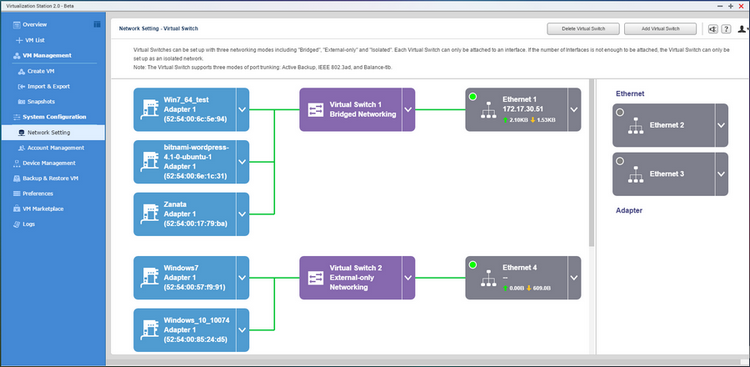 Networking modes:
- Isolated Networking
Not attaching any Ethernet interface to a Virtual Switch creates an isolated network. Manually setting IP address of VMs can enable communication between VMs connected to the same Virtual Switch. - External-only Networking
After attaching an Ethernet interface to a Virtual Switch, the IP address of the interface will be changed to 0.0.0.0 so that the VM network traffic will not go throughout the NAS. - Bridged Networking
Attaching an Ethernet interface (Port-trunking available) to a Virtual Switch creates a bridged network. The NAS and the Virtual Switch can share the same Ethernet interface without occupation and supports high-speed data transfer via internal routing.
- Isolated Networking
- Account Management:
When you choose “Account Management”, you will see a table listing each user’s permissions. This table will either show an overview of users’ permissions for each VM (virtual machine) including Control Permission and View-only Permission or show an overview of VMs for each user. You can also select “All” to display both as well.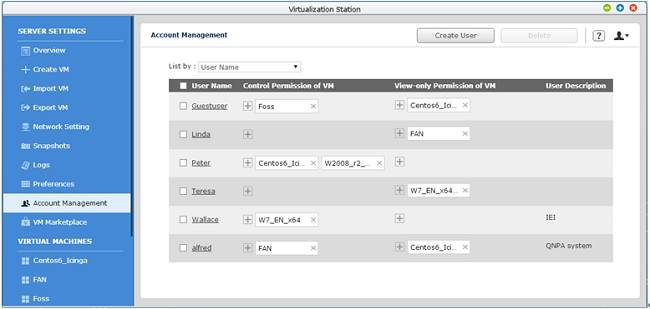
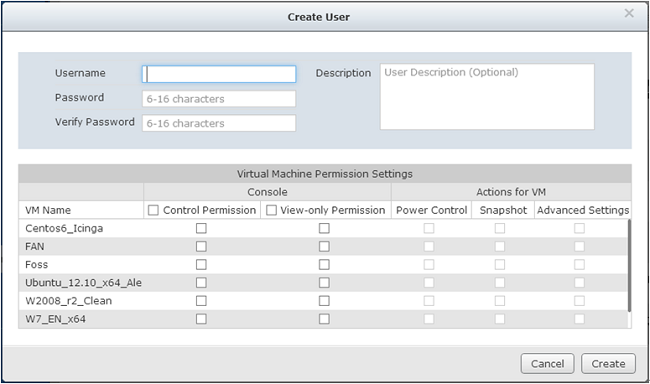
Clicking [Create User] allows you to create a new user. You can allocate the VMs to the user and set the permissions for using VMs such as Console and Actions. On the other hand, if you would like to modify the permissions of existing users, click the username and reset the permissions.
 If you click
  on the table, you can add a VM to the current user with either Control Permission or View-only permission. However, if you click
  on the table, you will remove the VM from the table.
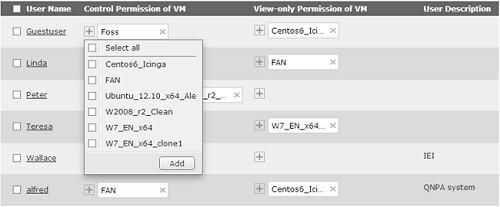
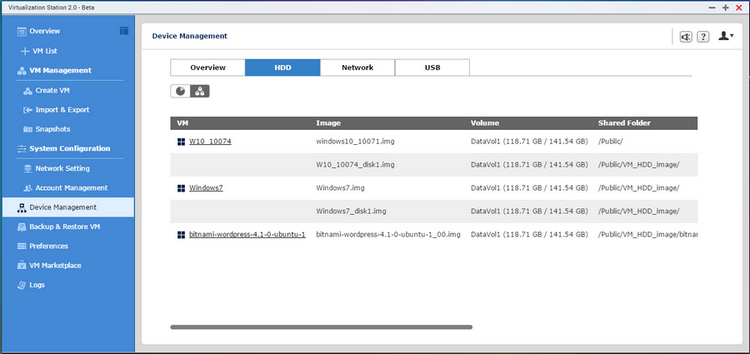
If you would like to delete users, please check usernames and click [Delete]. - Device Management:The device configuration of VMs are listed herein. You can switch between tabs including Overview, HDD, Network and USB to check their information. By clicking “Edit” you can add, delete, and adjust devices.

a. HDD
You can choose between: 1) Storage View 2) VM View
Storage View displays the usage of each shared folder and data volume, while the VM View displays HDD configurations such as controllers and cache modes.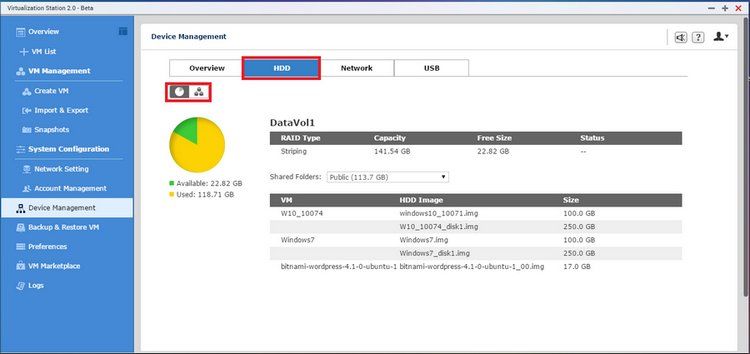
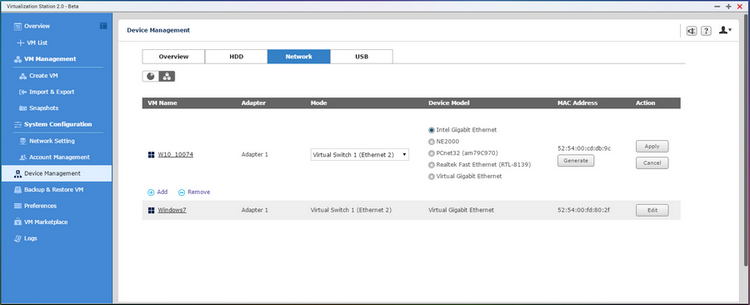
b. Network
You can choose between: 1) Network View 2) VM View.
Network View displays the traffic of Virtual Switches and connected VMs, while the VM View displays the Network adapter configurations such as device models and MAC addresses.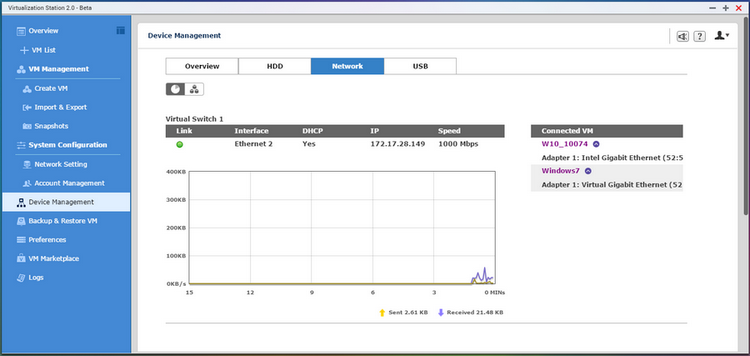
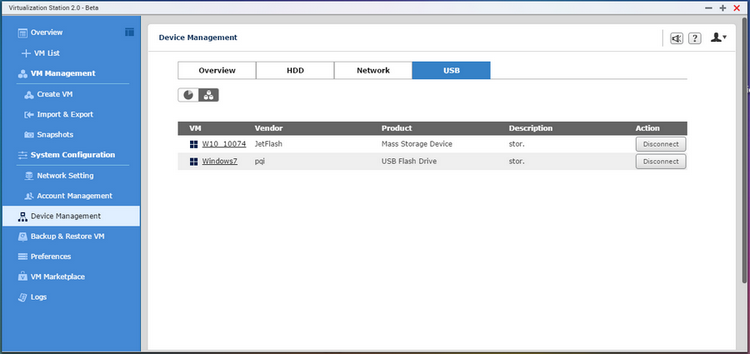
c. USB
You can choose between: 1) USB View 2) VM View.
USB View displays information related to USB devices, while the VM View shows the connected VM.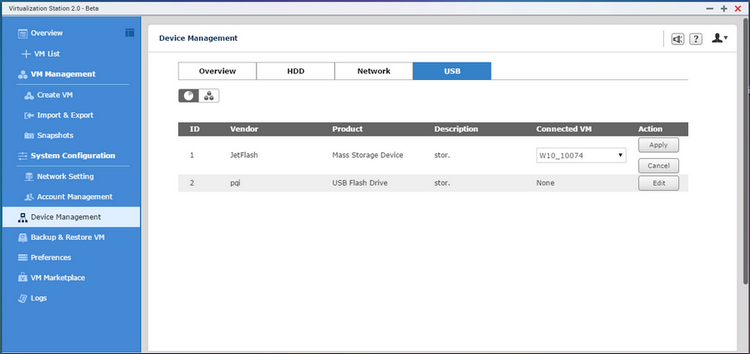
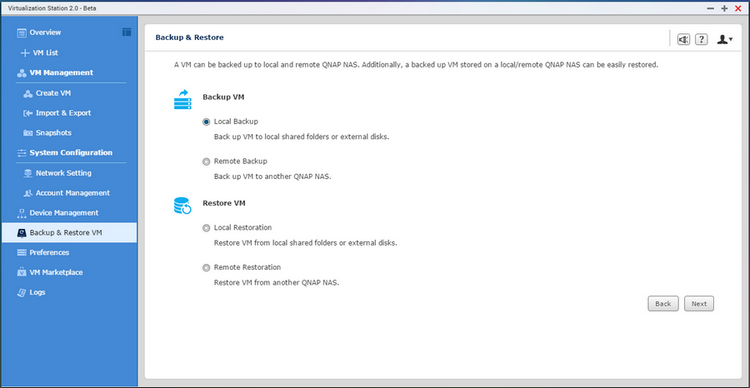
- Backup & Restore VM:The VM can be backed-up/restored to/from remote or local NAS. Every task can be manually activated, stopped, edited and deleted.
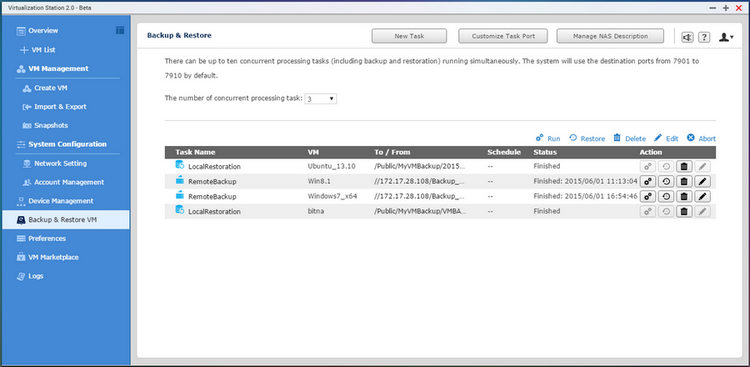
After clicking “New Task”, you can create a backup or restore task to/from the local or remote NAS.
7.1 To save remote NAS information
For remote backup/restoration tasks, the remote NAS information can be saved for future use.
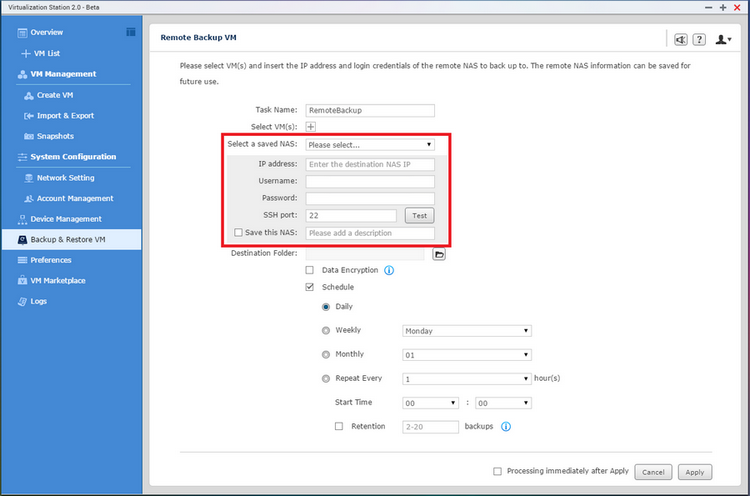
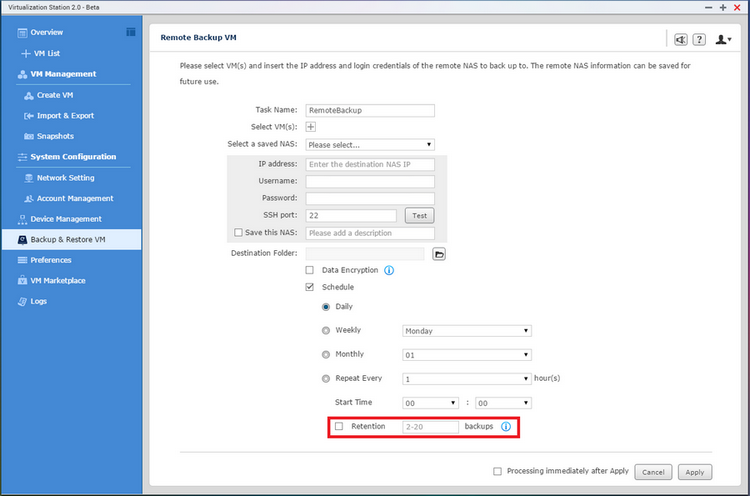
7.2 Schedule backup
Scheduling backup supports setting the maximum number of backup versions for optimized storage utilization.
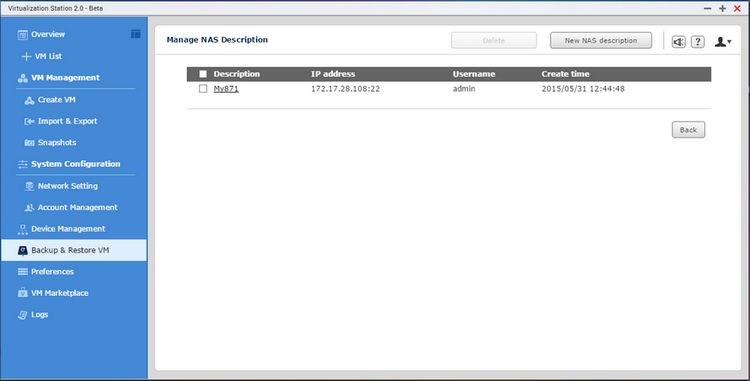
7.3 Manage remote NAS description
In “Manage NAS Description” you can edit, create and delete the saved remote NAS information and description.
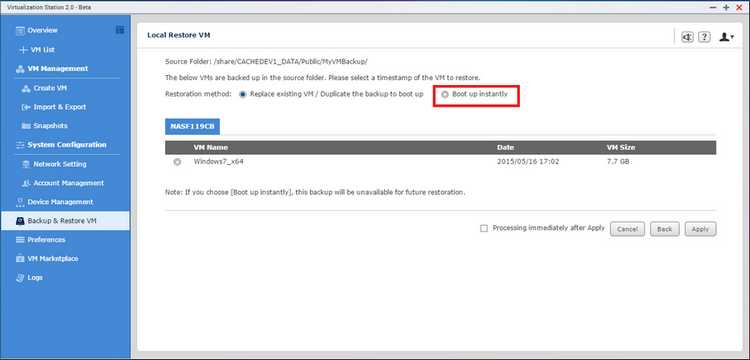
7.4 Boot up a VM backup in the local
The VM backup in the local NAS can be directly booted up as a VM but it can no longer be restored. This mechanism reduces the down-time of services running on the VM.
- Preferences:When you choose “Preferences”, you will see the four tabs:
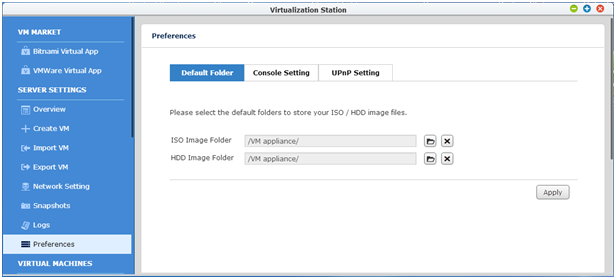
- Default Folder: you can set the default folder for the location of operating system disc images (ISO Image Folder), and the location of VM images (HDD Image Folder).
For other users who do not have NAS access permission and may need use the CD/DVD images, you can set the default folder for the location of CD/DVD images (CD/DVD Shared Folders).
- Port Settings:
The default ports of “Web Server”, “Web Server (SSL)” and “HTML5 Console” are 8088, 8089 and 3388 respectively. You can specify the ports used by Virtualization Station.

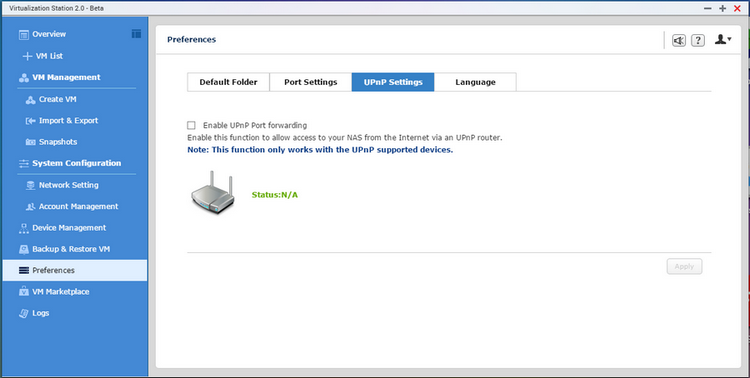
- UPnP Settings: You can enable/disable an UPnP router to allow access to your NAS from the Internet. (Note: this function only works with supported UPnP devices.)
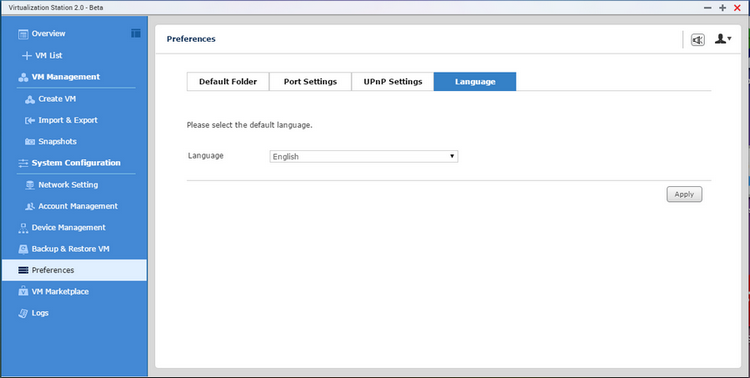
- Language
You can change the displayed language.
- Default Folder: you can set the default folder for the location of operating system disc images (ISO Image Folder), and the location of VM images (HDD Image Folder).
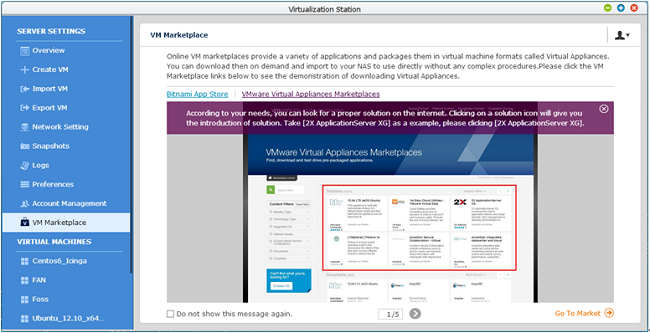
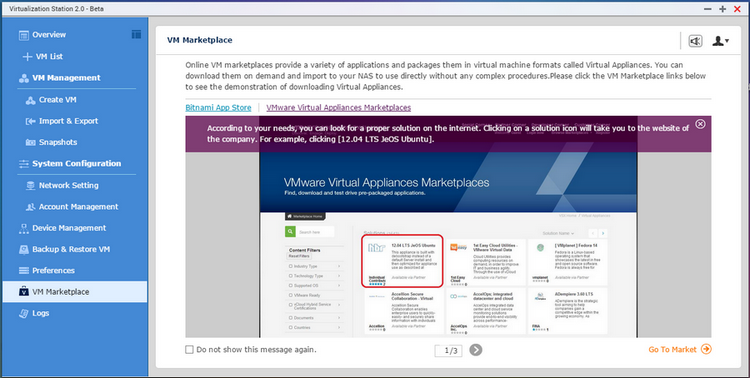
- VM Marketplace:If you choose “VM Marketplace” , you can see two VM Marketplaces, “Bitnami App Store” and “VMware Virtual Appliances Marketplaces”. If you click one of them, for example [VMware Virtual Appliances Marketplaces], there is a workflow for downloading Virtual Appliances to guide you how to download & import them to Virtualization Station.
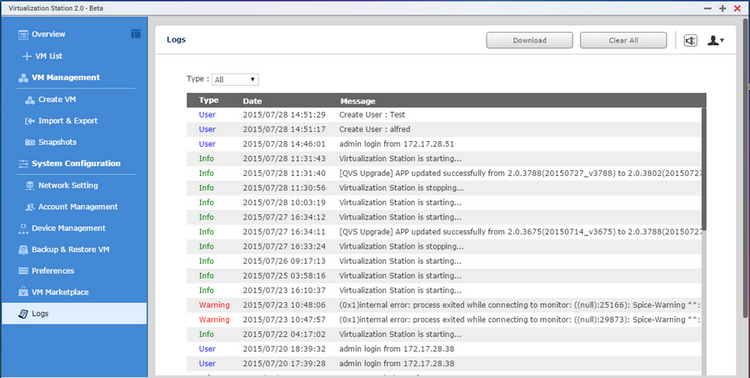
- Logs:If you want to check the system logs of the Virtualization Station, please choose “Log” to check. And if you want to download the whole report of system logs, please click “Download” to download a CSV file of the Virtualization Station system logs to your PC.
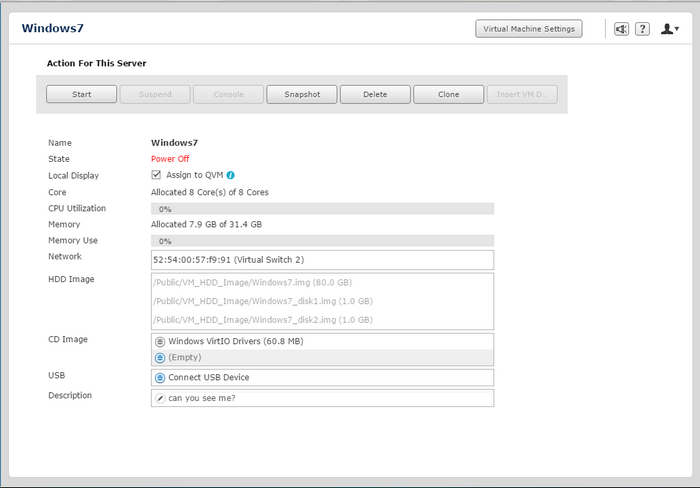
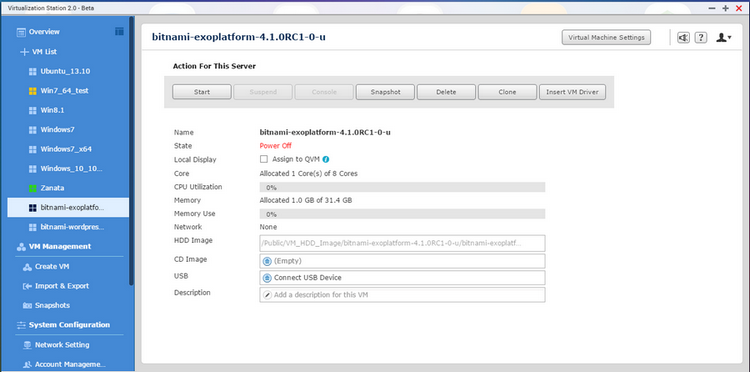
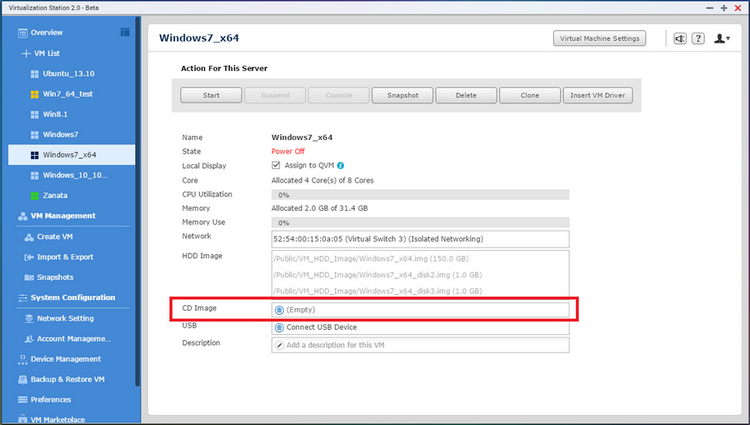
- Virtual Machine information page:Through the list of Virtual Machines, you can view all of the VMs (virtual machines) that you created. And when you choose one VM (virtual machine), you can check the hardware information for this VM (virtual machine).
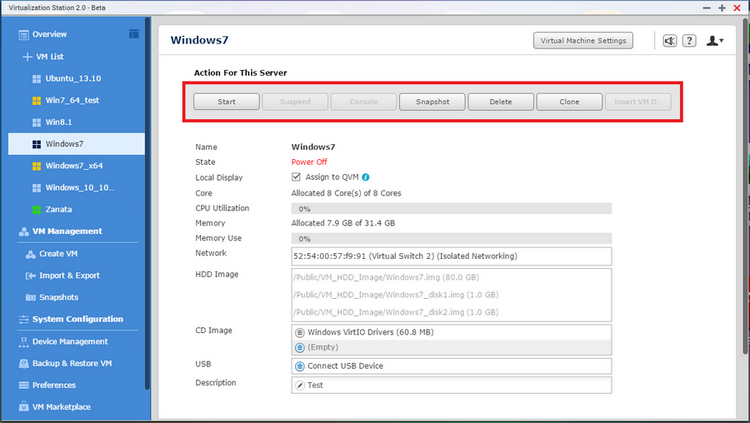
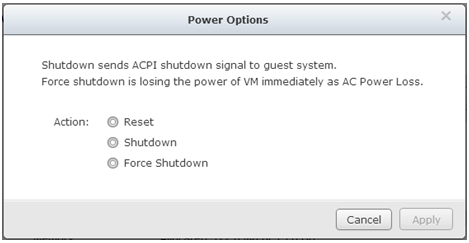
- If you click “Power” it will reset power, power on or power off this VM (virtual machine).
- If you click “Suspend”, it will pause this VM (virtual machine) allowing you to “Resume” later.
- If you click “Console”, it will switch on this VM (virtual machine) and let you use the operating system on this VM (virtual machine).
- If you click “Snapshot”, it will record the virtual machine system status at a point in time.
- If you click “Delete”, it will delete this VM (virtual machine).
- If you click “Clone”, it will copy this VM (virtual machine) to another shared folder on the QNAP Turbo NAS.
- If you click “Insert VM Driver”, it will insert the VM Driver image to the VM. (Please note: this VM Driver is able to install VirtIO interface devices such as Virtual Gigabit Ethernet and Virtual Disk Controllers. After selecting the VirtIO interface devices, you can use the VM Driver to install them inside the VM.)
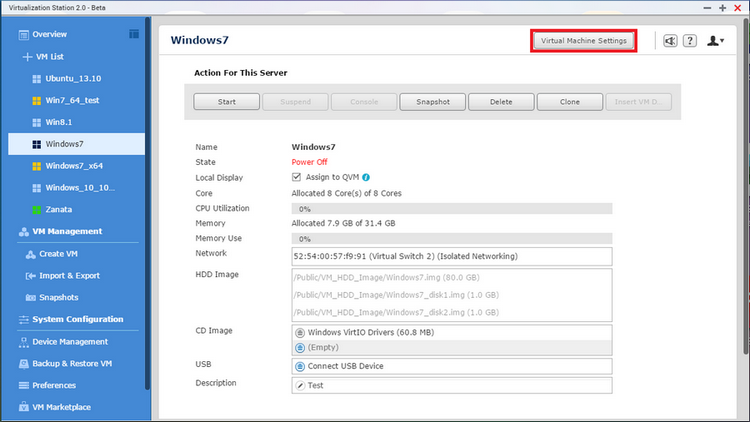
If you click “Virtual Machine Settings”, you can configure every option of the VM (virtual machine) including network, hardware, boot options, CD-ROM, video, auto-start, and remote console.

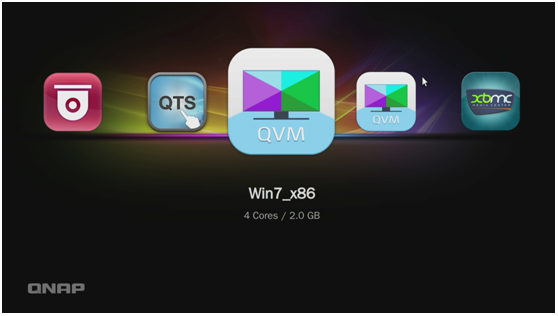
Checking “Local Display” will allow you to operate the VM locally via HD Station. You can use a keyboard, mouse and HDMI monitor to directly operate the VM as you would a normal PC.
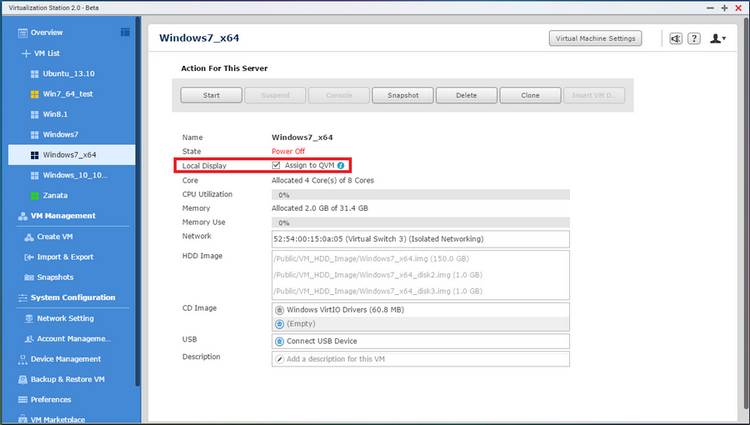
After checking this option, there will be a [QVM] icon shown on the output screen throughout HD Station. Clicking the [QVM] icon will enter the VM console.

Dragging the mouse cursor to the top center of the VM console will display a toolbar with the option to “Leave full screen”, “Send key combination” and “Disconnect”.

 : exits the full screen mode of the VM
 : provides the option to send key combinations
 : disconnects and returns to HD Station
Clicking
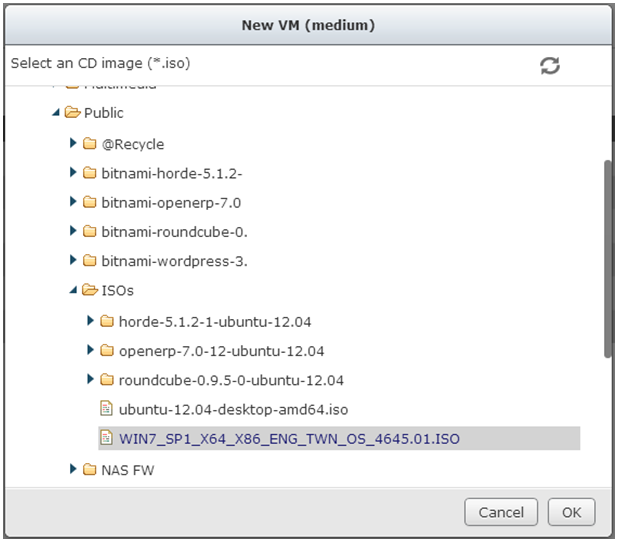
 next to CD Image will allow you to select a CD/DVD ISO image from the Turbo NAS to insert into the VM.
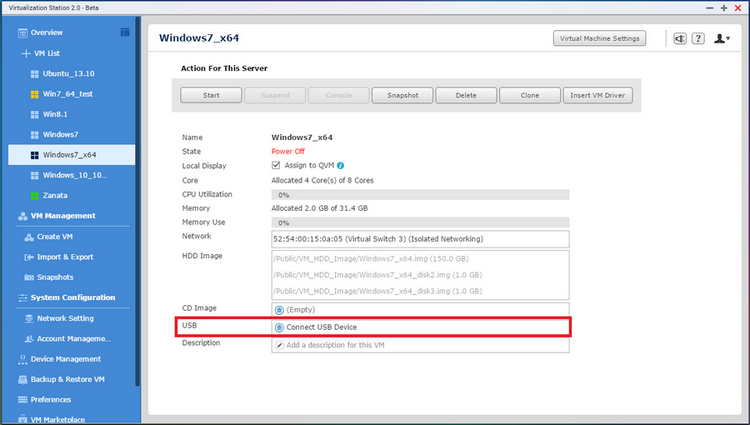
Clicking next to USB allows you to select what USB devices can connect to the VM.Please note:
- Due to the diversity of USB devices, we cannot guarantee universal USB support. Generic USB devices such as USB drives, card readers, keyboards, mice, printers and scanners should be compatible.
- If a driver is needed for the USB device, you will need to install it on the VM.
- To use USB 3.0 devices, they must be connected to a USB 2.0 port. USB 2.0 (or earlier) devices can be used with USB 3.0 ports.
- A maximum of 3 USB devices can be simultaneously used on a VM.
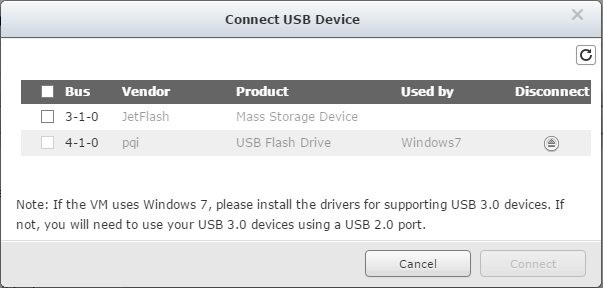
To remove a USB device:- Disconnect the USB device using the guest operating system
- Disconnect the USB device on the VM information page in Virtualization Station
- Unplug the USB device from the Turbo NAS
- If you click “Power” it will reset power, power on or power off this VM (virtual machine).
- Console:Please click “Console” to install the operating system on this VM (virtual machine).
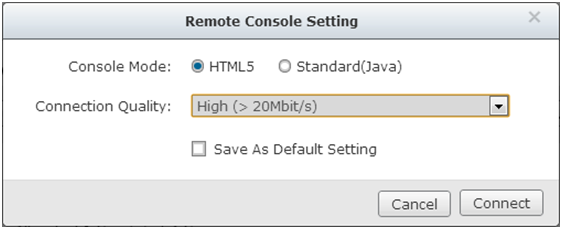
You can select the level of connection quality: High, Medium, Low and Ultra Low.
- If you click
 it will stop running this VM (virtual machine).
 - If you click
 it will reset this VM (virtual machine).
 - If you click
 it will shutdown this VM (virtual machine).
 - If you click
 it will force a shutdown of this VM (virtual machine).
 - If you click
 it will record the virtual machine system status at a point of time.
 - If you click
 it will trigger “Ctrl+Alt+Del” for this VM (virtual machine).
 - If you click
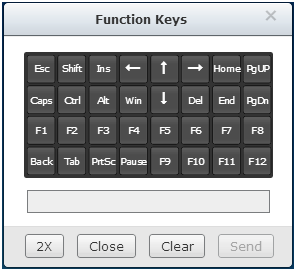
 it will show the software multi-keyboard for this VM (virtual machine).
- If you click
 , it will autofit to the size of window.
 - If you click
 , it will display in full screen.
 - If you click
 , it will switch connection quality to the high level.
 - If you click
 , it will switch connection quality to the medium level.
 - If you click
 , it will switch connection quality to the low level.
 - If you click
 , it will switch connection quality to the ultra low level.
- If you click
Virtualization Station Limitation
| Item | Description |
|---|---|
| Support OS list | Microsoft Windows XP Microsoft Windows 7 Microsoft Windows 8 Microsoft Windows 8.1 Microsoft Windows Server 2003 R2 Microsoft Windows Server 2008 Microsoft Windows Server 2008 R2 Microsoft Windows Server 2012 Microsoft Windows Server 2012 R2 Fedora 11、12、13、14、15、16、17、18、19 CentOS 6.0、6.1、6.2、6.3、6.4、7.0 Red Hat Enterprise Linux 6、7 Suse Linux Enterprise Server 11 OpenSUSE 11、12 Ubuntu 10.04 LTS (Lucid Lynx) Ubuntu 10.10 (Maverick Meerkat) Ubuntu 11.04 (Natty Narwhal) Ubuntu 11.10 (Oneiric Ocelot) Ubuntu 12.04 LTS (Precise Pangolin) Ubuntu 12.10 (Quantal Quetzal) Ubuntu 13.04 (Raring Ringtail) Ubuntu 13.10 (Saucy Salamander) Ubuntu 14.04 (Trusty Tahr) Ubuntu 14.10 (Utopic Unicorn) |
| Maximum number of Virtual CPUs | Up to 4 for Intel® Core™ i3 / i5. Up to 8 for Intel® Xeon/ Core™ i7. |
| RAM | Up to 30GB (Single VM). - Tower (16GB): Up to 14GB (Single VM). - Rackmount (32GB): Up to 30 GB (Single VM). |
| Maximum number of Virtual Switches | Up to 8. |
| Maximum number of snapshots | Up to 16 per VM (Virtual Machine). |
| Maximum number of simultaneously running VMs | The number of concurrently-running VMs is subject to actual usage of RAM, CPU capacity and running applications on VMs. Running multiple VMs at the same time may affect the performance of the NAS. (Note: Please visit QNAP’s website for detailed information. It is addressed on each supported NAS model.) |
| Maximum number of VMs | No limit. |
| Import VM File Support | *.OVA / *.OVF: VirtualBox 4.x and VMWare 5.0 *.VMX: VMWare WorkStation 8 and 9 |
| VGA Card | Standard VGA. (Please note: Direct X and OpenGL are not supported) |
| Maximum number of Control Permission | 2 per VM |
| Maximum number of View-only Permission | 2 per VM |
